Features Overview
A production-ready, mobile-optimized Souls-like engine built as an Unreal Engine plugin. Every system listed below is included and fully functional.
Combo System
Light, heavy, and charge attacks with automatic combo chaining and montage-driven windows.
Parry & Block
Timed parry with stagger feedback. Hold block with stamina drain and shield-break logic.
Dodge & Roll
Physics-based dodge with i-frames, directional rolls, and Super Dodge multiplier support.
Lock-On Targeting
Auto and manual target acquisition with smooth camera interpolation and strafe locomotion.
Weapon Abilities
Data-driven special attacks per weapon. Configurable cooldowns, costs, and custom montages.
Combat Feel
Hitstop, camera shake, hit flash, and trace-based hit detection with per-attack tuning presets.
Hit Reactions
Directional stagger, knockback, and step-in logic. Impact scales with weapon and ability type.
Animation Notifies
Custom notify states for combo windows, dodge invincibility, trace activation, and hitstop triggers.
Combat Input Sync
Input buffering ensures attacks, dodges, and blocks queue correctly during active montages.
Weapon Configuration
Blueprint-driven weapon setup — sockets, meshes, montage sets, damage values, and moveset data assets.
Data-Driven Actions
Action Data Assets for reusable abilities — define montage, cost, cooldown, and effects in one asset.
Status Effects & Buffs
Stackable timed effects — poison, burn, slow, stat modifiers. Driven by Status Effect Data Assets.
Stats Component
HP, Stamina, Mana with regeneration, depletion, and event-driven UI updates.
Souls Economy
Souls currency with earn, lose-on-death, and recover-from-corpse mechanics.
Bonfire & Level Up
Rest point with stat leveling UI. Respawn enemies and restore player on rest.
Inventory System
Component-based inventory with add, remove, stack, and equip. Supports any item type via Data Assets.
Item Data Assets
Master Data driven items — icons, descriptions, stats, effects, and categories in one asset.
Inventory UI
Full mobile-optimized inventory widget with grid layout, item details, and drag-scroll support.
Crafting System
Recipe Data Assets with ingredient validation. Crafting Station interactable with dedicated UI.
Enemy AI System
Behavior Tree-driven AI with detection, chase, attack patterns, and leash logic.
Boss System
Multi-phase bosses with phase transitions, enrage, ability patterns, and dedicated health UI.
Enemy Persistence
Save/load enemy states — killed enemies stay dead until bonfire rest or area reload.
Lock-On Target Marker
Visual indicator widget on locked enemies with smooth world-to-screen tracking.
AI Ability Data Assets
Per-enemy attack configuration — range, cooldown, chance, montage, and impact preset per ability.
Training Dummy
Non-hostile test target for combo and damage system validation.
Interaction System
Trace-based interact with prompt widget. Supports chests, doors, NPCs, pickups, and custom actors.
Chest & Container
Loot containers with open animation, item drops, and optional Loot Widget for selective taking.
Storage Box
Persistent world storage for depositing and withdrawing items between play sessions.
Ladder & Climbing
Interactable ladder with enter, climb, and exit montages. Supports variable heights.
Door Interactable
Openable/lockable doors with key-item validation and animation support.
Dropped Souls Pickup
Death-dropped currency pickup with world indicator and auto-recovery on interact.
Item & Currency Pickups
World-placed item pickups and currency orbs with interaction prompts.
Damage Volume
Environmental hazard zones with configurable damage, tick rate, and effect application.
Vendor NPC
Buy/sell merchant with item catalog, pricing, and full mobile shop UI.
Dialog System
Data Asset-driven NPC conversations with branching dialog, choices, and events.
Mobile HUD
Touch-optimized joystick, action buttons, HP/Stamina bars, and lock-on indicator.
Floating Damage Text
World-space damage numbers with color coding, crit scaling, and animation curves.
Main Menu
Cinematic mobile main menu with New Game, Continue, and Settings flow.
Settings Menu
Graphics quality, audio, sensitivity, and control customization with save/load.
Loading Screen
Seamless level transition with animated loading widget and tips system.
Boss Health UI
Cinematic boss health bar with name, phase icons, and reveal animation.
Effect Icon Widget
Active buff/debuff display with timer, icon, and stack count indicators.
Interaction Prompt
Context-sensitive interaction UI with fade-in/out and action label.
Confirmation Dialog
Reusable yes/no confirmation popup for critical player actions.
Professional Save System
Multi-slot save/load with auto-save. Stores inventory, stats, map, position, and world state.
Save Slot UI
Visual save slot list with timestamps, play time, and delete confirmation.
Persistent Component
Reusable component for any actor that needs to save/restore state across sessions.
Souls Developer Hub
Editor utility widget for quick asset creation, project validation, and workflow shortcuts.
Debug & Logging
On-screen debug overlay with verbose log categories for combat, AI, and inventory systems.
Mobile Input Logic
Enhanced Input integration with mobile virtual joystick and context-sensitive action mapping.
Showcase Route Guide
Pre-built demo level sequence for testing and demonstrating all kit features.
Editor Validation
Automated project validation tool that checks for missing references and configuration errors.
Component Architecture
Modular design — Combat, Stats, Inventory, Action, StatusEffect as independent components.
Data Asset Pipeline
Items, weapons, actions, buffs, AI abilities, recipes, and dialogs all driven by Data Assets.
Plugin Structure
Self-contained Unreal plugin — drop into any project with zero coupling to game-specific code.
ARCHITECTURE
Blueprint Project Setup
How to correctly initialize a production-ready Souls-like character.Souls Mobile Kit is designed as a complete Blueprint-friendly project. Most daily work happens in Blueprint assets: character setup, weapons, enemy tuning, animation montages, UI, and level design.
Class Defaults as the place for high-level character or enemy setup only. Component
systems are edited by selecting the component in the Blueprint Components panel first, such as
CombatComponent, InventoryComponent, StatsComponent,
ActionComponent, or StatusEffectComponent. This avoids large duplicated
categories in the main actor details panel and keeps each system's settings in its own focused view.
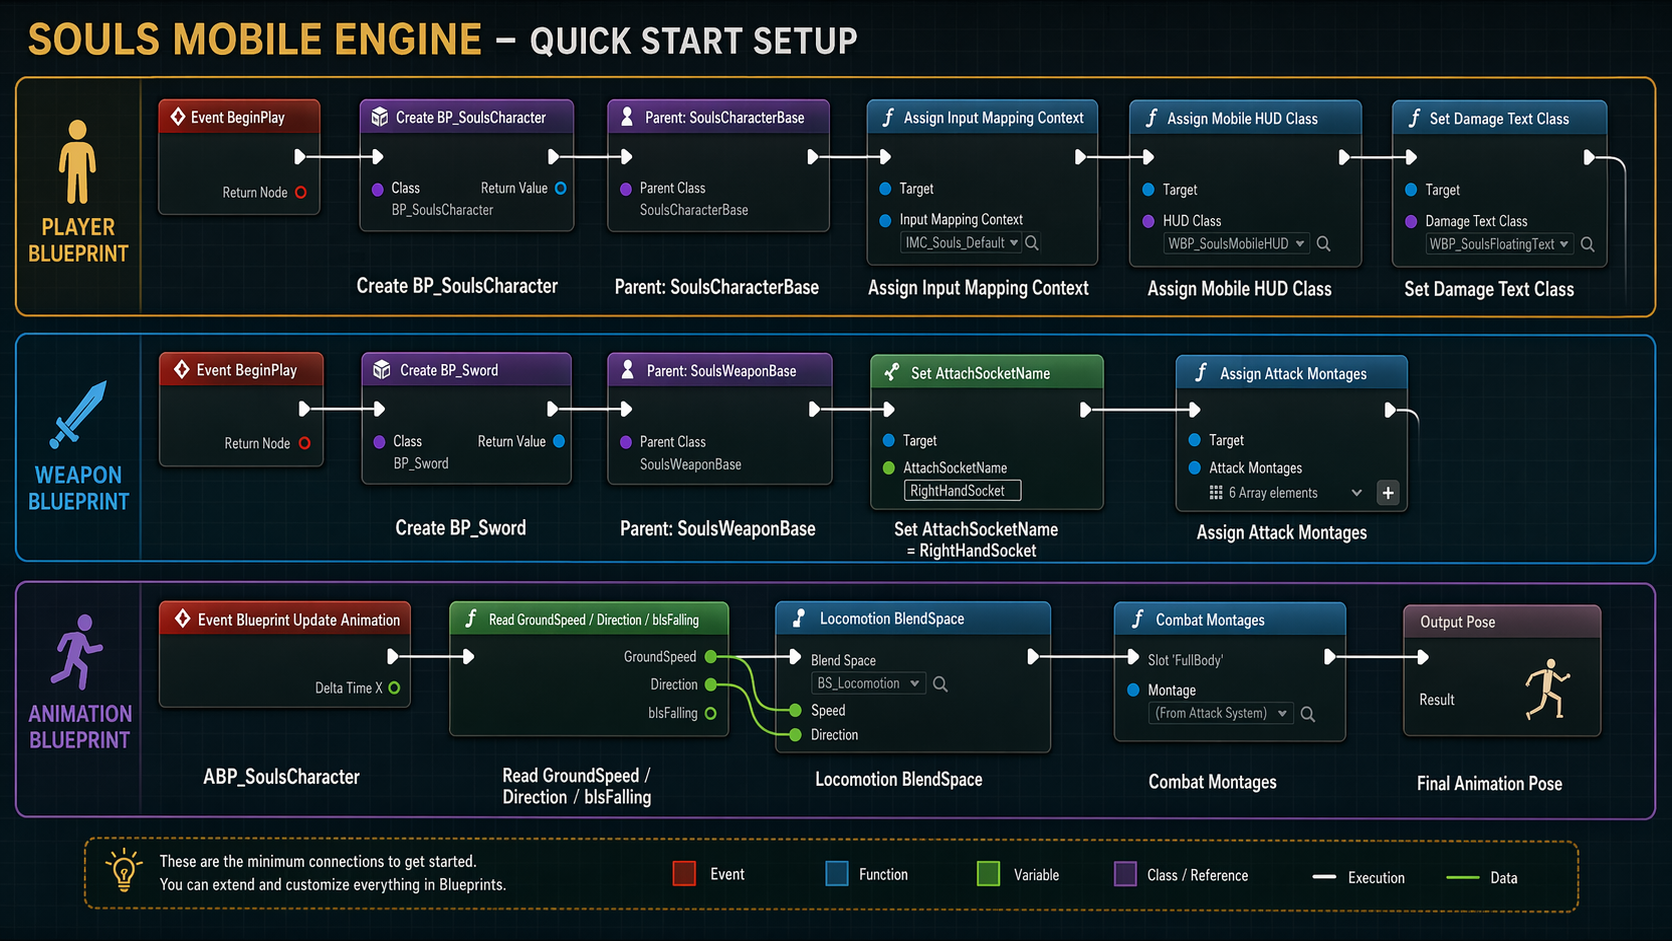
Quick reference: player, weapon, and animation Blueprint setup flow.
1. Proper Inheritance
DO NOT start with a default Unreal character. To benefit from the combat and mobile logic, you must inherit from our base class:
1 Right Click in Content Browser -> Blueprint Class.
2 Search for SoulsCharacterBase in
the All Classes list.
3 Open the new Blueprint and go to Class Defaults.
2. Core Movement Parameters
| Parameter Name | Field Type | Description & Recommendations |
|---|---|---|
| Walk Speed float |
300.0 | Baseline movement speed. Optimal for exploration and indoor environments. |
| Run Speed float |
600.0 | Triggered when the mobile joystick is at its edge. Ideal for traversing open levels. |
| Dodge Speed float |
1200.0 | The base launch velocity for physics dodges. Works in tandem with the Super Dodge multipliers. |
Orient Rotation to Movement is
set to TRUE and Use Controller Rotation Yaw is set to
FALSE for the standard "Souls" exploration feel.
FIRST 15 MINUTES
Quick Start Setup
The minimum setup required to make the kit playable in a fresh Blueprint project.
Use this as the one-screen checklist before testing the playable character.
1. Player Blueprint
1Create BP_SoulsCharacter and set the parent class to SoulsCharacterBase.
2Assign DefaultMappingContext, movement, look, dodge, attack, block, lock-on, and sprint actions.
3Assign MobileHUDClass on the player controller and DamageTextClass on the character.
4Set the default pawn in BP_SoulsGameMode.
2. Weapon Blueprint
1Create BP_Sword_001 from SoulsWeaponBase.
2Set AttachSocketName to RightHandSocket.
3Assign light, heavy, charge, block, and dodge montages when available.
4Call EquipWeapon from the character Blueprint begin play or from a loadout system.
3. Project Settings (Persistence)
1 Open Project Settings -> Maps & Modes.
2 Set Game Instance Class to BP_SoulsGameInstance.
3 Critical: If this is not set, the persistence system (Chests, Souls, Inventory) will not save to disk.
4. Mobile Entry Flow
1 Use MainMenu as the first level for the packaged demo.
2 Show WBP_MainMenu at level start.
3 Assign WBP_LoadingScreen on BP_SoulsGameInstance.
4 The menu automatically opens a new game map or continues from the saved map, then restores save data after loading.
5. Animation Blueprint
| Variable | Source | Purpose |
|---|---|---|
| GroundSpeed | SoulsCharacterBase |
Drives idle, walk, run, and sprint blendspaces. |
| Direction | SoulsCharacterBase |
Used for 2D strafe or lock-on locomotion blendspaces. |
| bIsFalling | SoulsCharacterBase |
Controls jump, fall, and landing transitions. |
| bIsSprinting | SoulsCharacterBase |
Allows sprint-specific poses or camera feedback. |
Enemy tag, equip a weapon, and consume
stamina during attacks.
BLUEPRINT RECIPES
Practical Blueprint Recipes
Small copyable setup patterns for common kit tasks.Equip Starter Weapon
- Open
BP_SoulsCharacter. - On begin play, call
EquipWeapon. - Pass
BP_Sword_001or any weapon child class. - Confirm the mesh has
RightHandSocket.
Enable Floating Damage
- Create widget child of
SoulsFloatingText. - Add a text block named
DamageText. - Assign it to
DamageTextClass. - Test with light attack trace damage.
Enemy Lock-On Target
- Use
BP_SoulsEnemyBase. - Add actor tag
Enemy. - Keep collision query enabled on the pawn.
- Assign lock-on indicator Niagara if available.
Mobile HUD
- Create HUD child of
SoulsMobileHUD. - Bind health and stamina bars.
- Assign class in
SoulsPlayerController. - Keep touch controls away from attack buttons.
Recommended Blueprint Responsibilities
| Blueprint Area | Should Contain | Should Avoid |
|---|---|---|
| Character Blueprint | Meshes, animation class, weapon class, HUD references, visual effects. | Damage math, state rules, stamina rules, combo branching. |
| Weapon Blueprint | Mesh, sockets, montages, damage numbers, block reduction. | Manual overlap logic or per-frame Blueprint traces. |
| Enemy Blueprint | Behavior tree asset, animation data, default weapon, tuning values. | Duplicated AI decision trees outside the included behavior tree setup. |
WORLD MODULES
Crafting System
Modular system for creating items from recipes at world stations.The Crafting System allows players to transform collected materials and currency (Souls) into useful items. It is fully integrated with the Inventory, Stats, and Save systems.
- Required ItemsArray
- Souls Costint32
- Result ItemDA
- Can Craft?Check
- ConsumeInventory
- Add ResultSuccess
- Recipe ListScroll
- DetailsPanel
- Craft ButtonAction
1. Recipe Configuration (Data Asset)
Recipes are defined using USoulsCraftingRecipeDataAsset. Each recipe specifies the cost in souls, the required materials, and the outcome.
| Field | Description |
|---|---|
| RequiredItems | An array of FSoulsItemStack (Item + Quantity). |
| CraftCostSouls | Amount of Souls currency required to craft. |
| bIsRepeatable | If false, the recipe disappears from the list after one successful craft (Saved persistently). |
| bConsumeIngredients | Whether to remove required items from inventory upon success. |
| CraftTime / CraftingTimeSeconds | Optional duration for timed crafting. Values above zero make the recipe complete after a progress timer instead of instantly. |
| bContinueCraftingWhileOffline | If enabled, saved active crafting progress advances while the game is closed and can complete on the next load. |
2. Crafting Station (Interactable)
Crafting happens at ASoulsCraftingStationInteractable actors. You can customize which recipes are available at specific stations.
Station Setup
- Place a
BP_SoulsCraftingStationin the level. - Assign your Recipes to the
Recipesarray. - Set the Station Display Name (e.g., "Blacksmith Anvil").
- Assign
WBP_SoulsCraftingto Crafting Widget Class.
3. Required Widget Bindings
To ensure the UI communicates correctly with the C++ backend, Widget Blueprints must use the expected names below.
- SelectButton: Button used to select the recipe row.
- RecipeNameText: Displays the recipe display name.
- ResultText: Displays the result item name.
- IconItem: Optional image for the recipe/result icon.
- IconItem: Image for the required ingredient.
- QuantityText: Required/owned amount such as
0/3. - ItemNameText: Optional ingredient label.
- RecipeList: Container for recipe rows.
- DetailsPanelScroll: Fixed-height ScrollBox for long details.
- RecipeNameText: Shows
Select Recipebefore selection and the selected recipe name after selection. - RecipeDescriptionText: Recipe description, hidden until selection.
- RequiredItemsText: Comma-separated ingredients such as
Sword x3, Axe x1. - RequiredItemsList: WrapBox/Panel showing ingredient icons and quantities.
- IconItem: Optional large preview icon, hidden until selection.
- ResultText: Result item and quantity.
- SoulsCostText: Souls cost.
- ProgressBarTime: Visible only while timed crafting is active.
- TextTime: Remaining time text, visible only while timed crafting is active.
- CraftButton: Starts the selected craft.
- CloseButton: Closes the interface without cancelling active timed crafting.
- FeedbackText: Hidden until success/failure feedback is needed.
4. Selection and Visibility Rules
- No Selection: only
RecipeNameTextremains visible withSelect Recipe. Details, icons, feedback, progress, and the craft action remain hidden or disabled. - Recipe Selected: the details panel shows the icon, description, comma-separated requirements, visual ingredient list, result, Souls cost, and craft action.
- Missing Requirements: pressing Craft without enough items displays English feedback such as
Missing required itemsor a missing-item summary. - Long Details: place the detail content inside
DetailsPanelScrollwith clipping enabled so long descriptions and ingredient lists scroll inside the panel instead of overflowing the UI.
5. Timed Crafting
Recipes with a crafting time use the active crafting state on the player's USoulsCraftingComponent. Only one active timed craft runs at a time.
- Start: the system validates ingredients and Souls, consumes them at start, stores the pending result, and shows
ProgressBarTimeplusTextTime. - In Progress: closing the UI does not cancel crafting. Reopening the same station restores the selected active recipe and current remaining time.
- Blocked Second Craft: trying to start another recipe while one is active returns feedback such as
Crafting already in progress. - Completion: the pending result is added once, selection is cleared, progress/time widgets are hidden, and non-repeatable recipes are marked completed.
6. Professional Save Persistence
The crafting system participates in the full project save. Saving during an active timed craft records enough data to resume or finish it safely later.
| Saved Field | Purpose |
|---|---|
ActiveRecipeId | Identifies the recipe being crafted. |
StationId | Identifies the station that started the craft when available. |
RemainingTime / TotalTime | Restores progress after load. |
PendingResultItem / PendingResultQuantity | Prevents result loss if the game is saved before completion. |
bIngredientsConsumed / bSoulsCostConsumed | Prevents duplicate ingredient or currency consumption. |
CompletedRecipeIds | Tracks non-repeatable recipes after successful completion. |
7. Manual Validation Checklist
- [ ] Naming: Is the button in the row named
SelectButton? - [ ] Binding: Is the row widget class assigned in
WBP_SoulsCraftingdefaults? - [ ] Selection: Does clicking a row update the icon, details, requirements, result, and cost?
- [ ] Requirements: Does
RequiredItemsTextdisplay ingredients on one line with commas, and doesRequiredItemsListshow ingredient icons and quantities? - [ ] Feedback: Does missing inventory show clear feedback instead of crafting for free?
- [ ] Timed Craft: Does a timed recipe show progress and remaining seconds only after Craft is pressed?
- [ ] Reopen UI: If the UI is closed during timed crafting, does reopening restore the active recipe and remaining time?
- [ ] Save/Load: If saved during timed crafting, does load resume or complete the craft without duplicating the result?
- [ ] Non-repeatable: Does a non-repeatable recipe disappear or become unavailable only after successful completion?
COMBAT POLISH
Combat Feel & Trace Tuning
Optional data-driven tuning for hit impact, defensive feedback, and attack trace shapes.Combat Feel Presets
SoulsCombatFeelPresetDataAsset lets designers tune the impact of individual attacks without
changing combat code. A preset can define hitstop, impact SFX/VFX, block feedback, parry feedback,
guard-break feedback, camera shake, and mobile vibration settings.
Impact Tuning for those values.
| Field | Use It For | Typical Notes |
|---|---|---|
| Hitstop Duration | How long the impact pause lasts. | Use short values for mobile responsiveness. |
| Hitstop Dilation | How slow time becomes during the pause. | Lower values feel heavier. |
| Impact SFX / VFX | Played when a hit successfully connects. | Use clear, short impact sounds for melee attacks. |
| Block / Parry / Guard Break | Separate feedback for defensive outcomes. | Use distinct audio so players can read the result quickly. |
| Camera Shake / Haptics | Optional screen and mobile vibration feedback. | Use carefully on repeated light attacks. |
Where To Assign Feel Presets
| Asset | Property | Recommended Use |
|---|---|---|
| SoulsActionDataAsset | Combat Feel Preset |
Player light attacks, heavy attacks, and weapon actions. |
| SoulsAIAbilityDataAsset | Combat Feel Preset |
Enemy or boss abilities that need custom impact. |
Camera Shake Setup
Camera shake is optional. Use it for heavy attacks, boss attacks, guard breaks, and strong ability impacts. Keep light attack shake subtle or leave it empty to protect mobile readability.
1 In the Content Browser, create a Blueprint class from CameraShakeBase.
2 Use a Wave Oscillator Camera Shake Pattern for simple melee impact shake.
3 Start with short values such as Duration 0.12 - 0.20, Blend In 0.02, and Blend Out 0.06 - 0.10.
4 Assign the shake asset to the relevant Combat Feel Preset.
5 Test in PIE and reduce amplitude if repeated hits feel noisy.
| Attack Type | Suggested Hitstop | Suggested Camera Shake |
|---|---|---|
| Light attack | 0.02 - 0.04 |
None or very subtle. |
| Heavy attack | 0.05 - 0.09 |
Short pitch/roll shake. |
| Boss ability | 0.07 - 0.12 |
Stronger shake, still under a quarter second. |
| Block or guard break | 0.03 - 0.08 |
Different from normal hit impact so the player reads the result. |
Trace Tuning
FSoulsTraceTuning allows a specific action, AI ability, or weapon to override trace values
while keeping the existing Souls_EnableHitbox notify workflow intact.
| Option | Use It For | Design Advice |
|---|---|---|
| Radius Override | Make a hitbox wider or narrower for a specific move. | Start small and use debug draw while tuning. |
| Socket Override | Use different start/end sockets for a special attack. | Useful for spear thrusts, shockwaves, or boss weapons. |
| Max Targets | Limit how many actors one trace window can hit. | Use 1 for narrow single-target strikes. |
| Allow Multi Hit Per Target | Let one trace window hit the same actor more than once. | Use only for spin, flurry, or repeated-hit animations. |
| Force Show Debug | Show trace debug for one move while tuning. | Disable it before shipping gameplay content. |
Attack Impact Tuning
FSoulsAttackImpactTuning provides a standardized structure for mathematical attack balancing.
This allows you to override damage, knockback, guard pressure, poise pressure, and hit reaction intent
without writing custom logic for every weapon ability or AI spell.
| Parameter | Function | Design Use |
|---|---|---|
| Override Damage | Allows this action or ability to change damage math. | Leave disabled when the move should use default weapon or notify damage. |
| Damage Multiplier | Multiplies the final calculated damage. | Use for powerful charged attacks or special boss moves. |
| Flat Bonus Damage | Adds a raw damage value after multipliers. | Useful for spells or elemental explosions. |
| Override Knockback | Allows this action or ability to change knockback strength. | Leave disabled for normal attacks that should use existing light/heavy knockback. |
| Knockback Multiplier | Scales the launch force applied to the target. | Use for heavy slamming attacks or "shove" moves. |
| Force Guard Break | Forces the target into a shield-break state if they are blocking. | Ideal for unblockable heavy attacks. |
| Guard Stamina Damage | Stamina damage applied to a blocking target. | If the target has less stamina than the incoming value, stamina is reduced to zero and the guard can break. |
| Force Heavy Hit Reaction | Forces a "Heavy" stagger animation on hit, regardless of poise. | Ensures high-impact moves feel powerful. |
| Hit Reaction Type | Requests a specific reaction style such as Light, Heavy, Ability, Guard Break, or Knockdown. | Use Auto for normal attacks and explicit types for signature abilities. |
| Min Reaction Lock Time | Minimum time before the current hit reaction can be replaced. | Use for long heavy or knockdown reactions that should not be interrupted instantly. |
| Poise Damage | Reduces the target's internal poise value. | Drives the stun/stagger lifecycle. |
SoulsActionDataAsset
for player actions and SoulsAIAbilityDataAsset for enemy abilities. Use it to make each
light attack, heavy attack, weapon art, boss attack, or AI ability produce a distinct gameplay result.
Impact Tuning Recipes
| Move | Recommended Impact | Reason |
|---|---|---|
| Fast light hit | DamageMultiplier 1.0, low or no poise damage, Reaction Auto. |
Keeps basic combat responsive without locking the target too often. |
| Heavy slash | DamageMultiplier 1.4 - 2.0, knockback override, heavy reaction. |
Creates a clear difference between light and heavy attacks. |
| Guard pressure move | GuardStaminaDamage 30 - 90, optional guard break on boss moves. |
Lets enemies punish passive blocking without making every attack unblockable. |
| Boss slam | High poise damage, explicit heavy or knockdown reaction, stronger knockback. | Makes boss attacks feel dangerous while staying data-driven. |
Recommended Validation
- Assign a feel preset to one player action and confirm only that action uses it.
- Assign a feel preset to one AI ability and confirm normal enemy attacks do not inherit it.
- Test block, parry, guard stamina damage, and guard-break feedback separately.
- Confirm gameplay impact comes from
Impact Tuningand visual/audio feel comes fromCombat Feel Preset. - Enable trace debug on one tuned attack, check the hit shape, then disable debug again.
- Confirm dodge, lock-on, and mobile movement remain responsive after repeated attacks.
COMBAT POLISH
Combat Vitality & Stability
Professional hit reactions, stagger gates, and aggressive AI movement flow.1. Hit Reaction (Stagger) System
The system now supports nuanced hit reactions for both players and enemies, preventing combat from feeling "floaty."
| Feature | Logic | Designer Control |
|---|---|---|
| Stagger Gating | Calculates if a hit should trigger a "Light" or "Heavy" reaction based on force and damage flags. | Set LightHitReactionMontage, HeavyHitReactionMontage, and optional ability-specific reaction montages on characters. |
| Reaction Cooldown | Prevents animation spam during multi-hit attacks. | Adjust HitReactionCooldown (default 0.45s) to control stagger pacing. |
| Heavy Threshold | The force required to trigger a "Heavy" reaction for the Player. | Adjust Heavy Hit Reaction Threshold in Player BP (Default: 600). Hits below this value trigger Light reactions. |
| Force Override | Forces a heavy stagger regardless of thresholds or poise. | Enable Force Heavy Hit Reaction in Attack Impact Data for signature boss moves. |
Incoming Force >= Character Threshold.
To ensure an enemy's light attack triggers a Light Reaction on the player, ensure the player's
Heavy Hit Reaction Threshold is HIGHER than the enemy's Light Hit Knockback Force.
2. AI Attack Step-In (Pressure)
Enemies now automatically "close the gap" when starting an attack, ensuring they stay aggressive and within range.
- Automatic Lunge: Applies a forward impulse when a combo step or ability starts.
- Range Sensitive: Only triggers if the target is within
AttackStepInMaxRangebut beyondAttackStepInStopDistance. - Integration: Works seamlessly with legacy combos and the unified AI ability system.
| Enemy Field | Use It For | Suggested Start |
|---|---|---|
| Use Attack Step In | Enables forward pressure at attack start. | Enable on aggressive melee enemies. |
| Attack Step In Max Range | Maximum distance where step-in is allowed. | 250 - 500 for melee enemies. |
| Attack Step In Stop Distance | Distance where the enemy should stop stepping in. | 80 - 160 depending on weapon reach. |
| Attack Step In Impulse | How strongly the enemy closes the gap. | Start low and raise until attacks connect reliably. |
COMBAT ANIMATION
Animation Notify Setup
How attack montages drive traces, combo windows, parry impact timing, and combat cleanup.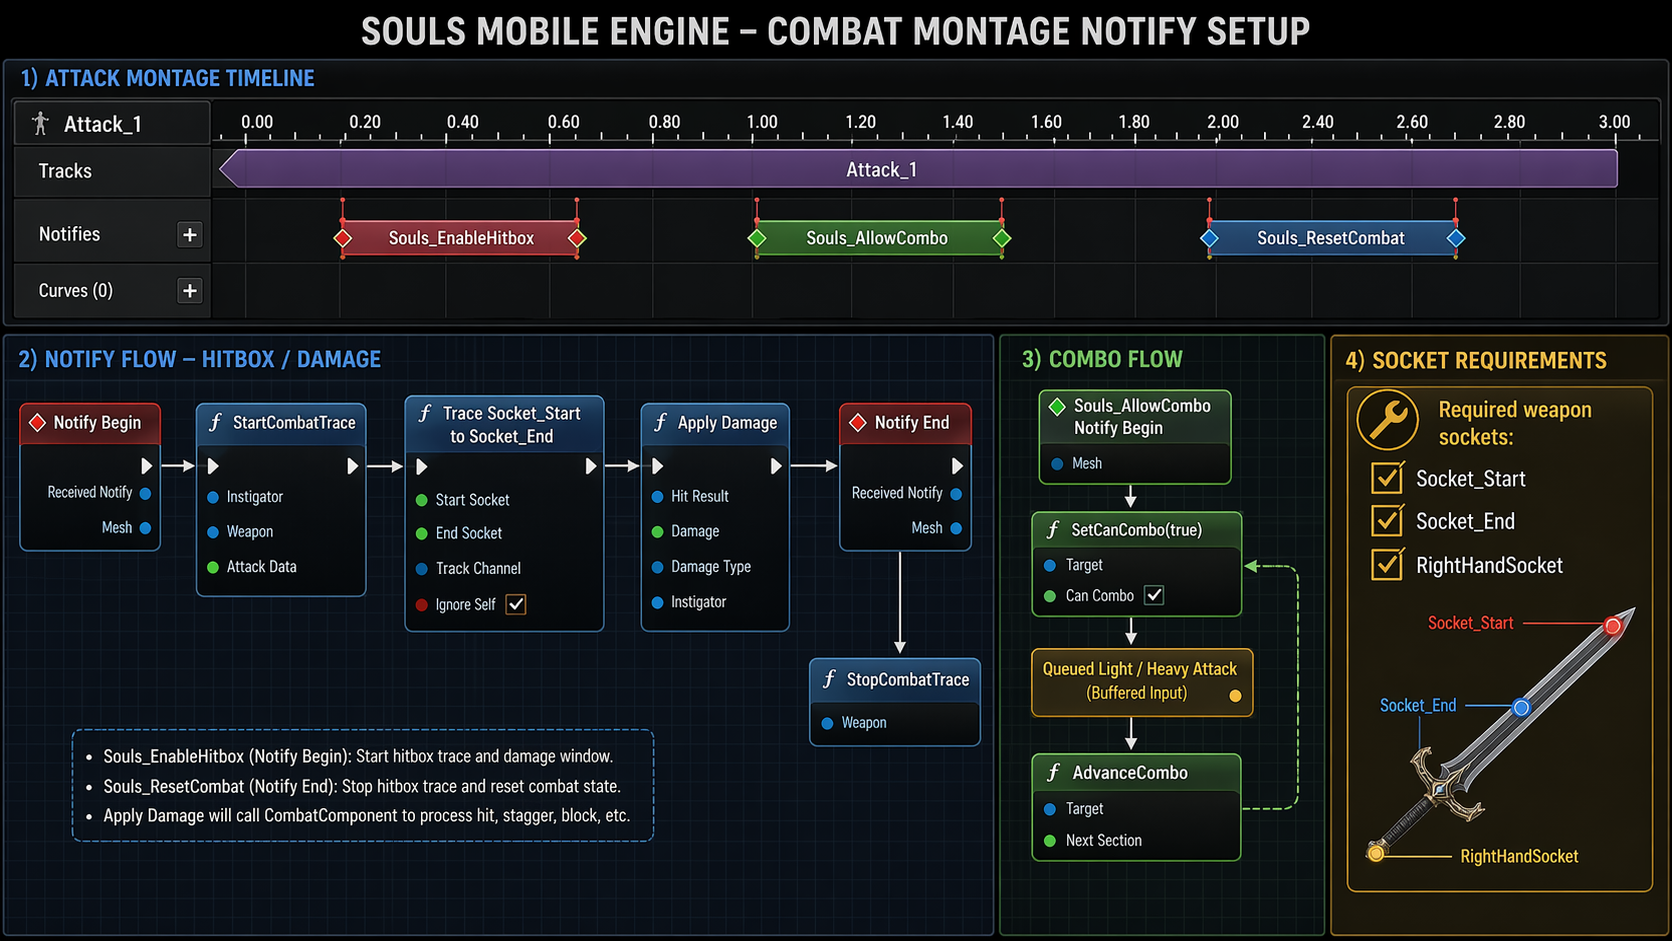
Attack montage timing: hitbox window, combo input window, and reset notify.
Required Notifies
| Notify | Use It For | Important Values |
|---|---|---|
| Souls_EnableHitbox | Notify state that starts and stops the weapon trace during the active hit frames. | SocketStart, SocketEnd, TraceRadius, OverrideDamage. |
| Souls_AllowCombo | Opens the input buffer so the next light or heavy attack can chain. | Place after impact frames, not at the start of the swing. |
| Souls_ResetCombat | Resets combo and returns the combat component to idle if no queued attack exists. | Place near the end of each attack section. |
| Souls_ParryImpact | Applies the stored parry finisher damage at the exact animation frame. | Place inside ParryCounterMontage when the weapon or hand visually hits the parried enemy. |
Socket_Start and
Socket_End for traces, while the character skeleton should provide
RightHandSocket for weapon attachment.
Montage Section Naming
The combo system expects montage sections named Attack_1, Attack_2, and
Attack_3 when MaxCombo is set to 3. If a montage uses different names,
attacks may play the first section repeatedly or fail to jump to the intended section.
Parry Counter Notify Timing
The parry system is animation-driven. A successful parry stores the enemy as the pending parry target,
plays the player's ParryCounterMontage, and waits for Souls_ParryImpact.
The enemy only receives Parry Finisher Damage when this notify fires.
Souls_ParryImpact on the exact frame where
the counter attack visually connects. This keeps enemy death synchronized with the finisher animation
instead of killing the enemy immediately when the parry succeeds.
| Montage | Required Setup | Purpose |
|---|---|---|
| Parry Montage | Assign in BP_SoulsCharacter > CombatComponent > Souls > Character > Parry. |
Short defensive animation played when the block button starts a parry attempt. |
| Counter Montage | Add Souls_ParryImpact at the strike frame. |
Finisher animation that applies delayed parry damage through the notify. |
| Enemy Parried Montage | Assign in BP_SoulsEnemyBase > Souls > Enemy > Parry. |
Stagger, dizzy, or guard-break reaction played while waiting for the counter impact. |
API REFERENCE
SoulsCharacterBase Class
Complete index of Blueprint-accessible character properties and combat functions.BP_SoulsCharacter and use
Class Defaults for character-level setup such as input actions, movement speeds,
animation data, camera tuning, death flow, and debug toggles. For subsystem settings, select the
relevant component from the left Components panel before editing:
CombatComponent for combat and lock-on, InventoryComponent for item slots
and equipped items, StatsComponent for health/stamina/souls, and
StatusEffectComponent for status and buff behavior. This is intentional and prevents
the same settings from appearing multiple times in the actor defaults.
Blueprint-Callable Functions
| Function Name | Inputs | Description |
|---|---|---|
| StartDodge | Direction (Vector) | Initializes the dodge sequence. Use this to bind to your input actions. |
| FindLockOnTarget | None | Performs a sphere trace (LockOnRadius) to find the nearest actor tagged "Enemy". |
| ClearLockOn | None | Resets camera and rotation logic to standard exploration mode. |
| EquipWeapon | WeaponClass (SubclassOf) | Spawns and attaches a weapon to the "Weapon_Socket" and initializes hitboxes. |
Vital Properties (Categorized)
Camera & Juice
- CameraBoom: SpringArm component with built-in Lag settings (Default: TargetArmLength 400).
- bEnableFOVKick: Toggles cinematic zooming during high-action frames.
- FOVReturnSpeed: Speed at which camera returns to normal after a dash.
Stats Integration
- DodgeStaminaCost: How much stamina is consumed per roll (Default: 25.0).
- bIgnoreDamage: System-managed flag for invincibility windows.
ADVANCED MOVEMENT
AAA Super Dodge PRO
The Souls_Super_Dodge (AnimNotifyState) is a high-performance movement driver.
It eliminates the "floaty" feel of default Unreal movement by injecting precise impulses
directly into the movement component.
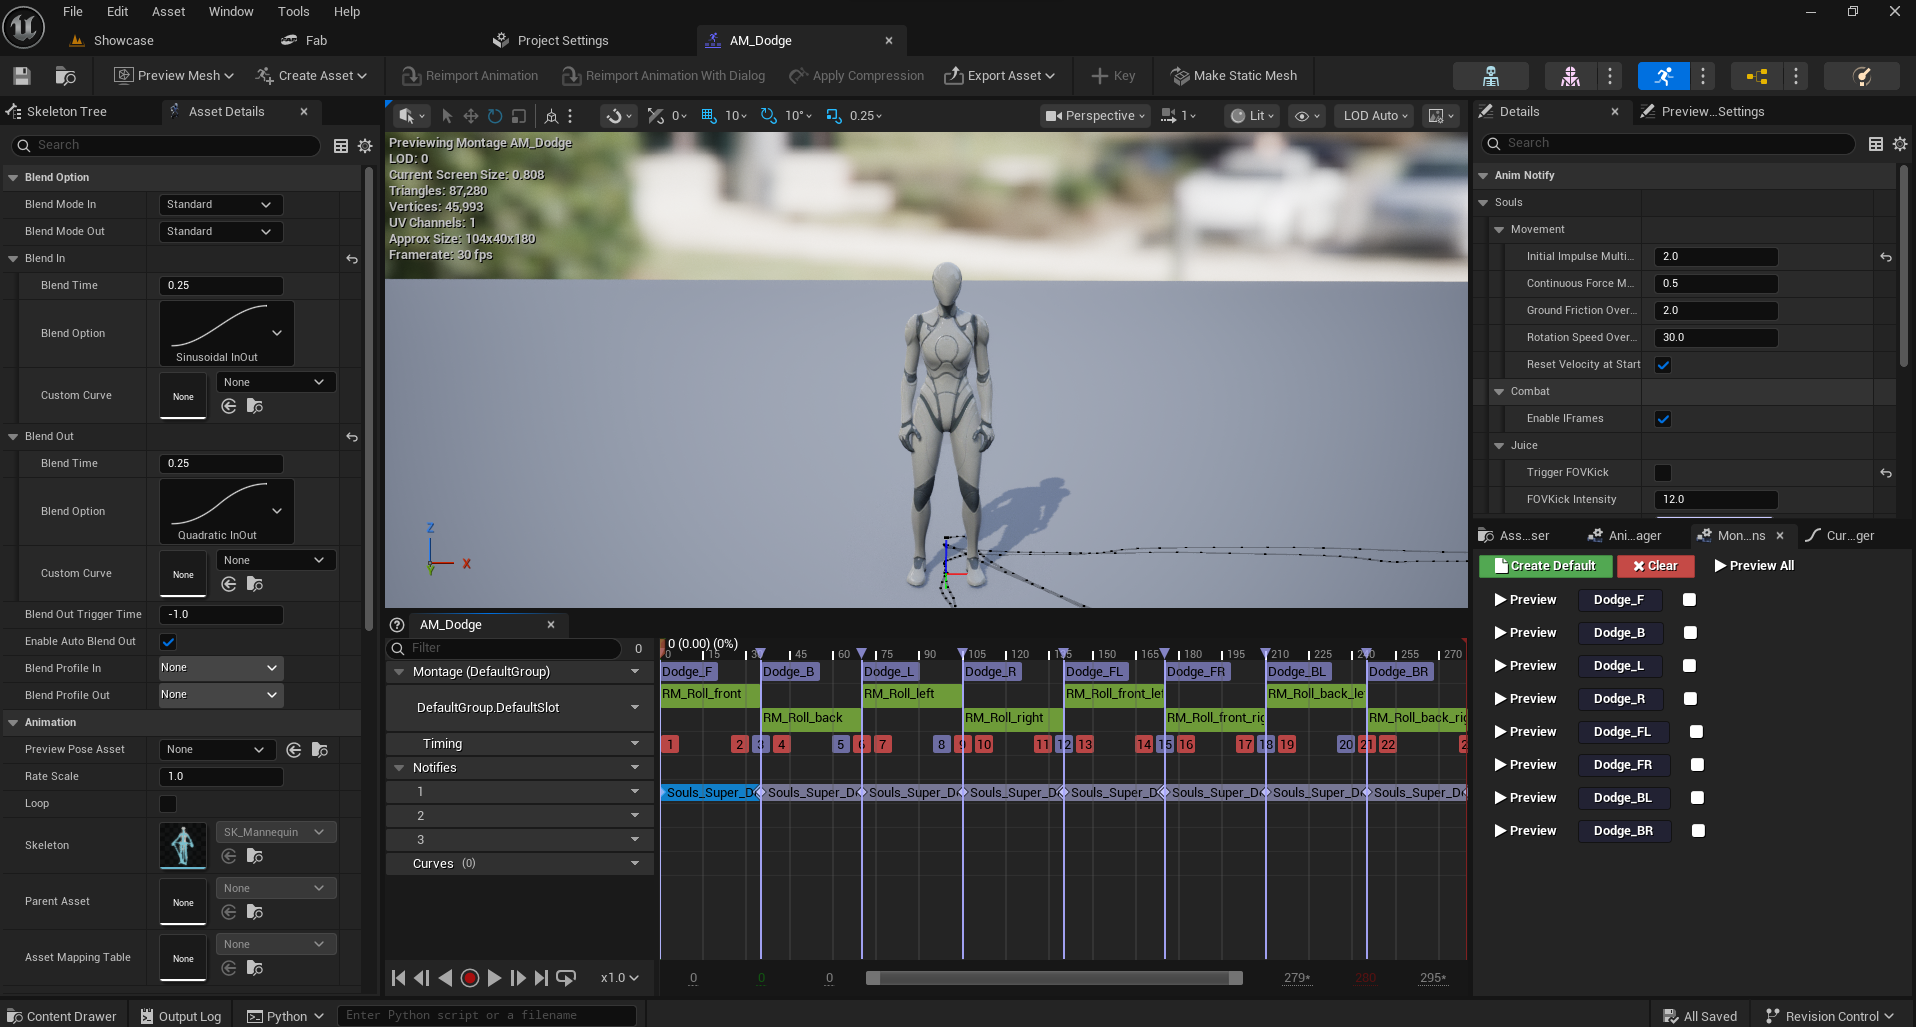
Full Settings Reference:
-
[01] Initial Impulse Multiplier
The "Pop" driver. Explodes the character in the input direction. Note: Scales both Physics and Root Motion. Recommended: 3.0.
-
[02] Continuous Force Multiplier
Prevents slowing down during the animation. Essential for "sliding" dodges or long lunges. Recommended: 0.5 - 1.0.
-
[03] Ground Friction Override
Controls the glide distance after the initial launch. Lower values (1.5) create a smooth, buttery slide. Higher values (10.0) cause a dead stop.
-
[04] Rotation Speed Override
The steer-rate during the roll. Allows the player to change direction slightly while moving. Set to 50+ to give the player control.
-
[05] Reset Velocity at Start
Toggles
StopMovementImmediately(). Essential for balance, ensuring consistency regardless of player speed. -
[06] Enable IFrames
Safety first. Turns on damage immunity for the duration of the notify box. Frame-perfect protection.
-
[07] Trigger FOV Kick
Toggles cinematic camera zooming to emphasize the "Kick" and impact of the dash.
-
[08] FOV Kick Intensity
How far the camera expands. Use 10 - 15 for a powerful, high-action feel.
Pro Tuning Scenarios:
• Bloodborne Slide: Reset Velocity: True, Initial Impulse: 3.5, Ground
Friction: 1.5, Continuous Force: 0.8.
• Dark Souls Heavy Roll: Reset Velocity: True, Initial Impulse: 1.1, Ground
Friction: 8.0, Continuous Force: 0.0.
2. Technical Property Reference
| Property | Type | Numerical Logic |
|---|---|---|
| Initial Impulse Multiplier | float | Scales character launch velocity at NotifyBegin. Default character Speed *
Multiplier. |
| Continuous Force Multiplier | float | Applied every frame (Tick) to maintain momentum during the mid-roll phase. |
| Ground Friction Override | float | Directly modifies CharacterMovement->GroundFriction. Lower = more slide.
|
| Rotation Speed Override | float | Increases yaw-snapping speed. Allows sharp turns during the dodge window. |
| bEnableIFrames | bool | Toggles bIgnoreDamage flag. Provides frame-perfect invulnerability. |
3. Lock-On Dodge Behavior
When the player is locked onto an enemy, the dodge system switches to a precision-based resolution mode. This ensures that the character moves relative to the threat rather than simply forward.
Directional Logic
• Joystick Input: The character will dodge in the exact world-space direction indicated by the joystick, relative to the camera and target.
• Neutral Input (Backstep): If no movement input is detected while locked-on, the character will perform a Backstep (dodging directly away from the target).
• Dynamic Montage Timing: The system automatically detects when the dodge animation (Montage) ends. Facing logic is suspended for the exact duration of the roll, preventing the character from snapping back to the enemy mid-animation.
• Smooth Recovery: Immediately after the dodge ends, the character enters a dedicated recovery state to smoothly rotate back and face the threat, avoiding "jittery" transitions.
| Property | Default | Description |
|---|---|---|
| bUseInputDirectionForLockOnDodge | true | If enabled, dodge direction follows the joystick during lock-on. |
| bBackstepWhenNoDodgeInput | true | If true, pressing dodge without moving results in a backstep away from the target. |
| bSuspendLockOnFacingDuringDodge | true | Disables forced-facing toward the target for the full duration of the dodge montage. |
| LockOnDodgeFacingSuspendExtraTime | 0.1 | Additional buffer time after the dodge ends before recovery begins. |
| LockOnPostDodgeFacingRecoverySpeed | 15.0 | Speed at which the character rotates back to face the enemy after a dodge. |
| LockOnPostDodgeFacingRecoveryMaxTime | 0.5 | Fail-safe duration for the recovery window. |
COMBAT POLISH
Combat Input Synchronization
Ensuring animation integrity and preventing input conflicts.Dodge-Attack Gating
To maintain high visual fidelity and prevent animation blending artifacts, the system enforces a strict relationship between dodging and attacking. This ensures that defensive maneuvers are not accidentally interrupted by aggressive inputs, while still allowing the player to escape danger at any time.
1. Input Interrupt Rules
| Action A (Current) | Action B (Requested) | Result | Reasoning |
|---|---|---|---|
| Attacking | Dodge | PERMITTED | Dodge is a high-priority defensive escape and should always cancel offensive frames. |
| Dodging | Attack (Any) | BLOCKED | Prevents "sliding attacks" and animation breaking during active dodge frames. |
| Dodging | Weapon Ability | BLOCKED | Ensures weapon arts cannot be triggered during movement invulnerability. |
2. How the Guard Works
The guard is implemented directly in the SoulsCharacterBase input entry points. Before any combat action is resolved, the system checks the character's internal bIsDodging state.
- AttackLightInput: Rejects input if
CombatComponent->bIsDodgingis true. - AttackHeavyInput: Rejects input if
CombatComponent->bIsDodgingis true. - TryWeaponAbility: Returns false immediately if the character is in a dodge state.
- Mobile-First Spam Protection: By blocking these inputs during dodge, the system naturally prevents button spamming from triggering an attack the moment the dodge ends (unless a separate buffer system is intentionally enabled).
Souls_AllowCombo notify in the dodge montage to open a cancel window.
3. Manual Validation Checklist
- [ ] Attack -> Dodge: Press Attack, then immediately press Dodge. The dodge should start and cancel the attack animation.
- [ ] Dodge -> Attack: Press Dodge, then spam Light/Heavy attack during the roll. No attack should trigger until the character has fully finished the dodge and returned to Idle.
- [ ] Dodge -> Ability: Press Dodge, then press the Weapon Ability button. The ability should not fire.
- [ ] Stamina Integrity: Verify that blocked inputs do not consume stamina or trigger cooldowns.
CONTROL SYSTEMS
Mobile Control & Swipe Logic
Technical breakdown of how high-precision touch is handled.Traditional mobile controls in Unreal feel slow and rigid. Our system uses a Raw Delta Capture
method inside the SoulsPlayerController to ensure the camera feels exactly like a
console analog stick.
1. Swipe Logic (Right Screen)
The Calculation
Delta = (CurrentTouch - LastTouch) * Sensitivity * DeltaTime
Instead of tracking a "joystick center", we track the frame-to-frame difference of your finger move. This allows for unlimited swipe area, meaning the player can move the camera regardless of where their finger starts on the right half of the screen.
2. Mobile Sensitivity Tuning
| Variable | Recommended Value | Purpose |
|---|---|---|
| LookSensitivity | 45.0 | Overall speed of x/y rotation. Higher values allow for "180-degree" flicks. |
| SwipeDamping | 0.1 | Controls the "momentum" when you lift your finger. Lower = Sharper stop. |
| JoystickRadius | 64.0 | Deadzone for the virtual joystick. Crucial for different screen sizes. |
GAMEPLAY MECHANICS
Stats & Regeneration Logic
In-depth look at the SoulsStatsComponent.The Stamina Cycle
Stamina is the most important currency in a Souls-like. Our component handles this with a Dual-Stage Regeneration system:
- Action Window: Regeneration stops for 1.2s (configurable) after any action (Dodge/Attack).
- Regen Stage: Stamina fills linearly at 25.0 points per second.
- Exhaustion: If Stamina reaches 0.0, the character enters "Exhausted" state where Sprint and Dodge are disabled until it reaches 20%.
2. Combat State Machine (Logic Hierarchy)
The system enforces a strict state machine to prevent animation glitches and ensure combat integrity. Below is the operational matrix:
| State | Priority | Permitted Input Actions |
|---|---|---|
| Idle | Baseline | All actions enabled (Movement, Attack, Dodge, Block). |
| Attacking | High | Input Buffering (Light/Heavy), Dodge Canceling (Weapon Specific). |
| Dodging | Critical | No inputs accepted until Recovery Notify or Animation End. |
| Blocking | Medium | Parry Trigger (Timely Block), Slow Walk movement. |
| Stunned | Lockdown | Zero input permitted. State is cleared by animation end. |
Stats Property Reference
| Variable | Type | Functionality |
|---|---|---|
| MaxHealth | float | Maximum damage tolerance. |
| MaxStamina | float | Total stamina pool. (Affects how many times you can roll). |
| RegenRate | float | Stamina points recovered per second. |
| StaminaDelay | float | Delay before regeneration starts after an action. |
ADVANCED SYSTEMS
Advanced Targeting System AAA
Weighted target selection, stable switching, automatic validation, and mobile-friendly lock-on feedback.Overview
The Targeting System controls the player's lock-on target, camera focus, target marker, and lock-on dodge behavior. It is designed for mobile Soulslike combat where the player needs fast target acquisition, predictable switching, and stable camera recovery without adding a separate targeting component.
1. Setup Guide (Step-by-Step)
1 Enemy Tagging: Ensure any actor you want to
target has the Tag Enemy added to its Actor Tags. If the actor has a Souls stats
component, dead targets are ignored automatically.
2 Input Mapping: Bind an Input Action (e.g.,
IA_LockOn) to the LockOnAction property in your Character's
SoulsEngine|Input category.
3 Component Config: In the
SoulsCombatComponent, set your desired LockOnRadius,
LockOnBreakDistance, scoring weights, switch threshold, and marker settings.
2. Weighted Target Selection
When lock-on is pressed, the system filters invalid candidates first, then scores the remaining enemies. This prevents the camera from locking to a poor target just because it is slightly closer.
- Distance: nearby threats are favored using
LockOnDistanceWeight. - Camera Intent: enemies near the camera center are favored using
LockOnForwardWeightandbPreferScreenCenterTarget. - Validity: dead actors, missing enemy tags, destroyed actors, and out-of-range candidates are rejected.
- Line of Sight: when
bRequireLineOfSightForLockOnis enabled, enemies behind blocking geometry are ignored.
bShowLockOnDebug in the Combat Component during
development to inspect candidate scoring, rejection reasons, and selected target logs in the Output
Log.
3. Mobile Target Switching
While locked on, look or swipe input can switch to another valid target. The switch path is tuned for mobile screens so small camera corrections do not cycle targets accidentally.
| Setting | Purpose | Suggested Start |
|---|---|---|
| LockOnSwitchMinInput | Minimum swipe/look strength before switching can happen. | 0.55 - 0.75 |
| LockOnSwitchCooldown | Prevents multiple switches from one swipe. | 0.30 - 0.50 seconds |
| TargetSwitchThreshold | Legacy threshold used by the existing switch flow. | Keep close to current project value |
4. Auto-Clear And Marker Cleanup
When bAutoClearInvalidLockOnTarget is enabled, lock-on is released when the target dies,
is destroyed, loses target validity, or exceeds LockOnBreakDistance. The widget marker
and VFX indicator are cleared with the target so no orphan marker remains in the level.
5. Recommended Lock-On Tuning
| Property | Recommended Start | When To Adjust |
|---|---|---|
| LockOnRadius | 1800 - 2200 | Increase for open arenas, reduce for dense rooms. |
| LockOnBreakDistance | 2500 - 3000 | Increase for bosses, reduce for close combat arenas. |
| LockOnForwardWeight | 1.5 - 2.0 | Increase if the system picks nearby side targets too often. |
| LockOnDistanceWeight | 0.5 - 1.0 | Increase if the system ignores close threats too often. |
| bRequireLineOfSightForLockOn | Enabled | Disable only for arena designs where lock-on through minor props is desired. |
6. Validation Checklist
- One enemy: lock-on activates, marker appears, pressing lock-on again clears it.
- Multiple enemies: camera-centered target is selected when the forward weight is high enough.
- Switching: left/right swipe switches once and respects cooldown.
- Invalid target: dead or distant enemies clear lock-on automatically.
- Line of sight: enemies behind solid walls are ignored when LOS is enabled.
- Regression: lock-on dodge, normal dodge, attack, block, parry, combat feel, AI feel, and trace tuning still work.
UI & COMBAT
Lock-On Target Marker
A professional circular reticle that identifies the currently locked enemy.The Lock-On Target Marker is a high-fidelity Widget-based system that automatically tracks the player's current lock-on target. It provides clear visual feedback in 3D space while remaining mobile-friendly.
1. Component Architecture
The system uses a UWidgetComponent managed by the SoulsCombatComponent. This component is dynamically spawned and attached to the target's mesh or root when a lock is established, ensuring the marker perfectly follows the enemy's movement.
Setup Requirements
1 Create a Widget Blueprint inheriting from SoulsLockOnTargetWidget (e.g., WBP_SoulsLockOnTargetMarker).
2 Add a UImage child named exactly MarkerImage. This is where your reticle texture goes.
3 Enable Is Variable on MarkerImage so the C++ widget class can tint and animate it.
4 Assign your Widget class to LockOnWidgetClass on the player's SoulsCombatComponent in your Character Blueprint.
2. Blueprint Setup Walkthrough
1 Open your player Blueprint, select CombatComponent, and search for LockOnWidgetClass.
2 Set LockOnWidgetClass to WBP_SoulsLockOnTargetMarker.
3 Keep bShowLockOnTargetMarker enabled.
4 Start with LockOnMarkerDrawSize around 64 x 64 or 80 x 80.
5 Use LockOnMarkerWorldOffset to place the marker over the enemy body. A useful first value is a positive Z offset such as 0, 0, 80.
6 Leave LockOnMarkerSocketName empty for root attachment, or set it to a valid mesh socket such as head or spine_03 when your enemy skeleton provides one.
3. Technical Properties
| Property Name | Description |
|---|---|
| bShowLockOnTargetMarker | Master toggle to enable/disable the widget-based marker system. |
| LockOnWidgetClass | The Blueprint class (WBP_SoulsLockOnTargetMarker) to spawn. |
| LockOnMarkerSocketName | Optional socket on the enemy mesh to attach to (e.g., spine_03 or head). Leave empty for root attachment. |
| LockOnMarkerWorldOffset | Vector offset from the attachment point. Useful for centering the marker on the enemy's torso. |
| LockOnMarkerDrawSize | The 2D size of the widget in the world (e.g., 100x100). |
4. Customizing the Visuals
Inside your WBP_SoulsLockOnTargetMarker, you can adjust the following settings in the Class Defaults:
Pulse Animation
Set PulseSpeed and PulseIntensity to create a subtle breathing effect on the marker.
Color Tinting
Use MarkerColor to change the reticle color (e.g., white for normal enemies, red for bosses).
5. Runtime Behavior
| Player Action | Expected Marker Behavior |
|---|---|
| Start play with no locked target. | No marker is visible. |
Tap the mobile Lock-On button near an enemy with the Enemy tag. |
The marker appears on the locked enemy. |
| Switch to another target if your setup supports target switching. | The marker moves to the new locked enemy and clears from the old target. |
| Unlock, move out of range, or kill the locked enemy. | The marker is destroyed or hidden safely. |
WBP_SoulsLockOnTargetMarker, add MarkerImage, assign it to LockOnWidgetClass, then lock onto an enemy with the mobile HUD button. The white circular marker should appear instantly, follow the enemy, and disappear when lock-on is cleared or the enemy dies.
LockOnMarkerWorldOffset.Z. If it appears too large on mobile, reduce LockOnMarkerDrawSize before changing the widget artwork.
COMBAT MECHANICS
Combo & Animation-Driven Parry
A deep dive into combo flow, contextual defense, and notify-based parry finishers.1. Smart Combo System
Our combo system is Data-Driven. You don't write logic for each swing; instead,
the system reads the AttackMontage from your weapon and follows a strict naming
convention for sections:
- Attack_1, Attack_2, Attack_3: Standard light attack sequence sections.
- Heavy_1, Heavy_2: Dedicated heavy attack sections.
The ComboCount variable tracks the current state and automatically jumps to the next
section if the player clicks within the Combo Window.
2. Input Buffering System (BufferedAttack)
The most critical feature for "Souls-like" responsiveness. Instead of ignoring clicks during an animation, the system Buffers (stores) the next intent and executes it at the earliest valid frame.
- Logic: When an attack is triggered while
bIsAttackingis true, the system checks theEBufferedAttackenum. - Queuing: If you spam Light Attack, it stores a
Lightbuffer. If you press Heavy Attack mid-swing, it overwrites with aHeavybuffer. - Execution: The
AllowCombonotify triggers theExecuteBufferedAttack()function, checking if a strike is queued.
3. Mixed Combos (Light-to-Heavy)
You can now perform seamless transitions. For example, starting with 2 Light Attacks and finishing with a devastating Heavy Strike.
Light (A1) -> Light (A2) -> [Input Heavy] -> Queues Heavy -> Plays Heavy_3 (or Heavy_1 if dedicated).
4. Advanced Charge Attack System v1.1
Heavy attacks can now be "Charged" by simply holding the attack button. This creates a high-reward tactical opening during combat. Everything is pre-configured to work with your existing Input Actions.
1. Assign Animation: In your Weapon Blueprint, go to
Souls | Animation and set your ChargeAttackMontage.2. Visuals & Sound: In
Souls | Effects, add your
ChargeReadyVFX (spawns when fully charged) and
ChargeCompleteSound.3. Fine-Tuning: In
Souls | Combat, adjust the
ChargeTimeThreshold (e.g., 1.5s) to control how long the player must hold the
button.
- How it works: The system automatically detects a "Long Press". If released early, a standard Heavy Attack plays. If released after the "Glow" (VFX), the devastating Charge Strike is executed.
- Power-Up: Use the
ChargeDamageMultiplierto make these hits deal 2x or 3x damage.
4. Contextual Parry & Block
Instead of a cluttered UI with separate defense buttons, the kit uses a Contextual Defense system. The same Block input can start a parry attempt, then fall back into standard blocking if the incoming attack does not land during the active parry window.
| State | Timing | Result |
|---|---|---|
| Parry Attempt | Active Parry Window, default 0.35s for early testing. |
Damage negated. Enemy enters parried/stunned state and the player can play a counter montage. |
| Standard Block | After the parry window or when parry is disabled. | Damage reduced by BlockDamageReduction percentage. |
Active Parry Window for feel. Use larger values such as
0.35 while building, then tighten to 0.18 - 0.25 for a more
demanding Souls-like release feel.
Animation-Driven Parry Finisher Current
Successful parries do not kill the enemy immediately. The system stores the enemy as a pending
parry target, plays the enemy's parried reaction, then waits for the player's
Souls_ParryImpact notify inside the Counter Montage.
- Parry Success: enemy attack damage is cancelled before it reaches stats.
- Pending Target: the parried enemy is saved on the player's combat component.
- Impact Notify:
Souls_ParryImpactappliesParry Finisher Damageat the visual hit frame. - Authoritative Rules: The
Kill Enemy On Successful Parrysetting is now fully authoritative. It overrides any difficulty preset behavior, ensuring that if it is disabled in the editor, the enemy will always receive damage instead of being instantly killed. - Fail-safe: if the notify is missing,
Parry Impact Fail Safe Delayapplies the finisher so testing does not get stuck.
5. Advanced Defense (AAA Features) v1.1
The system now supports high-fidelity feedback for defensive actions, including resource management and counter-offensive options.
Block Stagger
When blocking heavy attacks that exceed the BlockStaggerThreshold, the character
will play a BlockStaggerMontage. This prevents "Tanking" everything and forces the
player to manage their position.
Shield Break (Stamina Guard)
Every blocked hit consumes stamina based on the damage received. If stamina reaches zero, the
character enters the ShieldBroken state and plays the
ShieldBreakMontage, leaving them vulnerable to critical hits.
Parry Counter
Successfully performing a parry can play the configured Counter Montage. Put
Souls_ParryImpact inside that montage to choose the exact frame where the enemy
receives finisher damage.
6. Detailed Defense System Setup EDITOR GUIDE
This section covers the step-by-step configuration required inside the Unreal Editor to fully utilize the Advanced Defense System.
Step 1: Weapon Defense Configuration
Character defense is configured primarily on the player's CombatComponent. Weapon
block montages can still be used as advanced per-weapon overrides, but the clean player-project setup
is under Souls | Character | Defense and Souls | Character | Parry.
- Block Montage: assign a looping defense montage on the CombatComponent.
- Parry Montage: assign the short guard/parry attempt animation.
- Counter Montage: assign the finisher montage and add
Souls_ParryImpactat the hit frame. - Block Damage Reduction: A value between 0.0 and 1.0 (e.g., 0.8 for 80% protection).
Step 2: AnimGraph - Upper Body Blending
To allow the player to move while blocking, we use Layered Blend Per Bone. This separates the defensive pose from the locomotion (walking/running).
1. Add a Layered blend per bone node.
2. Set the Base Pose to your main Locomotion State Machine.
3. Add a Slot 'UpperBody' node and connect it to Blend Pose 0.
4. In the Layered Blend node details, add a Branch Filter and set the Bone Name to
spine_01.
Step 3: Character Defense Stats
In your Character Blueprint CombatComponent, you can fine-tune the global defense behavior:
- Use Parry When Block Starts: makes the Block input begin with a parry attempt before falling back to normal blocking.
- Active Parry Window: how long the incoming hit can be caught as a parry.
- Parry Impact Fail Safe Delay: backup timing if
Souls_ParryImpactis missing from the counter montage. - Block Stagger Threshold: If an incoming hit deals more
damage than this value, the character will play the
BlockStaggerMontage. - Shield Break Montage: This montage plays automatically when the player's stamina reaches zero while they are holding the block button.
3. Animation Notifies (The Combo Engine)
The sequence of your combo is controlled entirely by AnimNotifies within your Weapon Montage. Placing these correctly is the difference between a clunky game and a "Souls-like" feel.
| Notify Name | Placement | Functionality |
|---|---|---|
| Souls AN Allow Combo | Mid-Animation (Recovery) | Opens the "Input Window". If the player clicks while the animation is inside this notify state, the system buffers the next attack. |
| Souls AN Reset Combat | End of Animation | Forces the ComboCount back to 0. Ensures that the next time the player
attacks, they start from Attack_1. |
The "Perfect" Notify Sequence:
- 0.0s - 0.2s: Wind-up (Preparation).
- Souls AN Enable Hitbox: Place during the active hitting frames. (Notify State).
- Souls AN Allow Combo: Place during the recovery. Triggers Buffered Inputs.
- Souls AN Reset Combat: Place at the very last frame to clear the strike queue.
5. Custom AnimNotify Reference Manual
The engine provides specialized Notifiers to handle complex combat logic without Blueprint spaghetti.
[Action] Souls AN Allow Combo
Internal Class: USoulsAN_AllowCombo
Logic: When the animation playhead hits this frame,
the system calls ExecuteBufferedAttack(). If the player clicked earlier, the next
attack starts immediately.
[State] Souls ANS Combat Trace AAA UNIFIED
Internal Class: USoulsANS_Hitbox
Logic: This is the "Gold Standard" for combat registration. It performs a Frame-to-Frame Sphere Trace between the previous and current positions of two sockets, ensuring a continuous damage volume even during sub-frame movement.
To use this system, your weapon (or character mesh) MUST have two sockets defined:
- Start Socket: Usually placed at the Base/Handle of the weapon.
- End Socket: Usually placed at the Tip/Point of the weapon.
- Trace Radius: Defines the thickness of the blade. For a standard sword, 10 to 15 is ideal.
- Num Points: Defines how many spheres are spawned between Start and End. For a standard longsword, use 3 to 5 points to ensure no "gaps".
Socket_Start and Socket_End is recommended for consistency across all weapons and enemies.
Visual Debugging: Enable bShowDebug within the Notify to see the spheres in real-time. This can be toggled per-animation to assist in fine-tuning without polluting the global game view.
[Action] Souls AN Hitstop
Internal Class: UAnimNotify_SoulsHitstop
Logic: Triggers a brief global time dilation effect to simulate "Impact Weight". Essential for the AAA feel.
- Only on Impact (True): The slow motion will ONLY trigger if the weapon has successfully hit a target in the current attack. This is the "Smart" mode that prevents slow-mo when swinging at the air.
- Global (False): The slow motion triggers instantly when the notify is hit. Ideal for cinematic wind-ups or "Fury" attacks.
[AI] Advanced Combat Tactics PRO
The AI now utilizes a probability-based decision engine to switch between light and heavy strikes.
- Heavy Attack Chance: Configurable per-enemy. Allows AI to break player guards and vary attack patterns.
- Boss Aggression: Bosses automatically receive a 60% cooldown reduction and high-priority heavy strike queuing.
[Action] Souls AN Reset Combat
Internal Class: USoulsAN_ResetCombat
Logic: Resets ComboCount to 0 and clears
BufferedAttack. Essential at the end of every montage to prevent "Stuck" input
states.
5. The Buffering Logic Flow (Behind the Curtain)
Understanding the exact frame-logic is essential for high-level tuning. Here is the internal cycle:
| Phase | Internal Action | Result |
|---|---|---|
| User Input | Player clicks while bIsAttacking is TRUE. |
BufferedAttack variable is set to Light or Heavy.
|
| Notify Check | Animation reaches Souls AN Allow Combo. |
System calls ExecuteBufferedAttack(). |
| State Reset | Current animation section ends. | Buffer is cleared to None to prevent ghost hits. |
AllowCombo notify
triggers, the system will prioritize and execute the last input received (The Heavy
Strike).
6. Data Dictionary: EBufferedAttack
Internal enumeration used to track the player's intent between strike frames.
| Value | Description | Internal Logic |
|---|---|---|
| None | Default state. No strike queued. | Character returns to Idle/Locomotion after animation. |
| Light | Player requested a standard strike. | Triggers ComboCount++ and plays the next "Attack_X". |
| Heavy | Player requested a power strike. | Jumps directly to "Heavy_X" section, skipping light flow. |
BORINGLY DETAILED GUIDE
Mastering Weapon Configuration
How to create, customize, and link weapons to your character.1. Visual Representation (Skeletal vs Static)
The SoulsWeaponBase comes with a WeaponMesh (Skeletal) by default to
support complex animated weapons. However, most swords are Static Meshes.
- Option A (Static Mesh): In your Weapon Blueprint,
click +Add -> Search for
StaticMesh. Drag it underWeaponMeshto parent it. Set your sword model here. - Option B (Skeletal Mesh): Simply select the
WeaponMeshcomponent and assign your Skeletal Mesh directly in the details panel. - [NO HITBOX NEEDED]: You no longer need to add Box/Capsule collisions for damage. The system uses the Sockets on your mesh directly via the AnimNotify.
- Important: Ensure the model is rotated correctly so it aligns with the character's hand in the viewport.
2. Combat Statistics (The "Souls" Properties)
Located under the "Souls | Weapon" category in the Details panel. These define the power of your weapon:
| Property | Description | Ideal Value |
|---|---|---|
| Light Damage | Damage dealt during a standard Light Attack sequence. | 15 - 30 |
| Heavy Damage | Damage dealt during a Heavy Attack. Usually has higher poise damage. | 40 - 60 |
| Knockback Force | The physical impulse applied to the enemy upon impact. | 400 - 800 |
| Attach Socket Name | The exact string name of the bone socket on the player's skeleton. | RightHandSocket |
3. Dynamic Animation Overrides
One of the most powerful features is that each weapon carries its own "Personality". When equipped, the character reads these assets:
Attack Montage: The primary data source for Light
Attacks. Ensure sections are named Attack_1, Attack_2, etc.
Heavy Attack Montage: (New) A dedicated montage
for Heavy Attacks.
• If assigned: System uses sections from this
montage (e.g., Heavy_1).
• If empty: System falls back to the primary
Attack Montage and searches for "Heavy" sections.
Locomotion BlendSpace: (Optional) Providing a BlendSpace here allows the character to change their idle/walk/run animations based on the weapon (e.g., dragging a Greatsword vs holding a Dagger).
Dodge Montage: You can assign a unique dodge for specific weapons (like a 'Quickstep' for daggers).
Skeleton Flexibility: Montages no longer require matching skeletons. You can assign any animation montage to any character or weapon regardless of their base skeleton, provided the core bone names match (e.g., standard Humanoid setup).
4. Hit Feedback (VFX & SFX)
Located under "Souls | Effects". These trigger at the exact location of the collision:
Hit Effect Assign a Particle System (Cascade or Niagara). This will spawn at the impact point (e.g., Blood burst or sparks).
Hit Sound Assign a Sound Wave or Cue. This plays a "thud" or "slash" sound when the hitbox overlaps an enemy.
5. Common Setup Errors (Troubleshooting)
| Issue | Potential Cause | Fix |
|---|---|---|
| Combo stops at attack 1. | Section Name mismatch. | Ensure Montage sections are named exactly Attack_1, Attack_2.
|
| Heavy Attack plays Light sound. | Missing HeavyAttackMontage assignment. |
Assign the dedicated montage or add "Heavy_1" sections to the main montage. |
| Input Buffer ignored. | Allow Combo notify too short. |
Stretch the notify state box to cover the entire recovery window of the animation. |
| Camera Zooms/Clips on enemies. | Collision Channel Conflict. | The system now automatically sets ECC_Camera and ECC_Visibility to Ignore for all characters to prevent clipping. |
| Animation Montage cannot be selected. | Skeleton Restriction (Internal). | Fixed. We added AllowAnySkeleton metadata to combat montages, allowing cross-character animation usage. |
WEAPON SYSTEM
EquipWeapon Node
The primary node for switching and initializing weapons.Input: Weapon Class (Must inherit from SoulsWeaponBase)
Description: Despawns current weapon, spawns new class, and attaches it instantly.
Placement: Event BeginPlay or SwapWeapon event.
OFFENSIVE LOGIC
Attack Nodes
Executing light and heavy attack sequences.Input: None
Behavior: Checks if bIsAttacking is true. If yes, it sets
BufferedAttack to Light. If no, it plays the montage section
starting from ComboCount.
Contextual Action: If bCanParryCounter is true, this node will
automatically execute ParryCounter() instead of a standard light attack.
Automatic Link: If bCanCombo (set by AN_AllowCombo) is true, it
performs a direct jump to the next animation section.
Input: None
Behavior: Similar to LightAttack but sets buffer to Heavy.
Priority Logic: Heavy strikes always override Light strike buffers, allowing the player to "pivot" their combo into a finisher at the last millisecond.
Warning: This is primarily called by the AN_AllowCombo notify.
Calling it manually in Blueprints is not recommended unless creating custom AI-driven strike
sequences.
DEFENSIVE LOGIC
Defense & Block Nodes
Managing damage reduction, stamina consumption, and parry sequences.Behavior: starts a contextual defense. When
Use Parry When Block Starts is true, this first enters Parrying
for the configured Active Parry Window, then falls back to Blocking
if no enemy hit is caught.
Animation: plays Parry Montage if assigned; otherwise it falls
back to Block Montage.
Behavior: Returns the character to Idle state and removes
damage reduction modifiers.
Output: float (0.0 to 1.0)
Technical Note: Returns the reduction percentage defined in the currently
equipped weapon. Used to scale damage in TakeDamage logic.
Behavior: executes the rapid counter-attack montage when a manual counter
input is desired. In the default flow, the configured Counter Montage can also
play automatically when the parry succeeds.
Behavior: applies finisher damage to the stored parried enemy. This is called
automatically by the Souls_ParryImpact animation notify.
Blueprint Rule: do not call this every frame. Only call it manually for a
custom Blueprint finisher system. The normal setup is: add Souls_ParryImpact to
the counter montage at the impact frame.
Behavior: internal safety gate used by the hitbox trace system. It checks whether the defender is currently parrying and whether the attacking enemy can receive parry. On success, incoming damage is cancelled before it reaches stats.
EVASION SYSTEM
Dodging Nodes
AAA movement and invincibility frames.Input: DodgeDirection (Vector)
Description: Plays dodge montage and enables i-frames.
TARGETING
Advanced Lock-On System POLISHED
Intelligent target selection and perspective management for high-precision mobile combat.1. Weighted Scoring Selection
Unlike basic systems that only pick the closest enemy, the lock-on scan uses configurable scoring to determine player intent:
- Distance Score: Prioritizes immediate threats based on physical proximity.
- Camera Center Score: Prioritizes enemies closest to where the player is looking.
- Line of Sight: Optional trace check that prevents targets behind solid objects from being selected.
2. Polished Target Switching
Designed for touch screens. While locked on, a quick swipe on the right side of the screen triggers a Directional Switch.
- Input Deadzone: Switches only trigger if
LockOnSwitchMinInputis exceeded, preventing accidental cycles during camera adjustments. - Switch Cooldown: A short cooldown prevents switching through multiple targets in a single swipe.
- Validation: The system automatically skips dead or invalid targets during the switch search.
3. Intelligent Target Validation (Auto-Clear)
The system constantly monitors the state of your target to ensure the camera never stays "stuck" on empty air or dead corpses:
- Death Monitor: If the target's
StatsComponentreportsIsDead(), the lock-on clears instantly. - Distance Break: If the player or target moves beyond
LockOnBreakDistance, the camera releases focus to prevent snapping. - Marker Cleanup: Guaranteed destruction of VFX/Widget components upon target loss, preventing "ghost" indicators.
Lock-On Configuration Reference
| Property | Default | Description |
|---|---|---|
| LockOn Radius | 1500.0 | Initial detection radius for finding targets. |
| LockOn Break Distance | 2500.0 | Distance at which the lock-on automatically disconnects. |
| LockOn Forward Weight | 1.5 | Priority multiplier for targets near the center of the camera view. |
| LockOn Distance Weight | 1.0 | Priority multiplier for nearby targets. |
| Require Line Of Sight | true | If enabled, targets behind walls will be ignored by the initial scan. |
| LockOn Switch Cooldown | 0.3s | Prevents rapid target cycling on high-sensitivity mobile screens. |
| LockOn Switch Min Input | 0.6 | Minimum look or swipe strength required before switching targets. |
| Auto Clear Invalid Target | true | Automatically releases lock-on when the target dies, becomes invalid, or moves too far away. |
Assign a Niagara System to this property in the Combat Component. The engine will automatically spawn and attach it to the target's root when locked on, and destroy it when cleared.
A developer-only toggle. When enabled, it draws the sphere trace and logs target detection details including Scoring Results to the Output Log. Disable for production.
SYSTEM STATES
Impact & State Nodes
Reading real-time combat data for UI and FX.Output: ESoulsCombatState Enum
Values: Idle, Attacking, Dodging,
Blocking, Parrying, Stunned.
Usage: Connect this to a Switch on Enum node in your Animation Blueprint or UI to play specific FX or update HUD elements.
Pins: HitActor, DamageAmount,
bWasParried.
Description: Triggers whenever the weapon trace/overlap hits a valid target. Perfect for spawning blood particles directly from Blueprints.
Understanding the AAA Hit Flow (Advanced)
1. Notify Begin: The USoulsANS_Hitbox starts. It reads the sockets from the USoulsCombatComponent's owner (Mesh or Weapon).
2. Tick: Every frame, the system checks for overlaps in the path of the swing. If a hit is found, it is added to a "Hit List" so it isn't hit twice in the same swing.
3. Damage: The TakeDamage function is called on the victim, which passes through to the StatsComponent.
4. Notify End: The trace stops, and the "Hit List" is cleared for the next attack.
FEEL & STATE
Combat Feel Nodes
Game feel and internal state control.Description: Temporarily freezes character time for impact weight.
Description: Zeros the combo count and returns to Idle.
Attack Lunge & Knockback Tuning
These values are exposed on SoulsCombatComponent under Souls|Combat|Feel.
They are designed to add weight without requiring Blueprint logic.
| Property | Default | Use |
|---|---|---|
| bEnableAttackLunge | true | Enables a small forward impulse when an attack starts. |
| AttackLungeImpulse | 260 | Base movement push for light attacks. |
| HeavyAttackLungeMultiplier | 1.35 | Extra lunge applied to heavy attacks. |
| LightHitKnockbackForce | 0 | Optional push applied to targets hit by light traces. |
| HeavyHitKnockbackForce | 800 | Push applied to targets hit by heavy traces. |
AI SYSTEMS
AI Intelligence & Architecture PRO
Technical breakdown of the Souls AI brain, blackboard memory, and combat decision flow.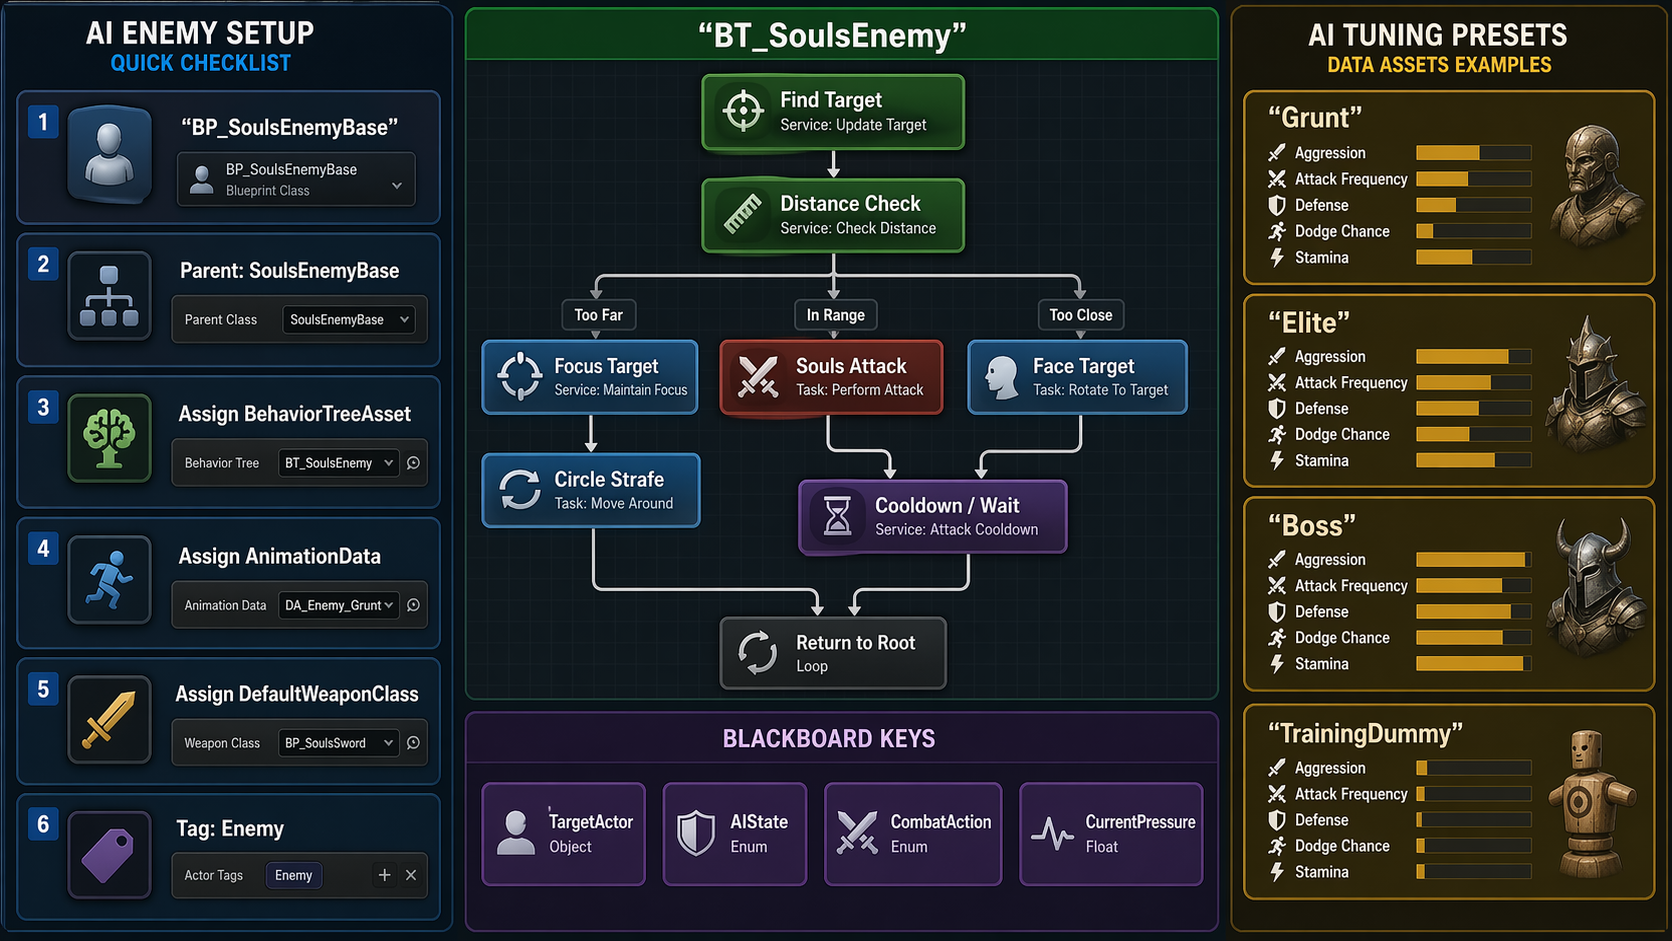
Enemy Blueprint setup, behavior tree flow, blackboard keys, and difficulty presets.
New Workflow: Organized Details Panel
To ensure a professional and clutter-free developer experience, all enemy configuration properties are now organized into a unified Enemy| hierarchy. This flat structure makes it easy for designers to find and tune critical settings without searching through multiple deep sub-categories.
- Enemy | Identity: Contains core identity flags:
Is Boss,Is Training Dummy, andIs Monster. These are surfaced at the top of the Class Defaults for instant character definition. - Enemy | AI: Groups Behavior Tree selection, aggression thresholds, strafing, retreat, and spawn leash logic.
- Enemy | Combat: Holds stats and tactical tuning such as
Heavy Attack Chance,Enragethresholds, and combo limits. - Enemy | Death & Respawn: Standardized settings for
Corpse Cleanup Delayand training dummy resurrection intervals.
Simple Combat AI Fallback Recommended First Test
The default enemy can now chase, face, and attack the player without requiring a Behavior Tree or NavMesh setup. This is the recommended first setup for testing damage, parry, hit reactions, and death flow in the showcase map.
- Enable Simple Combat AI: keep
bEnableSimpleCombatAIenabled onBP_SoulsEnemyBase. - Use Behavior Tree: keep
bUseBehaviorTreedisabled for the basic enemy. Enable it only when you want the advanced BT-driven enemy. - Training Dummy: enable
bIsTrainingDummyto stop AI movement and keep the enemy useful for damage and parry testing. - Aggressive Enemy: disable
bIsTrainingDummy, assign a default weapon, and place the enemy withinSimpleDetectionRadius.
Current build also includes ready Blueprint parent classes:
SoulsTrainingDummyEnemy for damage/parry testing and
SoulsAggressiveEnemy for a fast showcase opponent. Create a Blueprint from either
class, assign mesh, animation data, and weapon, then drop it into the showcase map.
AI Ability Selection PRO
Enemies can use a modular, data-driven ability system to execute special attacks based on weight, range, and cost. This system operates as a priority layer above the standard light/heavy combat fallback.
- Modular Data Assets: Create a
SoulsAIAbilityDataAssetto define each move. - Advanced Logic: Includes
AbilityId,Weight,MinRange,MaxRange,Cooldown, andStaminaCost. - Interrupt Behavior: Configure if the ability can be interrupted by damage or if it grants "Hyper Armor" during execution.
- Repeat Policy: Use
Can Repeat Ability,Min Repeat Interval,Avoid Immediate Repeat, andRepeat Penalty Multiplierto prevent boring loops without blocking the only valid ability forever. - Boss Phase Lists: Bosses can assign a different
AIAbilitieslist inside each entry of theBoss Phasesarray, while normal enemies can keep using the globalAIAbilitieslist.
Use AIAbility Selection is enabled, the AI evaluates all available abilities in the current phase list. It filters by range, cooldown, stamina, repeat rules, and recent-use memory, then performs a weighted random selection.
Ability Repeat & Movement Policy Advanced
AI abilities now expose practical behavior controls directly on the ability data asset, letting designers tune whether an enemy repeats a move, lunges into range, or commits to a full animation before choosing the next action.
- Can Repeat Ability: allows the same ability to be selected again after its cooldown and repeat interval.
- Min Repeat Interval: adds a repeat-specific delay separate from the base cooldown.
- Ability Repeat Memory Count: enemy-level memory used by weighted selection to avoid repeating the same ability too often.
- Ability Movement Mode: supports dash, leap, or lunge-style movement depending on the configured mode.
- Ability Movement Timing: lets movement happen before the montage or during the montage.
- Desired Strike Distance: lets lunging abilities stop at an attack distance instead of standing exactly on top of the player.
AI Ability Movement Modes
Ability movement is used when a special attack should close distance before or during its montage. Use it for lunges, short dashes, leap attacks, and boss gap closers. Leave it disabled for grounded attacks that should rely only on normal AI approach movement.
| Field | Meaning | Practical Tuning |
|---|---|---|
| Ability Movement Mode | Chooses how the enemy moves for the ability. | Use lunge/dash for melee strikes, leap-to-target for larger gap closers. |
| Desired Strike Distance | Preferred distance from the target at the end of movement. | Use weapon reach as the guide. Swords often work around 120 - 220. |
| Movement Speed | How fast the enemy moves while the ability movement is active. | Low values look like walking. Higher values create a dash or snap-lunge. |
| Max Movement Distance | Hard limit for how far the ability may move the enemy. | Keep lower than the leash radius. This prevents abilities from dragging enemies across the map. |
| Ability Movement Timing | Controls whether movement happens before the montage or while the montage plays. | Use During Montage for attacks where the animation itself should carry the enemy forward. |
| Movement Timeout | Safety stop if the movement cannot reach its target. | Use short values for melee attacks so the enemy does not slide for too long. |
Data-Driven Boss Phases PRO
Bosses can use a flexible Boss Phases array instead of a fixed two-step setup. Each entry defines when that stage begins, which abilities it uses, and what transition feedback should play.
- Health Threshold: Use normalized values such as
1.0,0.66, and0.33to build one-stage, two-stage, or three-stage encounters. - Phase Display Name: The current label is shown in the Boss HP HUD, for example
Guardian,Enraged, orFinal Stand. - AI Abilities: Assign a different ability list per stage so the boss changes behavior as health drops.
- Transition Feedback: Optional montage, sound, and VFX can play while movement and AI decisions are paused.
AIAbilities and normal combat patterns.
Telegraphed AI Abilities PRO
Special attacks can include readable windups (Telegraph) and recovery delays. This improves combat readability and prevents AI from chaining powerful moves instantly.
- Windup Time: A configurable delay before the montage begins. Ideal for "roar" or "weapon glow" cues.
- Recovery Time: A post-execution pause that ensures a window of opportunity for the player.
- Events: Bind to
OnAIAbilityTelegraphStartedfor visual/sound cues andOnAIAbilityRecoveryStartedfor posture changes.
Boss Resistances & Immunities PRO
Configure advanced physical and status resistances to create formidable boss encounters. These settings allow bosses to ignore standard player interactions like parries or staggers.
- Immune to Parry: Blocks parry finishers and stun states entirely. Perfect for giants or heavy-armored bosses.
- Immune to Stagger: Prevents hit reaction montages, allowing the boss to power through player attacks (Hyper Armor).
- Knockback Resistance: Scales or negates physical impulse from heavy attacks and explosions.
- Status Resistance: Multiplier for status effect buildup (e.g., Poison, Bleed), making the boss harder to afflict.
Enemy Difficulty Presets New
Enemy Blueprints can now auto-apply a clean preset from AIDifficulty. This keeps setup
fast while still producing distinct gameplay roles for basic enemies, elites, bosses, and testing dummies.
- Auto Apply Difficulty Preset: enabled by default. The enemy applies its preset at BeginPlay.
- Preset Can Override Stats: lets the preset set HP/stamina values.
- Preset Can Override Tactics: lets the preset set combo count, cooldown, heavy chance, strafe, retreat, and enrage.
- Apply Difficulty Preset: Blueprint-callable node for manually refreshing the enemy after changing difficulty.
Planned Enemy Combos & Action Commitment PRO
The simple enemy AI builds a short attack plan when it reaches combat range. Light and heavy attacks are protected by an action owner so the AI does not start an animation and immediately replace it with an ability or another attack.
- Light Combo Plan: The AI can request several light attacks with a small input delay, letting the montage combo window drive the final rhythm.
- Heavy Support: Heavy attacks can appear in the planned combo when a valid heavy montage exists, with fallback protection if it does not.
- Commit Guard:
AI Attack Owner Commit Guard TimeandAI Combo Step Commit Timeprevent instant action swapping. - Safe Cooldown: After an attack owner releases,
Post Combo Decision Delayprevents immediate spam.
AI Debug Logs Optional
Enemy debug logs are disabled by default to keep the project clean. Enable them only while tuning or investigating enemy behavior, then turn them off again before normal playtesting.
- Enable: open the enemy Blueprint or placed enemy instance, then turn on
Show Simple AI Debug LogsunderSouls > Enemy > AI > Debug. - Runtime Blueprint: call
Set Simple AI Debug Logs Enabledif you want a debug button in your own test tools. - Read the log: search for
SoulsAIin Output Log. Useful messages includeChasing target,Attack requested,Starting light combo plan,Starting standalone heavy attack, andAttack blocked: cooldown.
Combat Strafe & Retreat New
When the enemy is close to the player but waiting for attack cooldown, it can now circle-strafe instead of standing still. After a combo or heavy attack, it can also step back briefly to create a more readable Souls-like rhythm.
- Use Combat Strafe: enables side movement while the enemy is inside combat range.
- Combat Strafe Chance: controls how often the enemy chooses to circle instead of holding position.
- Post Attack Retreat Chance: controls how often the enemy backs away after an attack plan.
Low Health Enrage New
Enemies can become more dangerous when their health drops below a threshold. Enrage increases attack speed and reduces cooldown, giving bosses and elite enemies a simple phase-two feel without requiring a complex state machine.
- Enable Low Health Enrage: turns the feature on or off per enemy.
- Enrage Health Percent: health percentage where enrage activates.
- Enraged Attack Speed Multiplier: controls how fast attacks play after enrage.
- Enraged Cooldown Multiplier: lowers attack cooldown after enrage.
Spawn Leash Return New
The enemy can now return to its original spawn point if it is pulled too far away. This keeps the showcase map stable and prevents enemies from chasing forever across the level.
- Use Spawn Leash: enables return-to-spawn behavior.
- Leash Radius: maximum distance from spawn before the enemy disengages.
- Return Acceptance Radius: distance from spawn where the enemy is considered back home.
- Reset Stats When Leashed: optionally restores HP/stamina when the enemy returns.
- Immediate Reacquire: after returning home, the AI polls for the player again instead of waiting for a new overlap event.
Identity & Corpse Cleanup Professional UI
Defining an enemy's role and its lifecycle after death is now centralized in the Enemy|Identity and Enemy|Death categories. This ensures consistent behavior across all enemy types.
- Is Training Dummy: Disables normal AI aggression and turns the actor into a test target. Dummies use the
Enemy|Respawnlogic instead of cleanup. - Is Boss: Identifies the enemy as a boss, enabling boss-specific HUD integration and phase logic found in
Enemy|Identity. - Corpse Cleanup Delay: Found in
Enemy|Death. Controls how many seconds a normal enemy corpse remains before removal. Set to0to keep the corpse indefinitely. - Respawn Delay: Found in
Enemy|Respawn. Specifically controls training dummy restoration intervals.
Showcase Mode (Cinematic)
Designed for developers and content creators. When enabled (bShowcaseMode = true), the AI transforms into a cinematic movement actor.
- Zero Aggression: All combat logic is bypassed. The AI will never attempt an attack.
- Fixed Cinematic Distance: AI maintains a strict 650-unit radius for optimal camera framing.
- Intelligent Repulsion: If the player approaches, the AI smoothly backpedals to restore the cinematic distance.
- Focus Maintenance: AI remains permanently focused on the player actor.
AI Ability Setup Recipe
1 Create a SoulsAIAbilityDataAsset in the Content Browser.
2 Assign a Montage and set MinRange / MaxRange values.
3 Enable Use Telegraph and set Windup Time (e.g., 0.5s) and Recovery Time (e.g., 0.3s).
4 Configure repeat behavior with Can Repeat Ability, Min Repeat Interval, and optional repeat penalty settings.
5 Configure Ability Movement Mode only when the ability needs dash, leap, or lunge movement.
6 Configure Impact Tuning if this ability needs unique damage, knockback, guard damage, poise damage, or hit reaction behavior.
7 Assign a Combat Feel Preset if this ability needs unique hitstop, camera shake, sound, VFX, block, or guard-break feedback.
8 Open your Enemy Blueprint and add the asset to the AIAbilities array.
9 Ensure Use AIAbility Selection is checked in the enemy defaults.
AI Troubleshooting
| Issue | Probable Cause | Recommended Solution |
|---|---|---|
| Ability never triggers | Range or Stamina mismatch | Check MinRange/MaxRange and ensure the enemy has enough MaxStamina. |
| Enemy uses fallback attacks | All abilities on cooldown | Reduce Cooldown values or add more abilities to the list. |
| Ability does not repeat | Repeat policy or recent-use memory blocks it | Enable Can Repeat Ability, lower Min Repeat Interval, and reduce repeat penalty if the enemy has only one ability. |
| Ability movement misses the player | Desired distance, speed, or max movement distance does not match the montage timing | Reduce Desired Strike Distance, increase Movement Speed, and keep Movement Timeout short for fast melee lunges. |
| Ability hits but feels identical to normal attacks | No custom impact or feel data assigned | Set Impact Tuning for gameplay difference and Combat Feel Preset for hitstop, camera shake, SFX, and VFX. |
| Enemy changes actions too fast | Commit time is too short for the montage set | Increase AI Attack Owner Commit Guard Time or AI Combo Step Commit Time on the enemy. |
| Enemy does not chase after returning home | Detection relies on overlap-only behavior | Confirm the enemy returns to AcquireTarget after leash completion and that detection radius covers the player. |
| Corpse never disappears | Corpse Cleanup Delay is 0 or the actor is a training dummy |
Set a positive cleanup delay for normal enemies. Training dummies use respawn flow instead of corpse cleanup. |
| Boss never enters the next phase | Phases disabled | Enable bUseBossPhases, add entries to Boss Phases, and confirm each Health Threshold is ordered from high to low such as 1.0, 0.66, 0.33. |
| Telegraph delay feels wrong | Windup/Montage conflict | Ensure Windup Time does not exceed the startup frames of your montage. |
| Logs are too noisy | Debug flags enabled | Disable bDebugActionSystem and bEnableDebugLogs in component defaults. |
| Player cannot parry boss | Immunity enabled | Check bImmuneToParry or bCanBeParried in the boss settings. Also ensure Kill Enemy On Successful Parry is set correctly; this property is now authoritative over difficulty presets. |
| Enemy stuck after parry | Missing Souls_ResetCombat notify or fail-safe logic issue. |
Ensure the parried montage has Souls_ResetCombat near the end. The system now includes a fail-safe timer (Montage duration + buffer) to recover automatically if notifies are missing. |
| Boss ignores heavy hits | Stagger immunity | Check bImmuneToStagger. This is intended behavior for "Hyper Armor" bosses. |
Advanced Behavior Tree Tasks
For developers using the Behavior Tree (BT) system, several custom C++ tasks are provided to handle complex Souls-like movement and combat logic.
| BT Task | Primary Keys / Parameters | Behavior Description |
|---|---|---|
| BTTask_SoulsAttack | AttackType, TargetActor |
Triggers the combat component's light or heavy attack sequence based on the blackboard key. |
| BTTask_SoulsCircleStrafe | StrafeRadius, StrafeDirection, RotationSpeed |
Intelligent orbiting movement around the player. Automatically handles obstacle avoidance and direction switching. |
SoulsCharacterBase combat and movement buffers, ensuring perfect synchronization with animation montages and root motion.
1. Behavior Tree Architecture (The Brain Map)
The following schematic represents the Master AI Behavior Tree logic flow. It handles everything from perception to tactical execution.
BB_SoulsEnemy
2. The "Ultimate" AI Property Dictionary
Below is every single configurable value within the SoulsEnemyBase and its components.
| Property | Type | Range / Default | Deep Logic & Functionality |
|---|---|---|---|
| AIDifficulty | Enum | Grunt / Elite / Boss / TrainingDummy | Grunt: up to 3-hit combos. Elite: up to 3-hit combos. Boss: up to 4-hit combos. Training Dummy keeps combat disabled for testing. |
| Auto Apply Difficulty Preset | bool | true | Automatically applies the selected AIDifficulty preset when the enemy begins play. |
| Preset Can Override Stats | bool | true | Allows the preset to set HP and stamina for Grunt, Elite, Boss, or Training Dummy. |
| Preset Can Override Tactics | bool | true | Allows the preset to tune cooldowns, combo limits, heavy chance, strafing, retreat, and enrage settings. |
| AICombatStyle | Enum | Balanced | Relentless: Never resets pressure. Aggressive: High building. Defensive: Circles player constantly. |
| AI_AggressionThreshold | float | 0.3 - 0.9 | The point where Pressure triggers an attack. Lower = Higher attack
frequency. |
| AI_PressureGainRate | float | 0.1 - 0.5 | The speed of building aggression per second when in range. Multiplied by
Difficulty. |
| AI_AggressionDecayRate | float | 0.05 - 0.2 | Speed of pressure loss when the player is out of reach. Allows for "resetting" the duel. |
| AI_DecisionInterval | float | 0.1 - 1.0 | The tick-rate of the SoulsCombatLogic service. Lower = More responsive AI.
|
| AI_RetreatProbability | float | 0.0 - 1.0 | Chance to trigger a backward dodge/move after a combo finishes. Essential for Souls-like flow. |
| bIsTrainingDummy | bool | false | Disables normal AI aggression while preserving stats. Used for damage, parry, montage, and hitbox testing. |
| Training Dummy Respawn Delay | float | 3.0s | Seconds before a training dummy restores itself after death. |
| Training Dummy Can Attack | bool | false | Optional override for combat test dummies. Leave disabled for normal non-aggressive dummy behavior. |
| Corpse Cleanup Delay | float | 10.0s | Seconds before a non-training enemy actor is removed after death. Set to 0 to keep the corpse. |
| Use Spawn Leash | bool | true | Returns the enemy to its spawn point if it is pulled farther than Leash Radius. |
| Leash Radius | float | 2600 | Maximum distance from spawn before the enemy disengages and returns home. |
| Return Acceptance Radius | float | 120 | Distance from spawn where return behavior stops and normal targeting resumes. |
| Reset Stats When Leashed | bool | false | Optional reset for HP/stamina when the enemy returns home. Useful for boss arenas. |
| Use AIAbility Selection | bool | false | Enables the data-driven ability selection layer above legacy light/heavy fallback attacks. |
| AI Abilities | array | empty | List of SoulsAIAbilityDataAsset entries used by the enemy or current boss phase. |
| Allow Legacy Attack Fallback | bool | true | Allows light/heavy combo behavior when no valid AI ability can be selected. |
| Use Weighted Ability Scoring | bool | true | Uses ability weights and recent-use penalties for varied ability selection. |
| Ability Repeat Memory Count | int | 2 | Number of recent AI ability choices remembered when applying repeat penalties. |
| Show Simple AI Debug Logs | bool | false | Optional development toggle. When enabled, enemy decisions are printed to Output Log using the SoulsAI prefix. |
| MinAIComboHits | int | 3 | Minimum number of attacks the simple enemy AI tries to queue after it reaches attack range. |
| MaxAIComboHits | int | 4 | Upper limit for the simple enemy AI combo plan. Boss enemies can use the full value. |
| AIComboInputDelay | float | 0.42 | Delay between planned AI combo inputs. Lower values feel more aggressive; higher values feel easier to read. |
| Post Combo Decision Delay | float | 0.45s | Short delay after an attack owner releases before the next decision can begin. |
| AI Attack Owner Commit Guard Time | float | 0.75s | Minimum guard window that prevents a newly-started attack, ability, or weapon art from being replaced immediately. |
| AI Combo Step Commit Time | float | 0.75s | Minimum delay before a planned AI combo step can advance or finish, protecting light/heavy animation startup. |
| Use Combat Strafe | bool | true | Lets the enemy circle around the target while waiting for cooldown inside combat range. |
| Combat Strafe Chance | float | 0.65 | How often the enemy chooses strafe movement while close to the player. |
| Post Attack Retreat Chance | float | 0.35 | Chance to step backward briefly after finishing an attack plan. |
| Enable Low Health Enrage | bool | true | Enables phase-two style behavior when enemy health is low. |
| Enrage Health Percent | float | 0.35 | Health threshold where enrage activates. |
| Enraged Attack Speed Multiplier | float | 1.15 | Attack play-rate multiplier after enrage. |
| Enraged Cooldown Multiplier | float | 0.75 | Cooldown multiplier after enrage. Lower values make the enemy attack more often. |
| HeavyAttackChance | float | 0.35 | Chance that the enemy chooses a standalone heavy attack instead of a light combo when a heavy montage is configured. |
| Weapon Art Chance | float | 0.15 | Chance for an enemy to choose its weapon ability when range and cooldown rules allow it. |
| Weapon Art Cooldown | float | 8.0s | Cooldown applied to AI-controlled weapon art usage. |
| bGuaranteeHeavyComboFinisher | bool | true | Keeps heavy attacks separate from light combo chains so the heavy montage can finish cleanly. |
| CombatState | Enum | Idle | Internal state tracker (Idle, Attacking, Dodging, Stunned). Used for AnimBP transitions. |
3. Combat Archetype Presets (Pro-Tuning)
| Preset | Behavior | Best Use |
|---|---|---|
| TrainingDummy | No simple AI, no behavior tree, very high HP, can receive parry but does not die from parry by default. | Damage testing, parry testing, montage timing, hitbox setup. |
| Grunt | Readable attacks, lower HP, light combos, low heavy chance, can die from successful parry. | Normal basic enemy in the showcase map. |
| Elite | More HP, faster attacks, stronger combo plan, more strafe, enrage enabled. | Mini enemy, stronger duel enemy, advanced combat demo. |
| Boss | High HP, boss parry immunity, heavier attack chance, up to 4-hit plans, strong enrage. | Boss prototype, arena showcase, late-game enemy sample. |
The Pursuer (Nightmare AI)
- Difficulty: Boss
- Style: Relentless
- Threshold: 0.3
- Gain Rate: 0.4
The Strategic Duelist
- Difficulty: Elite
- Style: Defensive
- Threshold: 0.85
- Retreat Prob: 0.9
AAA Feature: The "Ghost Range" Logic
To ensure AI hits feel fair and dangerous on mobile, the system automatically scales the weapon hitbox by 1.5x during AI swings. This is a standard AAA technique to compensate for variable frame rates.
4. Blackboard Memory Key Reference
| Key Name | Type | Purpose |
|---|---|---|
| TargetActor | Object | The current target being pursued (usually the Player). |
| AIState | Integer | 2 = Chase Mode | 3 = Combat Mode. |
| CombatAction | Integer | 0 = Circle Strafe | 1 = Attack | 2 = Wait. |
| CurrentPressure | float | Internal value tracking aggression build-up. |
| ShouldRetreat | bool | Triggers the tactical retreat/dodge sequence. |
Data-Driven Implementation Guide:
1. Animation Data: Assign your USoulsAnimationDataAsset to the
enemy. It must contain the locomotion BS for 8-way movement.
2. Hit Reaction: The AI will automatically play the
HitReactionMontage when receiving damage, interrupting its current state unless it
has Hyper-Armor.
RPG BACKBONE
Inventory & Equipment Blueprint Ready
A compact item, pickup, weapon equip, quick item, and save flow for a real Souls-like loop.What This System Adds
The player now owns a SoulsInventoryComponent. It supports item stacks, equipment slots,
weapon equip, quick consumable use, pickup actors, and save snapshots through the existing save system.
- Item Data: create
SoulsItemDataAssetassets for weapons, consumables, key items, and soul currency. - Inventory: add, remove, find, and count item stacks from Blueprint.
- Equipment: equip a right-hand weapon from inventory and update the combat weapon automatically.
- Quick Item: assign a consumable to the quick slot and call
Use Quick Itemto heal and consume one stack. - Pickup: place
SoulsItemPickupin the level for overlap-based item rewards. - Enemy Drops: add loot entries on enemies so they spawn pickup actors on death.
- Save: inventory stacks, right-hand weapon, and quick item are saved in
SoulsSaveGame.
Quick Setup: Weapon Item
1 Create a Data Asset from SoulsItemDataAsset.
2 Set Item Type to Weapon.
3 Assign Weapon Class to your weapon Blueprint, for example BP_Sword.
4 Add the item to the player's SoulsInventoryComponent.
5 Call Equip Inventory Item on the player, or Equip Item on the inventory component using RightHandWeapon.
Quick Setup: Healing Item
1 Create a SoulsItemDataAsset and set Item Type to Consumable.
2 Set Max Stack to a value such as 10.
3 Set Heal Amount to the HP restored per use.
4 Add it to inventory, call Equip Quick Item, then call Use Quick Item.
Playtest Checklist: Inventory and Pickup
This is the fastest way to confirm the full item loop before building a final inventory UI.
1 Create DA_Item_Sword from SoulsItemDataAsset, set Item Type to Weapon, and assign your sword Blueprint to Weapon Class.
2 Create DA_Item_Heal, set Item Type to Consumable, set Max Stack to 10, and set Heal Amount to a value such as 40.
3 Create BP_ItemPickup from SoulsItemPickup, assign DA_Item_Heal, set Quantity to 3, and keep Pickup On Overlap enabled.
4 Place BP_ItemPickup in the map and walk over it. If the actor disappears, the item was added to the player's inventory.
5 For a weapon test, add DA_Item_Sword to InventoryComponent and call Equip Inventory Item. The weapon should spawn and attach to the character hand socket.
6 For a healing test, add DA_Item_Heal, call Equip Quick Item, take damage, then call Use Quick Item. HP should increase and the stack should decrease by one.
Enemy Loot Drops
Enemies can now spawn item pickups when they die. This gives the showcase a real reward loop after combat.
1 Open your enemy Blueprint, for example BP_SoulsEnemyBase or an aggressive enemy Blueprint.
2 In Souls > Enemy > Loot, keep Drop Loot On Death enabled.
3 Set Loot Pickup Class to your visual pickup Blueprint, for example BP_ItemPickup. If empty, the system uses the base SoulsItemPickup.
4 Add entries to Loot Drops. For each entry, assign an Item, set Quantity, and tune Drop Chance from 0.0 to 1.0.
5 Kill the enemy. A pickup should spawn near the death location and can be collected by walking over it.
Advanced Item Configuration
Upgrade your SoulsItemDataAsset with professional rules for a deeper RPG experience.
- Weapon Grip: toggle between
OneHandedandTwoHanded. 2H weapons automatically unequip the left hand. - Equip Side: restrict weapons to
Right Hand Only,Left Hand Only, orEither Hand. - Action Rules: per-item flags for
bCanBeDropped,bCanBeUsed, andbCanBeEquipped. - World Drop: assign a
DroppedPickupClassandDroppedPickupMeshso dropped items respawn as collectable pickups. - Paired Offhand: one-handed weapons can optionally define a paired shield, spell book, or secondary weapon.
Drop Confirmation System Mobile Safe
Protect rare and important items from accidental deletion with the mobile-first drop confirmation system.
- bRequireDropConfirmation: enable this in any
SoulsItemDataAssetto force a popup before dropping. - ConfirmationDialogClass: assign your confirmation widget Blueprint in the
WBP_SoulsInventorydetails. - Safe Behavior: Closing the inventory or tapping Cancel preserves the item. Only a deliberate Confirm tap executes the drop.
- Mobile Priority: Optimized for touch with clear, large buttons and safe input restoration.
bRequireDropConfirmation, assign a dialog widget that inherits from SoulsConfirmationDialog, and try to drop the item from the inventory.
Key Items & World Unlock
Key items can now be configured to unlock specific world objects like doors or gates without building a full quest system. The key stays as normal inventory data, while the world object decides which key it accepts.
- bCanUnlockWorldObjects: enable this for items that act as keys.
- bConsumeOnWorldUse: if true, the key is removed from inventory after one successful use.
- UnlockId: an optional ID (e.g.,
Gate.CourtyardKey) that must match the door'sRequiredUnlockId. - Recommended key rules: set important keys to non-droppable, non-equippable, and non-usable from the inventory action bar.
| Example Asset | Field | Suggested Value |
|---|---|---|
DA_Item_Key |
ItemType |
KeyItem |
DA_Item_Key |
bCanUnlockWorldObjects |
true |
DA_Item_Key |
UnlockId |
Gate.CourtyardKey |
DA_Item_Key |
bConsumeOnWorldUse |
false for reusable keys, true for one-time keys. |
Inventory UI Foundation PRO
The backend inventory system is fully upgraded. The UI handles categories, dynamic action buttons, and professional equipment rules natively.
- Tabs: All, Weapons, Consumables, and Key Items.
- Details: selected item name, description, type, quantity, and icon.
- Equipment: current right-hand weapon, left-hand weapon, and quick item readouts.
- Actions: dynamic English labels: Equip / Unequip / Switch / Use / Drop.
- Input: closing the inventory should restore the current developer playtest input mode, including visible cursor in Mobile UI Test mode.
WBP_SoulsInventory Layout Skeleton Built
The first Blueprint layout pass creates the inventory window structure without final styling. This gives C++ and Blueprint a stable set of widget names to bind before the real item entries are generated.
1 Create WBP_SoulsInventory with parent
SoulsInventoryWidget.
2 Add InventoryRootPanel and
InventoryMainBox as the centered inventory window.
3 Add a header with InventoryTitleText and
SoulsCountText.
4 Add tab buttons:
TabAllButton, TabWeaponsButton,
TabConsumablesButton, and TabKeyItemsButton.
5 Add InventoryContentBox as a horizontal three-column
area: ItemsPanel, DetailsPanel, and EquipmentPanel.
6 Add the item lists:
ItemsList, WeaponsList, ConsumablesList, and
KeyItemsList. Keep ItemsList visible and the category lists collapsed
until tab switching is wired.
7 Add details widgets:
SelectedItemIcon, SelectedItemNameText,
SelectedItemTypeText, SelectedItemQuantityText, and
SelectedItemDescriptionText.
8 Add equipment readouts:
RightHandWeaponText, LeftHandWeaponText, and
QuickItemText.
9 Add ActionButtonsBox with:
EquipButton, UseButton, DropButton, and
CloseButton.
10 Add InventoryButton to
WBP_SoulsMobileHUD. The next implementation step binds this button to open
WBP_SoulsInventory.
Functional Inventory UI Functional
The Inventory UI is now integrated with the SoulsInventoryComponent. It opens from the
mobile HUD, reads real player item stacks, generates visible item rows, filters by tab, and
updates the details panel when an item is selected.
- Real-time Population: Automatically fetches items from the player's inventory component upon opening or refreshing.
- Tab Filtering: Functional tabs for All, Weapons, Consumables, and Key Items.
- Item Rows: Uses
WBP_SoulsInventoryItemEntryfor a clickable row with item icon, name, and quantity. - Item Selection: Clicking an item entry updates the details panel with the item's name, type, quantity, description, and icon.
- Equipment Integration: Shows currently equipped weapons and quick items.
- Action Button States:
Equip: visible for equippable items. It changes toUnequiporSwitchwhen appropriate.Use: visible only for usable items.Drop: visible only for droppable items that are not currently equipped.
Equipment and Action Rules PRO
The inventory action bar is driven by item data and equipment state. Buttons that do not apply to
the selected item should be Collapsed, not merely disabled, so the mobile UI stays clean.
| Rule | Behavior |
|---|---|
OneHanded weapon |
Can occupy an allowed hand. The other hand remains available unless a paired off-hand item is equipped. |
TwoHanded weapon |
Occupies both hands. Show the same item in RightHandWeaponText and LeftHandWeaponText. |
| Equipped item | Cannot be dropped. Unequip it first, then drop if the item data allows dropping. |
| Non-usable item | UseButton should be collapsed. |
| Non-droppable item | DropButton should be collapsed. Use this for important keys and story items. |
Inventory Input Enhanced Input
The inventory should be opened through the same Enhanced Input workflow as the rest of the kit,
not through one-off keyboard events. Add or verify IA_Inventory in the player input
mapping context, bind it to a keyboard key such as I, and call the same inventory
toggle function used by the mobile HUD InventoryButton.
Inventory Item Entry Widget Required
Create the generated row widget as WBP_SoulsInventoryItemEntry in
/Game/SoulsMobileKit/Blueprint/Widget/ and set its parent class to
SoulsInventoryItemWidget. The C++ class provides the data bridge; the Blueprint
widget provides the visible row design.
1 Use this hierarchy for a simple row:
SizeBox
  Border or Button
    HorizontalBox
      ItemIconImage
      ItemNameText
      QuantityText
2 Mark these widgets as variables with exact names:
ItemIconImage, ItemNameText, and QuantityText.
3 Set the row height to about 44, avoid fixed width,
and let the row fill its parent list horizontally.
4 In WBP_SoulsInventory, set
ItemEntryClass to WBP_SoulsInventoryItemEntry. Do not leave it pointing
at the native C++ class alone, because the native class has no visual Blueprint layout.
Tabbed List Layout Layout Rule
The four inventory lists should share the same space under the Items heading.
Use Collapsed for inactive lists so they do not reserve layout space.
ItemsPanel
  ItemsPanelTitleText
  Overlay
    ItemsList
    WeaponsList
    ConsumablesList
KeyItemsList- Default open:
ItemsListisVisible; the other lists areCollapsed. - Weapons tab: only
WeaponsListisVisible. - Consumables tab: only
ConsumablesListisVisible. - Key Items tab: only
KeyItemsListisVisible. - Fill behavior: each list and each generated entry row should fill the Items column width.
Required Inventory Widget Names
| Area | Required Names | Purpose |
|---|---|---|
| Header | InventoryTitleText, SoulsCountText |
Window title and current souls amount. |
| Tabs | TabAllButton, TabWeaponsButton, TabConsumablesButton, TabKeyItemsButton |
Switches between item categories. |
| Lists | ItemsList, WeaponsList, ConsumablesList, KeyItemsList |
Containers for generated item entry widgets. Place them in one shared list area and collapse inactive tabs. |
| Entry Row | WBP_SoulsInventoryItemEntry with ItemIconImage, ItemNameText, QuantityText |
Clickable generated item row. Parent class should be SoulsInventoryItemWidget. |
| Details | SelectedItemIcon, SelectedItemNameText, SelectedItemTypeText, SelectedItemQuantityText, SelectedItemDescriptionText |
Shows the currently selected item. |
| Equipment | RightHandWeaponText, LeftHandWeaponText, QuickItemText |
Displays the currently equipped item slots. |
| Actions | EquipButton, UseButton, DropButton, CloseButton |
Runs item actions or closes the inventory screen. |
| HUD Entry | InventoryButton |
Button in WBP_SoulsMobileHUD that will open the inventory. |
Core Classes
| Class | Use | Buyer Setup |
|---|---|---|
| SoulsItemDataAsset | Defines item name, icon, description, type, stack size, value, weapon class, and heal amount. | Create one Data Asset per weapon, consumable, key item, or currency reward. |
| SoulsInventoryComponent | Stores stacks and equipped item references, with Blueprint events for UI updates. | Already created on SoulsCharacterBase. |
| SoulsItemPickup | Level actor that adds an item to the overlapping player's inventory. | Create BP_ItemPickup, assign Item and Quantity, then place it in the map. |
| SoulsInventoryWidget | Planned UI foundation for item tabs, item details, equipment readouts, equip/use actions, and close behavior. | Create WBP_SoulsInventory from this class when the UI foundation is available. |
| SoulsSaveGame | Saves inventory stacks, right-hand weapon, and quick item references. | Use the existing Bonfire save flow or call Save Inventory Snapshot. |
WORLD LOOP
Interaction & Pickups Blueprint Ready
A shared interaction flow for loot, bonfires, doors, and future world objects.What This System Does
The player can now interact with nearby world actors through one shared flow. Pickups, bonfires, and doors use the same interaction base, so new objects can be added without rebuilding input logic.
- Shared Base: use
SoulsInteractablefor any object the player can activate. - Player Input: assign
Interact Actionon the player, then callTry Interact. - Prompt Text: each object can return its own text through
Get Interaction Prompt. - Manual Loot: pickups can be collected by interact instead of only overlap.
- Bonfire Rest: bonfires can rest/save from the same interact button.
- Door Example:
SoulsDoorInteractablegives a simple open/close world object.
Quick Setup: Interact Input
1 Create an input action named IA_Interact.
2 Add it to your player input mapping, for example IMC_SoulsPlayer.
3 Open your player Blueprint and assign IA_Interact to Interact Action.
4 Press the mapped button near a pickup, bonfire, or door. The player will choose the closest valid interactable inside its radius.
Death Souls Recovery Marker
When the player dies, they drop their current souls at their location. This creates a recovery marker that must be collected before dying again, or the souls are lost forever.
- ASoulsDroppedSoulsPickup: The specific class used for death recovery. It stores the
DroppedSoulsAmountinitialized by the death flow. - Double Death: If the player dies again before recovering their souls, the existing marker is destroyed and replaced by a new one representing the souls held at the second death.
- Configuration: In the Player Blueprint, toggle
bDropSoulsOnDeathand adjustSoulsDropOffset.
Vendor Stock Persistence
Merchants and Vendors support limited stock stacks that persist through the AAA Save System.
- Unique ID Required: Every placed Vendor NPC must have a unique
PersistentIdandbSaveStateenabled to track stock correctly. - Stock Snapshots: When saving at a Bonfire or via manual snapshot, the vendor captures its current runtime stock state.
- Deselection: If a limited stock item reaches 0, the UI automatically prevents further purchases and can display a "Sold Out" state.
- Autosave on Transaction: Enable
bAutoSaveOnSuccessfulTransactionto write the world and player state to disk immediately after a successful purchase or sale. Otherwise, changes are only saved by a Bonfire or manual snapshot. - Debugging: Enable
bEnableVendorDebugLogson the Vendor NPC to track stock snapshots and restoration in the Output Log.
Placed Souls Rewards (World Loot)
For rewards placed in the world by designers (e.g., hidden soul items), use the ASoulsCurrencyPickup class.
- Persistence: Placed soul pickups are persistent. Use
bSaveStateand a uniquePersistentIdto ensure they don't respawn after collection. - Custom Amounts: Unlike the death marker, placed pickups have a designer-defined
SoulsAmount. - Autosave on Collect: Enable
bAutoSaveOnInteractCompleteto write the collected state to disk immediately. Otherwise, the state is only saved during a Bonfire rest or manual snapshot. - Avoid Markers: Do not use
ASoulsDroppedSoulsPickuporBP_SoulsRecoveryfor placed world rewards, as they are tuned for the death recovery flow.
Dialog Rewards (Souls & Items)
NPC Dialogs can grant souls and items upon completion via the Dialog Data Asset.
- Granting Souls: Managed by the
OptionalRewardSoulsproperty. Rewards are added directly to the player's active stats. - One-time Rewards: Set
GiveRewardOnceto true. The system captures the first-time completion state to prevent reward duplication. - Completion Save: Ensure
bSaveDialogCompletionis enabled on the NPC and aPersistentDialogIdis set to track state across restarts. - Debugging: Enable
bEnableDialogDebugLogson the Dialog NPC to verify reward eligibility and delivery in the Output Log.
Manual Loot Pickup
Use this when you want loot to stay on the ground until the player presses the interact button.
1 Open your pickup Blueprint based on SoulsItemPickup.
2 Disable Pickup On Overlap.
3 Set Interaction Radius to a comfortable value such as 150 or 180.
4 Walk near the pickup and press Interact. The pickup disappears only after the item is added to inventory.
5 For enemy loot, use a pickup class with overlap disabled if you want manual collection after death.
Bonfire Interaction
Bonfires still support quick overlap testing, but the normal Souls-like flow is manual rest.
1 Place your BP_Bonfire in the level.
2 Disable Auto Activate On Overlap for manual rest.
3 Keep Restore Stats On Rest and Save Immediately enabled for the normal checkpoint loop.
4 Approach the bonfire and press Interact. This activates the checkpoint, restores stats, and saves if enabled.
Door or Gate Example
1 Create a Blueprint from SoulsDoorInteractable, for example BP_Door.
2 Add a door mesh as a child of DoorRoot.
3 Leave Closed Relative Transform at the default closed position.
4 Set Open Relative Transform to the open rotation or offset you want.
5 Enable Can Close Again if the same button should close the door after opening.
6 Press Interact near the door to toggle it.
Locked Doors & Gates
Doors can now be configured as locked, requiring a specific SoulsItemDataAsset to open. This is intended as a small world-use foundation for keys, dungeon items, and special items.
1 Create or open a Blueprint based on SoulsDoorInteractable, for example BP_LockedGate.
2 Add your gate or door mesh under DoorRoot, then set Closed Relative Transform and Open Relative Transform.
3 Set bStartsLocked to true.
4 Assign RequiredKeyItem to DA_Item_Key or your own key data asset.
5 Optional but recommended: set RequiredUnlockId to match the key's UnlockId, such as Gate.CourtyardKey.
6 Customize LockedPromptText, UnlockPromptText, and MissingKeyMessage.
7 Listen for OnDoorUnlocked or OnDoorUnlockFailed for sound, VFX, UI feedback, or Blueprint-specific logic.
| Door/Gate Field | Purpose | Example |
|---|---|---|
bStartsLocked |
Initial lock state when the level starts. | true |
RequiredKeyItem |
The inventory item required to unlock. | DA_Item_Key |
RequiredUnlockId |
Optional designer ID check against the key data. | Gate.CourtyardKey |
bCanCloseAgain |
Whether the same gate can close after opening. | false for a one-way Souls-like unlock. |
Manual Validation: Key Door
Use this short checklist after placing BP_Key and BP_LockedGate in the showcase map.
| Test | Expected Result |
|---|---|
| Interact with the locked gate before picking up the key. | The gate stays locked and OnDoorUnlockFailed can provide feedback. |
Pick up BP_Key. |
DA_Item_Key appears in the inventory under Key Items. |
| Interact with the gate after collecting the key. | The gate unlocks, opens, and fires OnDoorUnlocked. |
Set bConsumeOnWorldUse to true, then unlock again. |
One key is removed from the player's inventory after the successful unlock. |
Set bConsumeOnWorldUse to false, then unlock again. |
The key remains in the player's inventory after the successful unlock. |
| Place a normal unlocked door with no required key. | Existing open/close door behavior still works normally. |
Core Interaction Properties
| Property | Use | Recommended Setup |
|---|---|---|
| Interaction Radius | Distance where the object can be selected by player interact. | Use 120-180 for loot, 180-250 for bonfires and doors. |
| Interaction Prompt | Text returned by the interactable for UI prompts. | Use short verbs like Pick Up, Rest, Open. |
| Can Interact | Lets each object decide if it is currently usable. | Override in Blueprint for locked doors, empty pickups, or disabled objects. |
| Interact | Runs the actual action. | Use it for pickup, rest, open door, talk, inspect, or activate. |
Get Interaction Prompt from the closest valid interactable.
DEVELOPMENT TOOLS
Showcase Route Guide PRO TOOL
A visual helper to organize and validate your demo level path.What This System Does
The ASoulsShowcaseRouteGuide is a development-only tool designed to help level designers build the "Perfect Souls Loop". It provides visual lines and points in the editor to represent the standard demo path.
- Visual Path: Draws debug lines and spheres between key gameplay points.
- Logical Points: Standardizes the "Bonfire -> Enemy -> Reward -> Return" flow.
- Quick Validation: Check if all critical showcase actors are linked with one button.
- Blueprint Friendly: Can be customized as
BP_ShowcaseRouteGuide.
How to Use
1 Create a Blueprint from SoulsShowcaseRouteGuide, for example BP_ShowcaseRouteGuide.
2 Place it in your Showcase map.
3 Auto-Setup: Click Auto Discover Actors in the details panel to automatically link actors with tags: Bonfire, ShowcaseEnemy, ShowcaseReward, and ReturnPoint.
4 Alternatively, manually assign your actors to the properties: Bonfire Actor, Enemy Encounter Actor, etc.
5 Enable Show Route Debug to see the visual path in the editor viewport.
6 Click Validate Route Setup to check for missing assignments and view the total Route Total Distance in the details panel.
Configuration Details
| Property | Description | Recommendation |
|---|---|---|
| Show Route Debug | Toggles editor-time debug lines and spheres. | Keep ON during map setup; OFF before final packaging. |
| Draw Route In Game | If enabled, draws the route for a short time on BeginPlay. | Useful for verifying the path during playtests. |
| Route Color | The color of the debug visualization. | Use Green or Yellow for high visibility. |
- Developer Debug Mode: Uses
Show Route Debugto draw persistent lines/spheres (ideal for precision). - Future Polish: a later pass can add premium 3D labels and directional arrows for demo presentations. The current MVP focuses on debug lines, spheres, and route validation.
CHECKPOINT SYSTEM
Bonfire & Save Lite Blueprint Ready
A simple Souls-like checkpoint flow for resting, saving, and returning the player to the last bonfire.What This System Does
The kit includes a lightweight checkpoint system designed for fast production. Drop a Bonfire actor in the level, let the player activate it, and the project stores the checkpoint transform, souls value, HP percentage, and stamina percentage in a save slot.
- Checkpoint: saves the Bonfire location and optional
Checkpoint Id. - Rest: can restore HP and stamina when activated.
- Save Slot: saves immediately by default, so the player can return to the same checkpoint later.
- Auto Respawn: the player can automatically return to the last Bonfire after death.
- Safe Revive: restores the character mesh from death/ragdoll state and gives a short invulnerability window.
Current Implemented Flow Verified
This is the working first production pass used by the showcase test. It is intentionally simple, but it already covers the full loop needed for a playable Souls-like prototype.
- Bonfire activation: saves the respawn point using
Player Respawn Offset, not the exact Bonfire center. - Player death: stops input, clears sprint/lock-on/combat state, then starts the death sequence.
- Death presentation: can play a death montage, optional ragdoll, and optional respawn widget.
- Respawn: teleports to last checkpoint, restores HP/stamina/souls snapshot, restores mesh pose, then returns control.
- No checkpoint fallback: if no Bonfire was activated, the player returns to the original spawn transform.
Quick Setup: Place a Bonfire
1 Create a Blueprint from SoulsBonfire, for example BP_Bonfire.
2 Add your mesh, flame effect, light, and sound inside the Blueprint.
3 Set Interaction Radius to the distance where the player can rest.
4 Enable Auto Activate On Overlap for instant checkpoint testing, or keep it disabled and call Activate Bonfire from your interact button.
5 Keep Restore Stats On Rest and Save Immediately enabled for the normal Souls-like flow.
6 Adjust Player Respawn Offset so the player revives beside or in front of the Bonfire, not inside the Bonfire mesh.
Blueprint Flow
| When | Blueprint Node | Result |
|---|---|---|
| Player interacts with Bonfire | Activate Bonfire |
Saves checkpoint, stores player snapshot, restores stats if enabled, then writes the save slot. |
| Game starts | Load Game From Slot |
Loads saved souls and last checkpoint data into the Game Instance. |
| Player dies | Auto Respawn At Checkpoint |
After Checkpoint Respawn Delay, the player returns to the last Bonfire and restores saved HP/stamina values. |
| Player dies before touching Bonfire | Spawn fallback | Returns the player to the transform captured at BeginPlay, then restores stats. |
| Player respawns | Respawn Invulnerability Duration |
Temporarily ignores damage so traps or damage volumes cannot instantly kill the player again. |
| New game / reset test | Delete Save Game |
Deletes the current save slot and clears stored souls. |
Auto Respawn At Checkpoint enabled for the fast setup.
Use the On Player Death event only for fade, sound, camera shake, or a custom death screen.
Player Death Properties
| Property | Default | Use |
|---|---|---|
| Auto Respawn At Checkpoint | true | Automatically restores the player at the last Bonfire when HP reaches zero. |
| Checkpoint Respawn Delay | 1.25 | Delay before teleporting back. Increase it if you play a longer death animation or fade. |
| Respawn Invulnerability Duration | 1.5 | Short safety window after respawn. Prevents instant re-death from traps, lava, or repeated damage triggers. |
| Player Death Montage | None | Assign the player's death montage here. Respawn waits at least until this montage duration finishes. |
| Use Death Ragdoll | false | Optional physical collapse after Ragdoll Delay. Keep disabled for simple montage-only death. |
| Ragdoll Delay | 0.75 | Time before ragdoll begins after death. Use it when you want the death montage to start before physics takes over. |
| Respawn Widget Class | None | Optional widget shown during the death/respawn delay. Use this for a simple "You Died" or revive fade screen. |
| On Player Death | Blueprint Event | Optional event for UI, sound, camera shake, or screen fade before the respawn happens. |
| On Player Respawned | Blueprint Event | Optional event for respawn sound, camera fade-in, VFX, or restoring custom Blueprint state. |
Bonfire Properties
| Property | Default | Use |
|---|---|---|
| Checkpoint Id | None | Optional name for this Bonfire. Useful for UI text, map logic, or debugging. |
| Interaction Radius | 180 | Size of the overlap sphere used for activation range. |
| Auto Activate On Overlap | false | Great for testing. Disable it when you want a manual interact button. |
| Restore Stats On Rest | true | Restores HP and stamina when the Bonfire is activated. |
| Save Immediately | true | Writes the save slot as soon as the Bonfire is activated. |
| Player Respawn Offset | X 120, Z 90 | Local offset from the Bonfire used as the revive position. Rotate the Bonfire to control the facing direction. |
Production Tip
Keep the first Bonfire version simple: activation, visual feedback, save, and respawn. Add menus, fast travel, level-up, and enemy reset later only after the combat loop feels stable.
Simple Respawn Widget
No-Button Death Screen
The respawn widget is optional and does not need buttons. A clean first version is just a fullscreen black overlay with centered text. The character system adds it on death and removes it automatically after respawn.
1 Create a Widget Blueprint, for example WBP_Respawn.
2 Add a fullscreen black Image or Border with partial opacity.
3 Add centered text such as YOU DIED.
4 Optional: add a fade-in animation inside the widget.
5 Assign it to Respawn Widget Class on the player Blueprint.
Fast Damage Test Volume
Testing Death and Respawn
Create a Blueprint from SoulsDamageVolume and place it near the Bonfire. This gives
you a clean way to test damage, death, and checkpoint respawn without waiting for enemy attacks.
1 Create BP_DamageVolume from SoulsDamageVolume.
2 Scale the DamageBox so the player can walk into it.
3 Set Damage Amount to 25 for normal testing, or 999 to test instant death.
4 Keep Player Only enabled if you do not want enemies to take trap damage.
5 Enable Damage Over Time if the volume should hurt the player repeatedly while standing inside.
Damage Volume Properties
| Property | Default | Use |
|---|---|---|
| Damage Amount | 25 | Damage applied when the player enters or remains in the volume. |
| Damage On Begin Overlap | true | Applies damage as soon as the player enters the box. |
| Damage Over Time | false | Applies repeated damage while the player stays inside. Useful for lava, poison, traps, or kill zones. |
| Damage Interval | 0.5 | Tick rate for repeated damage when Damage Over Time is enabled. |
| Per Actor Damage Cooldown | 1.0 | Prevents the same actor from being damaged every frame by the same volume. |
| Player Only | true | Limits damage to the player so enemies are not accidentally killed by testing volumes. |
| One Shot | false | Disables the volume after the first successful damage event. |
PROGRESSION LOOP
Souls Economy & Recovery MVP
A compact souls reward, death drop, and recovery loop for a playable Souls-like foundation.What This System Does
Enemies can now award souls when killed. If the player dies while carrying souls, the player drops a recovery pickup, respawns at the checkpoint with zero carried souls, and can recover them by returning to the drop. If the player dies again before recovery, the old pickup is destroyed and those old souls are permanently lost.
- Enemy Reward: set
Soul Rewardon enemy Blueprints. - Death Drop: player can spawn a recoverable souls pickup on death.
- Recovery: pickup can be recovered by Interact or by overlap.
- Double Death Loss: only the latest dropped souls marker can be recovered.
- Checkpoint Loop: player respawns at bonfire while dropped souls stay in the world.
- HUD Counter:
WBP_SoulsMobileHUDcan show the live souls value throughSoulsText.
Quick Setup: Enemy Souls Reward
1 Open an enemy Blueprint.
2 In Souls > Enemy > Souls Reward, enable Award Souls On Death.
3 Set Soul Reward to the amount the player receives, for example 25 for a weak enemy.
4 Keep Award Souls For Training Dummy disabled unless the dummy is being used for economy testing.
5 Kill the enemy. The attacking player receives the reward immediately.
Quick Setup: Player Death Recovery
1 Open the player Blueprint.
2 In Souls > Player > Souls Recovery, enable Drop Souls On Death.
3 Leave Souls Recovery Pickup Class empty to use the default recovery pickup, or assign your own visual Blueprint.
4 Keep Recover Dropped Souls On Overlap disabled if you want the player to press Interact.
5 Die while carrying souls. The player drops a recovery pickup and respawns with zero carried souls.
6 Return to the pickup and press Interact to recover the dropped amount.
Souls Recovery Grace Period
To prevent the "Instant Recovery" bug where the player accidentally collects their souls immediately upon death, the system now implements a mandatory spawn grace period.
- Recovery Grace Period: Default 0.75s. Configurable in the souls recovery pickup class.
- Overlap Protection: During the grace period, the pickup ignores all overlap events.
- Living Player Safety: Only living players can recover souls. This prevents the dead body from accidentally consuming the souls before the respawn flow is complete.
- Post-Grace Check: When the timer expires, the pickup automatically checks for overlapping players, ensuring smooth recovery even if the player remains stationary.
- Debug Logs: The system now logs the specific class and location of each spawned marker, such as
[Souls] Dropped Souls Recovery Marker! Class: BP_SoulsDroppedSoulsPickup at [Location].
Souls Recovery Pickup Class in the character defaults to customize the look of the recovery marker.
Soul Loss on Double Death
To maintain the challenge of the Souls-like loop, failing to recover your souls before dying again results in the permanent loss of the previous souls.
- The Rule: Only the most recent souls dropped are recoverable.
- Double Death: If the player dies while a souls marker is already in the world, the old marker is destroyed instantly before the new one spawns.
- No Stacking: Souls markers do not stack. The player must choose between safety and the risk of recovering their previous cache.
- Example: die with 10 souls, earn 10 more, then die again before recovery. The first 10 are lost, and the new marker contains only the latest 10.
Bonfire Level Up Lite
Spend your hard-earned souls at any bonfire to permanently increase your character's power. This system provides a clean C++ foundation for RPG progression.
- Max HP: Increases total health pool.
- Max Stamina: Increases stamina for more actions.
- Attack Power: Multiplies all weapon damage.
Cost = BaseCost * (Growth ^ CurrentLevel)
Default: 50 souls starting cost with 1.5x growth per level.
How to Implement UI:
The bonfire now broadcasts OnBonfireLevelUpAvailable when activated. Link your Level Up Widget to this event and use these functions:
InitializeLevelUpWidget(Actor)RefreshLevelUpValues()UpgradeHPFromWidget()UpgradeStaminaFromWidget()UpgradeAttackFromWidget()CloseWidget()
SoulsSaveGame and restored when respawning or loading the game.
- Check Debug Logs: Enable
Show Bonfire Debug Logsin the Bonfire details to see real-time overlap and interaction events. - Interaction Mode: If
Auto Activate On Overlapis OFF, you MUST press your Interact button near the bonfire. - Collision: Ensure the Player Character has
Generate Overlap Eventsenabled on its Capsule Component and is on thePawncollision channel. - Widget Assignment: Double-check that
Level Up Widget Classis set toWBP_BonfireLevelUp. - Save Game: Ensure your
SoulsGameInstanceis correctly set in Project Settings, as the bonfire relies on it for saving and snapshots.
UI Widget Setup:
Create a Widget Blueprint WBP_BonfireLevelUp inheriting from SoulsBonfireLevelUpWidget. You MUST name your components exactly as follows for C++ binding:
| Category | Name | Type |
|---|---|---|
| Currency | SoulsCountText |
TextBlock |
| HP | HPLevelText, HPCostText, HPUpgradeButton |
Mixed |
| Stamina | StaminaLevelText, StaminaCostText, StaminaUpgradeButton |
Mixed |
| Attack | AttackLevelText, AttackCostText, AttackUpgradeButton |
Mixed |
| System | CloseButton |
Button |
CloseButton when the menu opens. Closing the menu uses guarded removal so
repeated open/close tests do not create InputMode:UIOnly or
RemoveFromParent warnings.
Quick Setup: HUD Souls Counter
1 Open WBP_SoulsMobileHUD.
2 Add or select the Text Block used for souls display.
3 Name it exactly SoulsText.
4 Compile and save the widget. No extra graph logic is required for the basic counter.
5 Kill an enemy, die with souls, or recover dropped souls. The number should update automatically.
Recommended Test
| Step | Expected Result |
|---|---|
Activate a bonfire, then kill one enemy with Soul Reward above zero. |
The player's souls value increases. |
| Walk into a damage volume or let an enemy kill the player. | A souls recovery pickup appears near the death location. |
| Respawn at the bonfire. | The player returns safely with zero carried souls. |
| Go back to the recovery pickup and press Interact. | The dropped souls return to the player and the pickup disappears. |
| Die with souls, skip recovery, earn more souls, then die again in a different location. | The first recovery pickup is destroyed. Only the newest pickup can be recovered. |
| Activate a bonfire with enough souls and open Level Up. | The player can spend souls on Max HP, Max Stamina, or Attack Power, and the upgrades persist through save/respawn. |
RPG FOUNDATION
Inventory UI Reference
A full-featured C++ foundation for inventory management, equipment, and item usage.What This System Does
The USoulsInventoryWidget provides a premium C++ bridge to the existing inventory backend. It handles item filtering by tabs, selection details, and provides native hooks for equipping weapons or using consumables.
- Tabbed Navigation: Filter items into Weapons, Consumables, and Key Items.
- Detail Panel: Displays item names, descriptions, icons, and quantities automatically.
- Equipment Slots: Visual feedback for Right Hand, Left Hand, and Quick Item slots.
- Action Hooks: Native C++ support for selected item action states, with gameplay actions ready to extend.
- Blueprint Friendly: Inherit from
USoulsInventoryWidgetto build your visual design.
1. Component Bindings
When creating your WBP_SoulsInventory, use these exact names for the UI components to enable C++ auto-binding. This section is a compact technical reference; the main setup flow lives in the Inventory & Equipment section above.
2. Paired Offhand Items
The inventory system now supports paired off-hand items (e.g., dual swords or sword-and-shield combos). This is configured directly on the weapon's SoulsItemDataAsset.
- bSupportsPairedOffhandItem: Enable this to allow offhand pairing (only visible on One-Handed weapons).
- PairedOffhandItem: The secondary item to equip.
- bAutoEquipPairedOffhand: If true, equipping the main weapon will automatically add (if missing) and equip the paired offhand item to the left hand.
- bPairedOffhandCanBeUnequipped: If false, the offhand item is locked while the main weapon is equipped. Unequipping the main weapon will automatically clear the offhand.
3. Input Action Setup
The inventory is now toggled via the Enhanced Input System. Ensure you have an IA_Inventory action assigned to the InventoryAction property on your character class, and map it in IMC_SoulsPlayer (e.g., Keyboard I and Gamepad Special Right).
| Category | Name | Type |
|---|---|---|
| Lists | ItemsList, WeaponsList, ConsumablesList, KeyItemsList |
PanelWidget |
| Details | SelectedItemNameText, SelectedItemIcon |
TextBlock / Image |
| Equipment | RightHandWeaponText, QuickItemText |
TextBlock |
| Buttons | EquipButton, UseButton, DropButton, CloseButton |
Button |
| Tabs | TabAllButton, TabWeaponsButton, TabConsumablesButton, TabKeyItemsButton |
Button |
4. Item Entry Blueprint
Create WBP_SoulsInventoryItemEntry with parent class
SoulsInventoryItemWidget. This Blueprint is the visible row used by the C++ inventory
widget when it generates item entries.
- Required child names:
EntryButton,ItemIconImage,ItemNameText, andQuantityText. - Critical: The
EntryButtonmust have Is Variable enabled in Blueprint for C++ binding. - Click Reliability: Ensure that
ItemNameText,QuantityText, andItemIconImageare set to Hit Test Invisible. This prevents them from blocking mouse clicks meant for theEntryButtonbehind them. - Use a row height around
44and avoid fixed width so entries fill the list. - Set
ItemEntryClassonWBP_SoulsInventoryto this Blueprint class. - Put the four list widgets in one shared Overlay and collapse inactive lists during tab switches.
5. Logic Hooks
The system provides several BlueprintImplementableEvents to help you customize the visual behavior:
OnInventoryInitialized: Called when the widget is first opened.OnInventoryRefreshed: Called after items are re-filtered or updated.OnSelectedItemChanged: Triggered when a player selects a new item.OnInventoryTabChanged: Triggered when switching between category tabs.
InventoryButton to your HUD and bind it to OnInventoryPressed in C++ or Blueprint.
6. Drop Confirmation Dialog
For rare weapons, story items, or any item that should not be dropped by accident, enable bRequireDropConfirmation on the item's SoulsItemDataAsset. Then assign a confirmation widget to ConfirmationDialogClass on WBP_SoulsInventory.
- Create a Widget Blueprint that inherits from
SoulsConfirmationDialog. - Required child names:
TitleText,MessageText,ConfirmButton, andCancelButton. - Enable Is Variable for each required child so the C++ class can bind to it.
- Use large touch-friendly buttons and keep Cancel visually distinct from Confirm.
- Cancel closes only the dialog and keeps the item. Confirm executes the normal inventory drop flow.
Common Troubleshooting
- Buttons not clickable on first open: This usually happens if multiple category lists (e.g.,
ItemsListandWeaponsList) are overlapping and both are set toVisiblein the Blueprint. The system automatically collapses inactive lists viaSetInventoryTab, but ensure your default Blueprint visibility isn't blocking input. - Data not showing in row: Verify your
WBP_SoulsInventoryItemEntryinherits fromSoulsInventoryItemWidgetand the variable names match exactly. - Drop confirmation does not open: Verify the item has
bRequireDropConfirmationenabled, the inventory widget hasConfirmationDialogClassassigned, and the dialog Blueprint inherits fromSoulsConfirmationDialog. - Debug Logs: Enable
bEnableDebugLogson the inventory widget and filter the Output Log by[INV_DEBUG]to see real-time initialization and selection states.
WORLD MODULES
RPG World Modules
Foundational RPG systems including containers, loot boxes, and bonfire storage.1. Chest & Container Logic
The ASoulsContainerInteractable provides a professional base for world containers that grant loot and persist their state.
- Loot Granting: Automatically adds a list of items to the player's inventory upon opening.
- One-Time Use: Configurable persistence ensures chests stay opened across deaths and reloads.
- Interaction: Uses the shared interaction flow for a seamless world experience.
- Persistence ID: Each chest uses a unique
ContainerIdto track its state in theSoulsSaveGame.
2. Bonfire Storage Box
Enable players to manage their inventory at bonfires by depositing or withdrawing items using the ASoulsStorageBoxInteractable.
- Deposit/Withdraw: Transfer items between player inventory and persistent storage.
- Stack Management: Automatically merges stacks and handles item quantities correctly.
- Persistence: Storage content is saved to a global map in
SoulsSaveGame, accessible from any storage box with the sameStorageId. - Blueprint Hooks: Includes
OnStorageChanged,OnDepositFailed, andOnWithdrawFailedevents for UI updates.
3. Interaction Prompt HUD
Dynamic visual feedback that informs the player when they are within range of an interactable object, supporting both mobile and keyboard inputs.
- Proximity Focus: Automatically detects the nearest interactable and updates the HUD prompt (e.g., "Press E to Rest").
- Contextual Text: Prompts change based on the object state (e.g., "Open Chest" vs "Opened").
- Seamless Integration: Integrated directly into
USoulsMobileHUDfor consistent performance. - Mobile Ready: Enables/Disables interaction buttons dynamically based on proximity focus.
Setup Checklist: World Containers & HUD
| Check | Expected Result |
|---|---|
| Place BP_Chest | HUD prompt displays "Open Chest" when nearby. |
| Open Chest | Loot is added to player inventory, chest state becomes "Opened", HUD prompt hides. |
| Reload Map | Chest remains "Opened"; prompt doesn't appear or says "Already Opened". |
| Bonfire Rest | Stats and inventory are snapshotted; player returns to this point after restart. |
| Access Storage | UI hooks trigger, allowing deposit/withdraw calls. |
SoulsSaveGame. OpenedContainerIds tracks which world chests are spent, while SavedStorages manages all stored items by unique ID. Player state (Souls, Level, Inventory) is snapshotted at Bonfires.
VISUAL FEEDBACK
Floating Damage UI AAA
Complete guide to creating and customizing floating combat text.The Souls Floating Text system is designed for high-performance mobile rendering. It uses a dynamic Screen-Space Widget Component that automatically tracks hit locations while providing smooth, cinematic animations.
1. Blueprint Creation & Logic Schematic
1 Create a Widget Blueprint (Parent: SoulsFloatingText) and add a Text Block named DamageText.
2 Implement the Logic Schematic shown below to handle critical hits and animations.
- Value (Float) ->
- Color (Linear) ->
- Is Critical ->
Conv_DoubleToText is used to format the float into DamageText.
Sets Pink Color & Scale to 2.0
Sets Input Color & Scale to 1.0
Triggers the 'Fade' UI Sequence.
- Duration: 1.1s
- Action: Safe Remove Parent
2. Visual Implementation Guide
Follow these professional layouts to finalize your Blueprint logic and ensure proper memory cleanup.
SoulsUserWidget expose
SafeRemoveFromParent(). Use it for floating text or any widget managed by a
WidgetComponent; it checks whether the widget is actually in the viewport or has a
parent before removing it, avoiding noisy UMG warnings during repeated playtests.
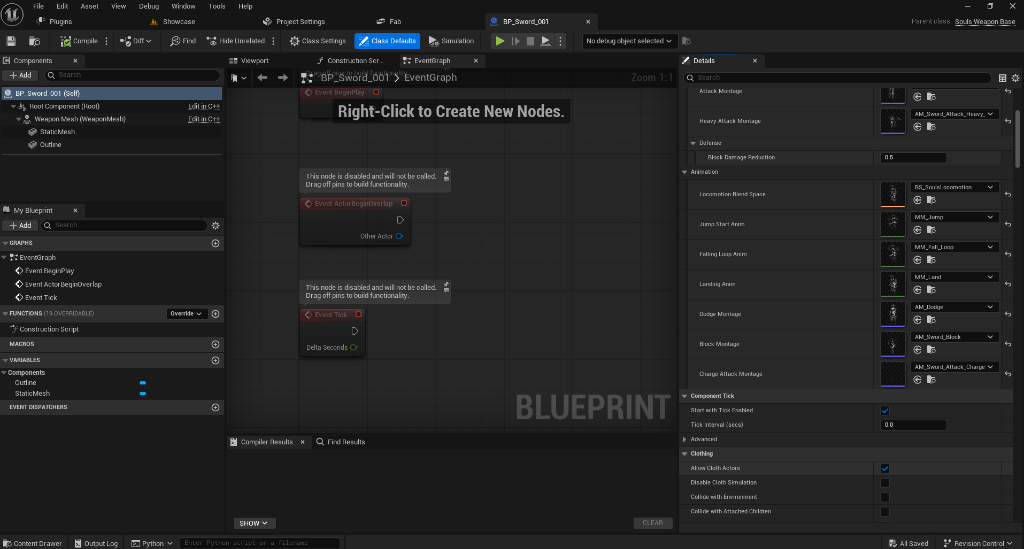
Step 1: Data Initialization
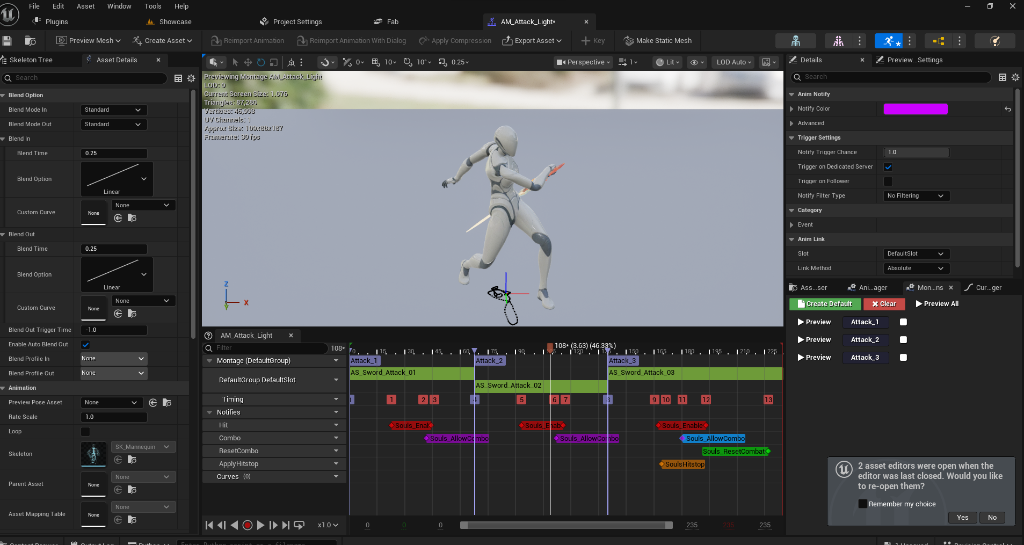
Step 2: Animation & Memory Management
3. Global Integration (Final Step)
Link your finalized Widget to characters to enable global damage tracking.
Character Configuration
- Damage Text Class: Assign your WBP_FloatingText in
BP_SoulsCharacterorBP_SoulsEnemy. - Bone Name: Recommended:
headorspine_03. - Optimization: The system automatically pools and destroys these widgets to prevent performance drops.
4. Mobile Interface Base (SoulsUserWidget)
All core UI elements in the kit inherit from SoulsUserWidget, providing native support for mobile optimization and cinematic transitions.
Safe Zone Support
Automatically calculates screen padding for modern mobile devices with notches or rounded corners.
Unified Animations
Provides PlayFadeIn and PlayFadeOut hooks that can be called from C++ or Blueprint to ensure consistent UI feel.
Input Handling
Native support for touch interactions, preventing input "bleed-through" to the game world while UI is active.
SoulsUserWidget as the parent for your menus, health bars, and inventory screens to maintain the premium glassmorphism aesthetic and performance.
MOBILE UX
Souls Mobile Move Stick Widget PRO
The USoulsMobileMoveStickWidget is a C++ foundation for creating high-performance virtual joysticks. It handles normalized 2D input vectors, deadzones, and radius clamping natively, ensuring smooth character movement on mobile devices.
How to Use
- Create a Widget Blueprint parented to
SoulsMobileMoveStickWidget. - Bind
StickThumbandStickBackgroundto Image widgets. - Adjust
StickRadiusandDeadZonein the details panel. - Use
OnMoveInputChangedto drive character movement.
Technical Features
- Input Vector: Returns a normalized
FVector2Dfor movement. - Radius Clamping: Prevents the thumb from leaving the designated area.
- Auto-Reset: Smoothly returns to center using
ThumbReturnSpeed. - Invert Y: Optional toggle for specialized control schemes.
ARCHITECTURE
Data-Driven Action System
A lightweight, extensible system for managing character actions and combat rules.The Action System provides a standardized way to define and execute character actions like attacks, dodges, and interactions. It separates logic (C++) from data (Blueprints/Data Assets), allowing for rapid iteration without code changes.
1. Hardened Action State Management
The system is designed to be extremely resilient, ensuring your character never gets "stuck" in a busy state.
- Automatic Cleanup: Actions are automatically finished when their associated montage ends, even if interrupted by other logic.
- Fail-Safe Timeout: If an action somehow fails to report completion, a background fail-safe timer (Montage Length + 0.5s) will automatically clear the busy state.
- Montage Control: Use the
bActionSystemPlaysMontageflag on your Data Asset to choose whether the Action System should play the montage itself or just act as a validation/cooldown wrapper.
bActionSystemPlaysMontage set to
false. These actions use the Action System for validation, stamina cost, cooldown,
and buffering, while the existing Combat/Dodge systems continue to play their own montages. This
prevents double montage playback and avoids stuck-busy input states.
2. Creating an Action Data Asset
1 Right Click in Content Browser -> Miscellaneous -> Data Asset.
2 Select SoulsActionDataAsset as the class.
3 Name it (e.g., DA_Action_LightAttack).
4 Configure stamina cost, cooldown, montage, and validation rules.
3. Component Responsibilities
| Field | Description |
|---|---|
| ActionId | Unique identifier used for cooldown tracking and logic. |
| ActionMontage | The animation montage to play when the action starts. |
| StaminaCost | Amount of stamina consumed upon successful commitment. |
| Cooldown | Time in seconds before the action can be used again. |
| bCanBeBuffered | If true, the action can be queued while another is active. |
4. Global Integration
Assign your Action Data Assets to the character's Action System category to enable the data-driven behavior. Existing input functions will automatically check these assets before executing logic.
5. Weapon Action Overrides
Equipped weapons can override the character's default action assets. This allows for unique stamina costs, cooldowns, and montages per weapon type.
How Overrides Work
- Priority 1: The system checks the currently equipped weapon's
Action Overridescategory. - Priority 2: If the weapon override is empty, it falls back to the character's default action asset.
- Priority 3: If both are empty, the legacy hard-coded combat logic is executed.
6. Weapon Abilities (Foundation)
The system includes a dedicated hook for Weapon Abilities (Weapon Arts). You can trigger these via the TryWeaponAbility function on the character.
Setup steps:
- Create a
SoulsActionDataAssetwithActionType = WeaponAbility. - Assign it to the
Weapon Ability Actionslot on your Weapon Blueprint. - Call
TryWeaponAbilityfrom your input handling or HUD button.
7. Manual Validation
| Test | Expected Result |
|---|---|
| Press Dodge several times during PIE. | Dodge may respect cooldown, but the character should never stay permanently busy. |
| Use Dodge, then Light Attack and Heavy Attack. | Each action can start after its normal rules allow it; no repeated Character is busy lockout. |
Set a core action to bActionSystemPlaysMontage = false. |
The legacy combat or dodge montage still plays, while the Action System handles rules and cooldown. |
| Assign a weapon action override on a weapon Blueprint. | The equipped weapon action is used before the character default action. |
| Clear the weapon override. | The character default action is used. If that is also empty, legacy behavior still works. |
COMBAT DEPTH
Status Effects & Buffs
Reference for buildup effects, timed buffs, HUD icons, inventory effect details, weapon status, radial timers, and professional stacking rules.System Overview
The system is split into Status Effects and Buffs. Status Effects are buildup-triggered gameplay states such as Poison, Bleed, Burn, Frost, Stun, or Custom effects. Buffs are timed stat modifiers such as Attack Up, Defense Up, Stamina Regen Up, Move Speed Up, or Custom designer-defined effects.
All core logic lives in C++ for stability and performance, while designers tune behavior through Data Assets and Blueprint widgets. The system connects weapons, consumables, HUD feedback, inventory details, and stack behavior into one reusable foundation.
- Status Effects: Track buildup, decay buildup over time, trigger when the threshold is reached, optionally deal damage over time, and optionally stack.
- Buffs: Apply timed gameplay modifiers to Max HP, Max Stamina, Attack Power, Defense, Stamina Regen, Move Speed, or Custom logic.
- Inventory Use: Consumables can heal, apply a buff, cleanse one status effect, or cleanse all negative status effects.
- Weapon On-Hit Status: Weapons can apply status buildup on light and heavy hits through weapon Blueprint defaults.
- HUD Feedback: Active buffs and triggered statuses appear as icons with remaining seconds, optional stack text, and optional radial expiry overlay.
- Inventory Details: Selected items show healing, buffs, cleanses, stack rules, and weapon on-hit status information.
- Professional Stacking: Re-applying an effect can do nothing, refresh duration, extend duration, increase stack count, or increase magnitude depending on each Data Asset.
1. Status Effect Data Asset
1 Create a Data Asset of type SoulsStatusEffectDataAsset. Recommended folder: Content/SoulsMobileKit/Data/Effects.
2 Name it clearly, for example DA_Status_Poison, DA_Status_Bleed, DA_Status_Burn, or DA_Status_Frost.
3 Configure identity, buildup, damage, rules, HUD stack display, and debug fields.
| Property | What It Does | Designer Guidance |
|---|---|---|
| EffectId | Stable internal ID used for logs and matching. | Use simple IDs like Poison, Bleed, or Burn. |
| DisplayName | Name shown in UI and inventory details. | Keep it short for mobile readability. |
| EffectType | Classifies the effect as Poison, Bleed, Burn, Frost, Stun, or Custom. | Use Custom for project-specific effects. |
| Icon | Texture shown in WBP_SoulsEffectIcon. | Use high-contrast square icons. |
| Description | Human-readable explanation shown to designers/players. | Describe the gameplay result. |
| bUsesBuildup | If true, hits fill a buildup meter before the status triggers. | Usually true for Poison, Bleed, Burn, and Frost. |
| BuildupThreshold | Amount required before the status becomes active. | 100 is a good starting value. |
| BuildupDecayPerSecond | How fast untriggered buildup falls over time. | Higher decay makes the status harder to trigger. |
| TriggerDuration | How long the active status remains after it triggers. | Longer for Poison, shorter for burst-like effects. |
| bClearBuildupOnTrigger | Clears buildup after the status activates. | Usually true to avoid instant repeated triggers. |
| bDealsDamageOverTime | Allows the active status to deal repeated damage ticks. | Enable for Poison or Burn. |
| DamagePerTick | Damage applied each tick while the status is active. | Start small and tune upward. |
| DamageTickInterval | Seconds between DOT ticks. | 1.0 second is easy to read and tune. |
| bDamageIgnoresBlock | If true, DOT damage bypasses block. | Good for poison pressure; disable if shields should counter it. |
| bRemoveOnDeath | Clears the status when the owner dies. | Usually true. |
| bDebugEffect | Enables effect-specific debug output when supported. | Use while tuning, then disable. |
2. Buff Data Asset
1 Create a Data Asset of type SoulsBuffDataAsset. Recommended folder: Content/SoulsMobileKit/Data/Effects.
2 Name it clearly, for example DA_Buff_AttackUp, DA_Buff_StaminaRegen, DA_Buff_DefenseUp, or DA_Buff_MoveSpeed.
3 Add one or more Modifiers. Each modifier has ModifierType, AdditiveValue, and MultiplierValue.
4 Set Duration. Use a positive duration for temporary buffs. Use 0 only for infinite/manual clear behavior.
| Property | What It Does | Designer Guidance |
|---|---|---|
| BuffId | Stable internal ID used for logs and matching. | Use names like AttackUp or StaminaRegen. |
| DisplayName | Name displayed in inventory and HUD contexts. | Keep it short. |
| Icon | Texture shown in the active effect HUD. | Use a clear icon silhouette. |
| Description | Explains the buff in human-readable text. | Example: Temporarily increases attack power. |
| Duration | How long the buff lasts. | 15-30 seconds is a good starting range for consumables. |
| Modifiers | Array of stat changes applied while active. | Use one modifier for simple buffs, multiple for rare special items. |
| ModifierType | Target stat: MaxHP, MaxStamina, AttackPower, Defense, StaminaRegen, MoveSpeed, or Custom. | Use Custom only when your own logic reads it. |
| AdditiveValue | Flat stat increase or decrease. | Example: +10 Max Stamina. |
| MultiplierValue | Multiplies the target stat. | 1.2 means +20%. |
| bRemoveOnDeath | Removes the buff on death. | Usually true for Souls-like flow. |
3. Professional Stat Modifier System
The system features a robust C++ back-end for real-time stat modification using a non-destructive calculation logic:
- Stat Types: Supports
Max HP,Max Stamina,Attack Power,Defense,Stamina Regen, andMove Speed. - Calculation Logic: Uses
(BaseValue + TotalAdditive) * TotalMultiplicativefor all stat calculations, ensuring predictable outcomes. - Stacking Awareness: Modifiers automatically scale with stack count if
bScaleMagnitudeWithStacksis enabled in the Buff Data Asset. - Safety & Cleanup: Modifiers are keyed by
BuffId. When a buff expires or the owner dies, modifiers are cleanly removed, preventing permanent "stat leaking" or corruption. - Real-time UI: Any change to
Max HPorMax Staminatriggers a UI broadcast to the Mobile HUD. TheHealthTXTandStaminaTXTelements are automatically updated to reflect the Effective Max values (e.g., displaying "1200 / 1200" instead of the base "1000 / 1000" while the buff is active).
4. Professional Stacking Rules
Both SoulsBuffDataAsset and SoulsStatusEffectDataAsset use ESoulsEffectStackPolicy. This is the core setting that decides what happens when the same buff/status is applied again while already active.
| Stack Policy | What Happens On Re-Apply | Best Use Case |
|---|---|---|
| None | The second application is ignored if the effect is already active. | Unique buffs, boss mechanics, one-at-a-time special states. |
| RefreshDuration | Remaining time resets back to the Data Asset duration. | Safe default for Attack Up, Defense Up, Stamina Regen. |
| ExtendDuration | Base duration is added to current remaining time. MaxExtendedDuration can cap it. | Consumables that should last longer when reused without becoming stronger. |
| IncreaseStacks | Stack count increases up to MaxStacks. Duration behavior is controlled by the refresh/extend toggles. | Layered poison, frost pressure, repeated status effects. |
| IncreaseMagnitude | Stack count increases up to MaxStacks, and power can scale when bScaleMagnitudeWithStacks is enabled. | Rare high-risk buffs, stronger DOT stacks, special RPG effects. |
Stacking Properties
MaxStacks: Maximum stack count. Use1for effects that should not show x2/x3.bRefreshDurationOnStack: When a stack is added, reset duration to the base duration.bExtendDurationOnStack: When a stack is added, add base duration to the current remaining duration.MaxExtendedDuration: Maximum duration allowed after extension.0means no cap.bScaleMagnitudeWithStacks: Allows stack count to increase strength. Leave false for most balanced attack buffs.StackMagnitudeMultiplier: Strength multiplier used when magnitude scaling is enabled.bShowStackCountInHUD: Allows the HUD icon to show stack text. It still hides when stack count is 1.StackDisplayFormat: Text format for stack display. Default:x{0}.
4. Combat Integration
Apply status buildup directly through weapons or enemy attacks. Equipped weapons now have dedicated properties for status effects.
| Property | Description |
|---|---|
| Status Effect On Hit | The SoulsStatusEffectDataAsset used when this weapon hits a target. |
| Status Buildup On Light Hit | Amount of buildup applied per light attack hit. |
| Status Buildup On Heavy Hit | Amount of buildup applied per heavy attack hit. |
Weapon Status Flow
- The weapon Blueprint owns the status settings, for example
BP_StafforBP_Sword_002. - When the combat component confirms a hit, it reads the current weapon defaults.
- If
StatusEffectOnHitis valid, the target must haveUSoulsStatusEffectComponent. - Light attacks use
StatusBuildupOnLightHit. - Heavy attacks use
StatusBuildupOnHeavyHit. - When buildup reaches
BuildupThreshold, the status triggers and appears in the HUD active effects list.
5. Inventory Item Use
Consumables can now apply buffs or cleanse negative status effects.
- Heal Amount: Restores HP immediately when the item is used.
- Buff To Apply On Use: Triggers a buff (e.g., Attack Up) when the item is used.
- Status Effect To Cleanse On Use: Instantly clears a specific status (e.g., Poison Moss).
- Clear All Negative Status On Use: Wipes all active status effects (e.g., Divine Blessing).
- Consume On Use: Removes one quantity from the stack after successful use if enabled.
DA_Item_AttackBuff can set BuffToApplyOnUse = DA_Buff_AttackUp. DA_Item_StaminaBuff can set BuffToApplyOnUse = DA_Buff_StaminaRegen. A cure item can set StatusEffectToCleanseOnUse = DA_Status_Poison.
6. HUD & UI Feedback
The Mobile HUD has been enhanced with numeric stat tracking and an active effect tracker:
- Numeric HP/Stamina: Added
HealthTXTandStaminaTXT(BindWidgetOptional) toUSoulsMobileHUD. Visibility can be toggled viabShowHealthTextandbShowStaminaTextin the HUD class defaults. When disabled, the widgets are collapsed completely and stale values are not shown. - Active Effects List: Added
ActiveEffectsList(PanelWidget) to HUD. Dynamically populates withUSoulsEffectIconWidgetinstances for active buffs and triggered statuses. - Radial Cooldown Overlay:
USoulsEffectIconWidgetnow supports an optionalRadialProgressImage(UImage). By assigning aRadialProgressMaterial, the icon will visually drain/fill based on remaining duration (using 'Percent' or 'Progress' scalar parameters). - Professional Stacking: Icons now support dynamic stack counts and formatting. Use
bShowStackCountInHUDandStackDisplayFormat(e.g., "x{0}") in the effect data asset to configure visuals.
| HUD Widget / Setting | Required Name | Behavior |
|---|---|---|
| Health Text | HealthTXT | Optional TextBlock for numeric health. Controlled by bShowHealthText. |
| Stamina Text | StaminaTXT | Optional TextBlock for numeric stamina. Controlled by bShowStaminaText. |
| Active Effects Panel | ActiveEffectsList | PanelWidget that receives active effect icons under the stamina area. |
| Show Active Effects | bShowActiveEffects | Disables the active effect tracker when false. |
| Effect Icon Class | EffectIconWidgetClass | Set this to WBP_SoulsEffectIcon. |
| Refresh Interval | EffectsRefreshInterval | Timer interval for remaining seconds and radial progress updates. |
7. WBP_SoulsEffectIcon Setup
WBP_SoulsEffectIcon should inherit from SoulsEffectIconWidget. C++ uses optional bind widgets, so missing widgets will not crash, but the following names are recommended for the full status and buff UI.
| Widget | Required? | Purpose |
|---|---|---|
| EffectIconImage | Recommended | Main image for the active buff or status icon. |
| RemainingTimeText | Recommended | Shows integer seconds such as 12, 5, or 1. |
| StackText | Recommended | Shows x2, x3, etc. Hidden when stack count is 1 or when the Data Asset disables HUD stack count. |
| StackIconImage | Optional | Optional support image for a custom stack layout. |
| RadialProgressImage | Optional | Image used for the MMO-style radial expiry overlay. |
SoulsEffectIconWidget respects the font sizes and layout set in WBP_SoulsEffectIcon. Enable bOverrideTextStyle only if you want C++ to force RemainingTimeFontSize and StackFontSize.
8. Radial Cooldown Overlay
The radial overlay is optional. CooldownPercent moves from 1.0 to 0.0 as the effect expires. If a UI material is assigned to RadialProgressMaterial, C++ pushes the value into a scalar parameter named Percent or Progress.
- Add an Image named
RadialProgressImagetoWBP_SoulsEffectIcon. - Assign a UI material to
RadialProgressMaterial. - The material should expose
PercentorProgress. - If no material is assigned, the icon still works with image, time text, and stack text.
9. Inventory & Weapon Effects
Selecting an item in the inventory now displays comprehensive effect information in the details panel:
- Consumables: Displays healing amounts, buff descriptions, and stacking rules (e.g., "Reapply: Extends duration").
- Weapons: Now automatically detects and displays
StatusEffectOnHitand buildup values directly from the weapon class defaults. - Scaling Awareness: If a weapon's status effect supports scaling, the inventory will highlight "Power scales with stacks" to inform the player.
- Required Item Fields: Weapon items must have
WeaponClassset so the inventory can readASoulsWeaponBasedefaults. - Required Details Panel: The inventory widget uses the selected item effect panel to add text lines for healing, buffs, cleanses, and weapon status info.
| Displayed Line | Source | Meaning |
|---|---|---|
+ Buff: [Buff Name] | BuffToApplyOnUse | The selected consumable applies this buff on use. |
Stacks: Up to [MaxStacks] | Buff/Status stack settings | The effect supports multiple stacks. |
Power scales with stacks | bScaleMagnitudeWithStacks | Stacks are allowed to increase strength, not only display x2/x3. |
Reapply: Refreshes duration | RefreshDuration | Using the same buff again resets the timer. |
Reapply: Extends duration up to [seconds]s | ExtendDuration and MaxExtendedDuration | Using the same buff again adds time, optionally capped. |
+ Cleanses: [Effect Name] | StatusEffectToCleanseOnUse | The item clears one specific status. |
+ Cleanses All Negative Effects | bClearAllNegativeStatusOnUse | The item clears all negative statuses. |
On Hit: [Effect Name] | Weapon class default StatusEffectOnHit | The selected weapon can apply this status on hit. |
Light Buildup: [Value] | Weapon class default StatusBuildupOnLightHit | Buildup amount applied by light hits. |
Heavy Buildup: [Value] | Weapon class default StatusBuildupOnHeavyHit | Buildup amount applied by heavy hits. |
10. Recommended Example Assets
| Asset | Important Settings | Expected Result |
|---|---|---|
| DA_Buff_AttackUp | ModifierType = AttackPower, MultiplierValue = 1.2, Duration = 20, StackPolicy = ExtendDuration, MaxStacks = 1, bScaleMagnitudeWithStacks = false. |
Repeated use extends or refreshes time without multiplying damage endlessly. |
| DA_Buff_StaminaRegen | ModifierType = StaminaRegen, MultiplierValue = 1.25, Duration = 20, StackPolicy = RefreshDuration. |
Safe stamina recovery buff for mobile combat pacing. |
| DA_Status_Poison | EffectType = Poison, BuildupThreshold = 100, bDealsDamageOverTime = true, DamageTickInterval = 1, optional StackPolicy = IncreaseStacks, optional MaxStacks = 3. |
Repeated triggers can show x2/x3 if HUD stack display is enabled. |
| DA_Status_Bleed | EffectType = Bleed, BuildupThreshold = 100, short TriggerDuration, StackPolicy = RefreshDuration or IncreaseMagnitude. |
Works as pressure now, with room for a later burst-damage implementation. |
| DA_Item_AttackBuff | ItemType = Consumable, BuffToApplyOnUse = DA_Buff_AttackUp, bConsumeOnUse = true. |
Using the item applies the buff, shows a HUD icon, and displays buff details in inventory. |
| BP_Staff / BP_Sword_002 | StatusEffectOnHit = DA_Status_Bleed, StatusBuildupOnLightHit = 35, StatusBuildupOnHeavyHit = 60. |
The inventory shows on-hit status information, and combat applies buildup to valid targets. |
11. Manual Validation
| Test | Steps | Expected Result |
|---|---|---|
| HUD Text Toggle | Open WBP_SoulsMobileHUD, disable Show Health Text and Show Stamina Text, then Play. | HealthTXT and StaminaTXT are fully hidden/collapsed. |
| Buff Use | Pick up DA_Item_AttackBuff, open inventory, use it. | Buff applies, item quantity updates, HUD icon appears with remaining seconds. |
| Stack Policy | Use the same buff/status multiple times with different stack policies. | Refresh, extension, stack count, or magnitude behavior matches the Data Asset settings. |
| Radial Overlay | Assign RadialProgressMaterial and use a timed buff. | Radial progress moves from full to empty as remaining duration decreases. |
| Weapon Status Details | Select a weapon item whose WeaponClass has StatusEffectOnHit. | Inventory details show On Hit, Light Buildup, and Heavy Buildup. |
| Combat Buildup | Equip a weapon with status buildup and attack an enemy/player that has USoulsStatusEffectComponent. | Buildup accumulates, status triggers at threshold, and the active effect appears in HUD. |
WEAPON ABILITIES
Weapon Abilities
Setup for active weapon skills, action data assets, mobile buttons, and safe Action System rules.What This MVP Does
Weapon Abilities are special actions owned by the currently equipped weapon. They allow weapons to feel different in gameplay, not only different in damage numbers.
The weapon points to a SoulsActionDataAsset, the player presses a HUD or input button, and the existing USoulsActionComponent handles stamina, cooldown, alive/grounded checks, busy state, and montage playback rules.
- Designer-facing: create or edit a
SoulsActionDataAssetand assign it to a weapon Blueprint. - Player-facing: press the mobile ability button or the mapped input action to trigger the equipped weapon skill.
- Safe fallback: if the weapon has no ability, the input does nothing safely. With Action System debug enabled, the Output Log can explain why.
- Current example: a sword-style
Forward Slashor generalAbility Attackusing an existing attack montage.
1. Required Assets
| Asset | Recommended Name | Purpose |
|---|---|---|
| Action Data Asset | DA_Action_Sword_ForwardSlash or DA_Action_Ability |
Stores the ability id, display name, action type, montage, stamina cost, cooldown, and safety rules. |
| Weapon Blueprint | BP_Sword, BP_Axe_001, or any child of SoulsWeaponBase |
Owns the WeaponAbilityAction reference. This makes the ability weapon-specific. |
| Mobile HUD Button | WeaponAbilityButton |
Optional mobile button in WBP_SoulsMobileHUD. The C++ binding is optional-safe, so missing buttons do not crash. |
| Animation Montage | Any clear attack montage, for example a charge or forward slash montage | Visualizes the ability. Use an existing montage first, then replace it later with a custom weapon art montage. |
2. Action Data Asset Settings
Create or open a SoulsActionDataAsset. These are the recommended first-test values for a safe sword-style ability.
| Field | Recommended Value | Why It Matters |
|---|---|---|
| Action Id | SwordForwardSlash or AbilityAttack |
Internal id used by cooldown tracking and logs. Keep it stable and without spaces. |
| Display Name | Forward Slash or Ability Attack |
Readable name for UI, debug, and future inventory/action descriptions. |
| Action Type | Weapon Ability |
This is mandatory. It tells ResolveActionForType to look for the equipped weapon ability slot. |
| Action Montage | A sword/weapon attack montage | Use a clear existing montage first. The ability can be made unique later with lunge, guard break, VFX, or custom notifies. |
| Action System Plays Montage | Off first, turn On only if no animation plays |
Some existing combat paths may already play montages. If stamina/cooldown works but no animation appears, enable this. If the animation double-plays, disable it. |
| Stamina Cost | 30 |
Makes the ability feel special without being free to spam. |
| Cooldown | 2.0 |
Prevents repeated instant use and proves cooldown integration is working. |
| Can Be Buffered | Off for the first test |
Keeps the first validation simple. Turn this on later after the basic button-to-ability flow is stable. |
| Buffer Window | 0.25 |
Only matters if buffering is enabled later. |
| Can Interrupt Self | Off |
Stops the ability from restarting itself while already active. |
| Can Interrupt Other Actions | Off |
Keeps dodge, attack, block, and other busy states stable for the first MVP. |
| Requires Grounded | On |
Prevents accidental air activation until aerial abilities are intentionally designed. |
| Requires Alive | On |
Prevents dead or respawning characters from starting abilities. |
| Requires Enough Stamina | On |
Connects the ability to the existing stamina economy. |
| Fail Reason | Cannot use weapon ability |
Optional user/debug text for failed attempts. |
| Action Tag | Weapon.Ability.Sword |
Optional organization tag for future UI, analytics, or special logic. |
Action System Plays Montage disabled. If the button consumes stamina and starts cooldown but the character does not animate, enable it and test again. If the animation plays twice or feels duplicated, disable it again.
3. Key Fields & Setup
| Field / Component | Purpose |
|---|---|
| WeaponAbilityAction UInputAction* |
Enhanced Input binding in SoulsCharacterBase. Map it to a keyboard, gamepad, or touch-friendly input action. |
| WeaponAbilityButton UButton* |
Optional widget binding in SoulsMobileHUD using BindWidgetOptional. When clicked, it calls the character's weapon ability entry point. |
| WeaponAbilityAction USoulsActionDataAsset* |
Assigned on the equipped ASoulsWeaponBase Blueprint. This is the per-weapon action override that makes one weapon have a special skill and another weapon have none. |
4. Logic Flow
- WBP_SoulsMobileHUD Button Press
- Enhanced Input WeaponAbilityAction
- TryWeaponAbility Checks weapon
- ResolveActionForType Finds Data Asset
- Stamina Check Spend stamina
- Cooldown Start timer
- Montage Play animation
5. Manual Setup Steps
1 Create the action: Create a SoulsActionDataAsset named DA_Action_Sword_ForwardSlash or use the existing DA_Action_Ability.
2 Set action identity: Set Action Id to SwordForwardSlash, Display Name to Forward Slash, and Action Type to Weapon Ability.
3 Set action cost: Set Stamina Cost to 30 and Cooldown to 2.0.
4 Set action rules: Disable Can Be Buffered for the first test. Keep Requires Grounded, Requires Alive, and Requires Enough Stamina enabled.
5 Assign animation: Assign a weapon attack montage to Action Montage. Leave Action System Plays Montage off first unless the ability does not animate during testing.
6 Link the weapon: Open the weapon Blueprint and assign the action asset to its WeaponAbilityAction property.
7 Link the HUD: In WBP_SoulsMobileHUD, add or confirm a button named WeaponAbilityButton. The C++ HUD binding will use it if present.
8 Playtest: Equip the weapon, press the ability button, and confirm animation, stamina cost, cooldown, and safe failure behavior.
6. Safety Validation: No Ability Weapon
Ensuring that the weapon ability system handles weapons without assigned abilities gracefully is critical for a stable production experience. A weapon without an ability should fail safely without consuming resources or causing side effects.
No Ability Weapon Safety Test
The system is designed to "fail safely" if a player attempts to use a weapon skill on a weapon that has no WeaponAbilityAction (and no moveset-level ability).
- Safe Return:
ASoulsCharacterBase::TryWeaponAbilityreturnsfalseimmediately. - No Side Effects: No stamina is consumed, no montages are played, and no internal action states are changed.
- Debug Logging: If
bDebugActionSystemis enabled on the character, the Output Log will explicitly state:[Souls Action] No weapon ability assigned.
- Equip a weapon without a
WeaponAbilityActionassigned (e.g., a basic starter weapon). - Press the WeaponAbilityButton on the Mobile HUD or the mapped key.
- Verify: No animation plays, no stamina bar movement, and character remains in the Idle state.
- Verify: Check the Output Log for the "No weapon ability assigned" message.
7. Manual Validation Checklist
| Test | Expected Result |
|---|---|
| Ability button with valid weapon | The character starts the ability action and plays the selected montage if montage playback is configured correctly. |
| Stamina cost | Stamina decreases by the action's Stamina Cost. |
| Cooldown | Repeated button presses do not spam the ability during the cooldown window. |
| Low stamina | The ability does not start when Requires Enough Stamina is enabled and stamina is too low. |
| No ability assigned | Pressing the button on a weapon with no WeaponAbilityAction does not crash and does not trigger a random fallback attack. |
| No HUD button | The HUD still opens and runs because WeaponAbilityButton is optional. |
8. Common First-Test Problems
| Problem | Likely Cause | Fix |
|---|---|---|
| Button works, stamina changes, but no animation plays. | Action System Plays Montage is off and no other system is playing the montage. |
Enable Action System Plays Montage on the ability action and test again. |
| Animation plays twice or feels duplicated. | Both the Action System and existing combat path are playing animation. | Disable Action System Plays Montage. |
| Ability never starts. | Wrong Action Type, low stamina, cooldown active, no weapon ability assigned, or character is busy. |
Confirm Action Type = Weapon Ability, check stamina, wait for cooldown, and confirm the weapon Blueprint points to the action asset. |
| Ability works on one weapon but not another. | The second weapon has no WeaponAbilityAction. |
Assign an action asset to that weapon, or leave it empty intentionally for weapons without special skills. |
bDebugActionSystem is enabled on the character, a log message "No weapon ability assigned" will appear in the Output Log.
9. Weapon Ability Forward Lunge
Purpose
The Forward Lunge option makes the first Weapon Ability feel like a real weapon art instead of a normal attack montage. When enabled on a Weapon Ability action, the character moves forward over a short duration while the ability is executing.
This is useful for sword slashes, axe rushes, guard-break attacks, and any short-range special attack that should close a small gap. It should stay optional because not every ability should move the player: buffs, ranged casts, defensive arts, and stationary heavy slams may feel better with lunge disabled.
| Lunge Setting | Recommended Value | Meaning |
|---|---|---|
| bUseForwardLunge | On for Forward Slash, Off by default |
Enables the lunge movement only for this action. Keep it off for abilities that should not move the character. |
| ForwardLungeDistance | 250 |
Total travel distance in Unreal units. Use 150 for subtle movement, 250 for a clear slash, and avoid going above 350 until the attack is tuned. |
| ForwardLungeDuration | 0.18 |
How long the forward movement lasts. Lower values feel snappier; higher values feel heavier and easier to read. |
| ForwardLungeSpeedMultiplier | 1.0 if available |
Optional tuning multiplier. Keep it neutral for the first pass, then adjust only if distance and duration are not enough. |
Forward Lunge Setup
1 Open DA_Action_Sword_ForwardSlash or the current Weapon Ability action.
2 Search for Lunge in the Details panel.
3 Enable bUseForwardLunge.
4 Set ForwardLungeDistance = 250 and ForwardLungeDuration = 0.18.
5 Save the Data Asset, equip the weapon that references it, and press WeaponAbilityButton.
| Forward Lunge Test | Expected Result |
|---|---|
| Press ability on flat ground | The character plays the ability and moves forward a short distance. |
| Cooldown spam test | The character should not lunge repeatedly while cooldown is active. |
| Low stamina test | The lunge should not start if the action cannot start due to stamina rules. |
| No ability assigned | No lunge occurs and no crash happens. |
10. Weapon Abilities & Movesets
Overview
The weapon ability and moveset system extends combat from generic light/heavy attacks into specialized, weapon-driven behavior. Each weapon can have a unique Weapon Ability and a comprehensive Moveset that defines its mechanical identity.
The system relies on SoulsActionDataAsset for ability logic, WeaponAbilityAction on the weapon blueprint, and SoulsWeaponMovesetDataAsset for organizing actions and montages with a strict resolution priority: Moveset > Weapon Override > Legacy Fallback.
1. Weapon Ability Action Data
Weapon abilities are defined as USoulsActionDataAsset with the following core properties:
| Field | Purpose |
|---|---|
| Action Id | Unique identifier for the action system. |
| Display Name / Description | UI metadata used in the inventory details panel. |
| Action Type | Must be set to Weapon Ability for proper resolution. |
| Action Montage | The animation montage played when the ability is triggered. |
| Action System Plays Montage | Should be True for the standard ability flow. |
| Stamina Cost / Cooldown | Resource rules applied when the action starts. |
2. Forward Lunge
Used to give abilities a "gap closer" feel or extra momentum.
- Use Forward Lunge: Enables the movement component during the action.
- Distance: Total units traveled over the duration.
- Duration: Time in seconds for the lunge to complete.
Usage Tip: Keep lunge OFF for stationary abilities (like buffs or ground slams) and ON for dashes, leaps, or lunging thrusts.
3. Impact Profile
Allows abilities to use combat tuning separate from standard weapon hits.
- Use Ability Impact Profile: Enables ability-specific multipliers.
- Damage Multiplier: Scales raw damage (e.g.,
1.5for 50% more damage). - Knockback Multiplier: Scales target reaction force.
- Guard Break: Marks the attack as high guard pressure.
- Guard Break Stamina Damage: Extra pressure against blocking targets.
- Heavy Hit Reaction: Forces a stronger stagger animation on the target.
4. Feedback Fields (Optional Polish)
The system provides dedicated fields for audio-visual feedback. These are considered optional polish and do not block the ability logic if left empty.
- Ability Start/Impact Sound
- Ability Start/Impact VFX
- Feedback Socket Name (Character or Weapon socket)
5. Weapon Moveset Data
The SoulsWeaponMovesetDataAsset acts as a container for a weapon's entire kit.
- Moveset Id / Name: Identity metadata.
- Weapon Ability Action: The shared ability asset for this moveset.
- Weapon Ability Montage: The specific animation for this weapon type.
- Action Fallbacks: Light, Heavy, Dodge, and Block fields can be left empty to use the current engine fallbacks.
Reference Examples
- Action: DA_Action_Sword_ForwardSlash
- Moveset: DA_Moveset_Sword
- Stamina: 30 | Cooldown: 2.0s
- Lunge: 250 units / 0.18s
- Impact: x1.35 Dmg | x1.25 KB
- Guard Break: Enabled
- Action: DA_Action_Axe_Cleave
- Moveset: DA_Moveset_Axe
- Stamina: 40 | Cooldown: 3.0s
- Lunge: 150 units / 0.22s
- Impact: x1.65 Dmg | x1.6 KB
- Heavy Reaction: Enabled
6. No-Ability Safety
The system is architected to handle weapons without assigned abilities gracefully:
- Pressing input (Keyboard 'R' or Mobile Button) triggers a safe "no action" path.
- Stability: No crashes occur when
WeaponAbilityActionis null. - Resources: No stamina is consumed if the ability cannot fire.
- Logic: No stuck states; previous abilities are cleared upon weapon swap.
7. Inventory Ability Details
The SoulsInventoryWidget provides full transparency for weapon properties:
- Content: Displays Moveset, Ability Name, Description, Costs, Lunge, and Impact multipliers.
- ScrollEffect: Long descriptions are contained within a dedicated
ScrollBox, ensuring they never overflow the UI panel or cover HUD buttons.
Setup Checklist
| Check | Expected Result |
|---|---|
| Trigger Sword Ability | Animation plays, lunges 250 units, costs 30 stamina. |
| Trigger Axe Ability | Animation plays, lunges 150 units, deals heavy damage/knockback. |
| Weight/Feel Difference | Axe feels noticeably heavier and slower than Sword. |
| No-Ability Test | Input does nothing, character remains stable, no stamina loss. |
| Inventory Selection | All ability stats (Dmg, KB, Cost, Cooldown) are visible. |
| Inventory Overflow | Long text uses ScrollBox; HUD buttons remain accessible. |
| Input Methods | Keyboard (R) and Mobile HUD button both trigger the ability. |
| Core Stability | The project builds and launches without missing dependencies. |
ScrollEffect without overflowing the UI.
WORLD MODULES
Vendor NPC System
Implementing merchants, trade logic, and item economy.Merchant Backend
The ASoulsVendorNPC provides a robust C++ backend for creating interactive merchants. It handles item stock, pricing overrides, and secure transactions between the player's inventory and Souls currency.
Create a Blueprint class from SoulsVendorNPC, place it in the level, set its Interaction Prompt to a short label such as Trade, and populate the vendor stock list in the Details panel.
1. Stock Management
Vendors use a Stock list of FSoulsVendorStockEntry structures. Each entry allows for detailed control over the merchant's inventory:
- Item Data: The
USoulsItemDataAssetto be sold. - Quantity: Available amount. Limited stock decreases with each purchase.
- Buy Price Override: Manually set a price. If set to
-1, the system uses theValuedefined in the Item Data Asset. - Infinite Stock: If enabled, the item never runs out regardless of quantity.
Quantity = 3, Buy Price Override = 25, and Infinite Stock disabled. This makes it easy to verify that purchases reduce stock and eventually fail when the item runs out.
2. Trade Logic
System verifies player has enough Souls and vendor has enough stock before completing the swap.
Players can sell items at a multiplier (default 50%). Equipped items and Key Items are protected from sale.
- Buy checks: the vendor verifies the player has enough Souls, the item data is valid, and limited stock is still available.
- Buy result: the item is added to the player inventory, Souls are removed, and limited stock decreases by the purchased quantity.
- Sell checks: protected items cannot be sold when they are equipped, marked as key items, or blocked by item rules.
- Sell result: the item is removed from inventory and Souls are awarded using the item value multiplied by the vendor sell multiplier.
3. Blueprint Integration
The system provides several hooks for UI development and custom logic:
| Event/Function | Description |
|---|---|
OnVendorOpened | Fired when a player interacts with the NPC. Use this to open your Trade UI. |
BuyItem | Executes the purchase logic and broadcasts success/fail events. |
SellItem | Executes the sale logic and adds Souls to the player's stats. |
OnBuySucceeded | Fired when a transaction is successful. |
OnBuyFailed | Fired when the player lacks Souls, the stock entry is invalid, or the vendor has no remaining stock. |
OnSellSucceeded | Fired when an item is removed from inventory and Souls are awarded. |
OnSellFailed | Fired when the item cannot be sold, is missing, or is protected by item/equipment rules. |
4. Creating a Vendor Blueprint
1 In the Content Browser, create a new Blueprint Class and choose SoulsVendorNPC as the parent.
2 Name it BP_SoulsVendor and place it under Content/SoulsMobileKit/Blueprints/Interaction.
3 Add a simple mesh or character visual component, then compile and save.
4 Set Interaction Prompt to Trade and keep Can Interact enabled.
5 Add one or more entries to Stock, assigning item data, quantity, price override, and infinite-stock behavior.
6 Assign VendorWidgetClass to WBP_SoulsVendor and keep bOpenVendorWidgetOnInteract enabled.
7 Place the Blueprint in the level and interact with it to open the shop UI.
5. Vendor Trade UI
The included trade UI uses USoulsVendorWidget and USoulsVendorItemRowWidget. It is designed for a mobile-readable shop screen with square item tiles, Buy/Sell tabs, item details, feedback text, and transaction buttons.
| Widget Name | Type | Purpose |
|---|---|---|
BuyScroll / SellScroll | ScrollBox | Scrollable containers for large vendor stock and player inventory lists. Set clipping to bounds so item tiles cannot draw over the header or buttons. |
BuyList / SellList | WrapBox | Grid containers for square item rows. Put each WrapBox inside its matching ScrollBox for product grids that wrap into new rows. |
BuyTabButton / SellTabButton | Button | Switches the UI between vendor stock and player inventory selling mode. |
BuyButton / SellButton | Button | Executes the selected buy or sell transaction. These names must match exactly for automatic binding. |
CloseButton | Button | Closes the shop and restores normal gameplay input. |
Info or InfoPanel | Panel Widget | Optional details panel. It stays hidden until an item row is selected. |
FeedbackText | TextBlock | Shows transaction results such as Purchased, Sold, Sold Out, or Not enough Souls. |
imageinfo, SoulsIcon, or PriceIcon | Image | Optional item/price images. These should be hidden when no item is selected. |
BuyScroll > BuyList and SellScroll > SellList. The ScrollBox owns the fixed visible area and scrolling; the WrapBox owns the square product grid. Keep the Buy/Sell transaction buttons outside the scroll area so item rows cannot cover them.
6. Item Row Widget
WBP_SoulsVendorItemRow should use SoulsVendorItemRowWidget as its parent. A square row works best for mobile shops because it keeps icons, price, quantity, and sold-out state readable.
| Widget Name | Purpose |
|---|---|
SelectButton | The clickable area for selecting the row. |
IconImage | Displays the item icon when available. |
ItemNameText | Displays the item name. |
PriceText | Displays buy or sell price. |
QuantityText | Displays stock quantity or owned quantity. |
SoldOutText | Shown when limited stock reaches zero. |
7. Transaction Behavior
- Selection required: pressing
BuyButtonorSellButtonwithout a selected row shows feedback instead of changing inventory. - Infinite stock: after purchase, the row remains selected and visible because the vendor can keep selling the same item.
- Limited stock: stock quantity decreases after each purchase. When quantity reaches zero, the row becomes sold out or is removed from the active purchase list.
- Selling: selling removes or decreases the player inventory item immediately and awards Souls using the vendor sell-price rules.
- Protected items: equipped items, key items, and non-sellable items fail safely and remain in the inventory.
- Feedback: transaction messages appear only when useful, such as successful purchase, successful sale, sold out, invalid item, protected item, or not enough Souls.
8. Sell Price Rules
Vendors can calculate sell prices from the item data asset or from vendor stock when appropriate.
- SellPriceMultiplier: default value such as
0.5means selling returns half of the base value. - Buy Price Override: if the item exists in vendor stock and stock pricing is allowed for sell calculations, the override can be used as the base value.
- Item Data Value: if the item is not in vendor stock, the system uses the item data asset's value.
- Default Item Value: if no valid value exists, the vendor uses a safe fallback such as
10. - Final formula: sell price is clamped to at least
1Soul after applying the multiplier.
9. Manual Validation Checklist
| Test | Expected Result |
|---|---|
Open a vendor with VendorWidgetClass = WBP_SoulsVendor. | The shop opens, shows current Souls, and displays vendor stock in the Buy grid. |
Select a stock item and press BuyButton with enough Souls. | The item enters inventory, Souls decrease, and limited stock quantity updates. |
| Try to buy with insufficient Souls. | The transaction fails and feedback explains the reason. |
| Buy an infinite-stock item. | The row remains visible and selected after purchase. |
| Buy a limited-stock item until quantity reaches zero. | The row becomes sold out or disappears and cannot be bought again. |
Switch to Sell mode, select a normal item, and press SellButton. | The item quantity decreases or is removed, and Souls increase immediately. |
| Try selling an equipped weapon or key item. | The sale fails and the protected item remains in the inventory/equipment slot. |
| Save at a Bonfire after buying/selling, then restart play. | Inventory, Souls, and limited vendor stock remain at the saved values. |
| Add many stock entries and scroll. | Rows remain clipped inside the product area and never cover the title or transaction buttons. |
SaveGameNow after important trade flows to persist purchases, sales, and sold-out limited stock.
WORLD MODULES
NPC Dialog System
Lightweight, data-driven NPC interactions with world flag conditions and rewards.Dialog Foundation
The ASoulsDialogNPC provides a lightweight solution for Souls-like NPC interactions. It uses USoulsDialogDataAsset to define dialog lines, speaker names, and portraits, integrated with the global Save System via World Flags.
1. Dialog Data Asset (USoulsDialogDataAsset)
Dialog is defined in a Data Asset, allowing designers to create complex branching-like logic using World Flags without full quest systems.
| Property | Description |
|---|---|
| Dialog Id | Unique name used to identify this dialog in save data, logs, and Blueprint setup. |
| Speaker Name | Display name shown in the dialog widget. |
| Lines | Array of FSoulsDialogLine. Each line can define text, optional portrait, optional voice, display time, and whether the player must press Next. |
| bRepeatable | When enabled, the NPC can repeat this dialog after completion. When disabled, completion can permanently disable the NPC interaction. |
| Required World Flags | Dialog only triggers if all these flags are marked "Completed" in the save. |
| Blocked World Flags | Dialog is hidden if any of these flags are marked "Completed". |
| Completed World Flag | Flag marked as "Completed" once the dialog finishes. |
| bMarkCompletedOnFinish | Marks the completion flag when the last line is reached or the dialog is finished cleanly. |
| Optional Reward | Give items or Souls automatically upon completion. |
| bGiveRewardOnce | Prevents duplicate rewards by granting them only the first time the dialog is completed. |
2. NPC Setup (ASoulsDialogNPC)
1 Create a Blueprint inheriting from SoulsDialogNPC.
2 Assign your DialogData asset and DialogWidgetClass (WBP_SoulsDialog).
3 Set a unique PersistentDialogId if you need to track specific NPC state beyond world flags.
4 Set the interaction prompt to a short verb such as Talk.
5 Interact with the NPC in-game to start the dialog flow.
bRepeatable is disabled and the dialog completion is saved, the NPC can automatically stop being interactable. The prompt disappears, mobile/keyboard Interact no longer opens the dialog, and the disabled state remains after save/load.
3. Widget Bindings
The USoulsDialogWidget requires specific BindWidget names in your Blueprint widget:
SpeakerNameText(TextBlock)DialogLineText(TextBlock)PortraitImage(Image, Optional)NextButton(Button)CloseButton(Button, Optional)ContinueHintText(TextBlock, Optional)
4. Integration with Save System
Dialog completion and rewards are tied to the AAA Save System:
- World Flags: Use
IsWorldFlagCompletedto check if an NPC has already spoken or if a world event has occurred. - Non-repeatable Dialogs: Non-repeatable dialogs can disable their NPC interaction after completion when saved.
- Auto-Save: The game automatically saves after a dialog finishes if a reward was given or a completion flag was marked.
- One-Time Rewards: If
bGiveRewardOnceis enabled, rewards are only granted when theCompletedWorldFlagis first set.
5. Manual Validation Checklist
- [ ] Prompt: Does the NPC show
Talkonly while it is available? - [ ] Line Flow: Does
NextButtonadvance through each dialog line and finish cleanly? - [ ] Save Flag: Does the
CompletedWorldFlagbecome saved after finishing the dialog? - [ ] Non-Repeatable: With
bRepeatabledisabled, does the NPC hide the prompt and ignore Interact after completion? - [ ] Save/Load: After saving and restarting play, does the completed non-repeatable NPC remain disabled?
- [ ] Reward Once: If a reward is configured, is it granted only once when
bGiveRewardOnceis enabled?
WORLD MODULES
Ladder / Climb System
A lightweight climb interactable with designer-friendly point generation, debug visibility, and animation hooks.Designer-Friendly Foundation
The ASoulsLadderInteractable lets designers place climbable ladders without hand-positioning every helper point in every level instance. The system can auto-generate climb and mount points from simple settings, while still allowing manual point editing for special layouts.
1. Quick Setup
1 Create or place BP_SoulsLadder in the level.
2 Keep bAutoConfigurePoints enabled for normal ladders.
3 Set LadderHeight to match the climbable height.
4 Set MountForwardOffset so the player exits safely away from the ladder face.
5 Use bShowLadderPointDebugInEditor to show or hide helper points while designing.
2. Ladder Points
The ladder uses four scene points. They are stored as relative positions on the ladder actor, so moving the ladder in the level moves all points with it.
| Point | Description |
|---|---|
| BottomPoint | Start of the climb path at the bottom. A relative location of 0,0,0 is normal when the ladder root is placed at the bottom. |
| TopPoint | End of the climb path at the top. Auto-configured from LadderHeight. |
| MountBottomPoint | Safe exit position after climbing down or cancelling at the bottom. |
| MountTopPoint | Safe exit position after reaching the top. |
3. Setup Properties
- LadderHeight: vertical climb length.
- BottomOffsetZ: bottom point offset from the actor root.
- MountForwardOffset: forward safety distance for exits.
- MountBottomOffsetZ / MountTopOffsetZ: extra vertical adjustment for exit points.
- bAutoConfigurePoints: rebuilds points from ladder settings.
- bAllowManualPointEditing: disables auto updates so designers can move points by hand.
- RebuildLadderPointsFromSettings: call-in-editor helper to regenerate points from settings.
- bShowLadderPointDebugInEditor: show point spheres/lines while editing.
- bShowLadderPointDebugInGame: show point debug during Play.
- DebugPointSize / DebugLineThickness: visual size controls.
4. Climbing Behavior
- Interact: the player presses Interact near the ladder to enter climb mode.
- Movement: forward/backward input moves the player up and down between
BottomPointandTopPoint. - Restrictions: attacks, heavy attacks, abilities, dodge, jump, and normal movement are blocked while climbing.
- Exit: the player exits at
MountTopPointorMountBottomPoint, then returns to normal walking movement.
5. Animation Hooks
Animation is optional. If no montages are assigned, the ladder still works using simple movement. Projects can later assign enter, loop, and exit montages or use Blueprint events for custom animation logic.
BottomPoint having a relative location of 0,0,0 is expected. The bug to avoid is using world origin as a fallback. Valid ladders should have a meaningful distance between BottomPoint and TopPoint, and all movement should use the point locations from the placed ladder actor.
6. Manual Validation Checklist
- [x] Place
BP_SoulsLadderin the level. - [x] Change
LadderHeightand confirmTopPointplusMountTopPointupdate. - [x] Change
MountForwardOffsetand confirm mount points move away from the ladder. - [x] Toggle
bShowLadderPointDebugInEditorto show/hide point visualization. - [x] Enable
bAllowManualPointEditingonly for special ladders that need hand-placed points. - [x] Press Interact at the bottom and verify the player climbs without teleporting to world origin.
- [x] Reach the top and verify the player exits at
MountTopPoint.
ENEMY MODULES
AI & Boss Foundation
Sophisticated enemy behaviors and boss-level combat logic.Boss System
Bosses feature specialized attack patterns and health-based transitions. Enabling bIsBoss on SoulsEnemyBase activates the boss HUD range flow, while Boss Phases defines how the encounter changes as health drops.
Standard moveset and readable aggression levels.
Unlocked at lower health thresholds with stronger abilities and transition feedback.
Boss HP HUD Integration
Professional mobile-first Boss Health display with support for multiple phases and proximity-based visibility. The HUD automatically syncs with the boss's status component and handles range-based detection.
Setup Instructions:
- Create a Widget Blueprint inheriting from SoulsBossHealthWidget (e.g.,
WBP_SoulsBossHealth). - Assign this class to the Boss Health Widget Class property in your main
WBP_SoulsMobileHUD. - In your Boss Enemy Blueprint, enable bIsBoss and bShowBossHealthHUD.
- Configure Boss Display Name and Boss HUD Range (distance at which the HUD appears).
Required Component Bindings:
Ensure your WBP_SoulsBossHealth contains these components with exact names for native C++ binding:
| Name | Type | Purpose |
|---|---|---|
BossHealthBar | ProgressBar | Displays current HP percentage. |
BossHealthText | TextBlock | Displays current and maximum HP, for example 500 / 1000. |
BossNameText | TextBlock | Displays the Boss Display Name. |
BossPhaseText | TextBlock | Displays the current phase label from Phase Display Name, or a safe default if no name is set. |
BossPhaseIconsBox | PanelWidget | Container (Horizontal Box) for dynamic phase icons. |
Phase Icon Setup:
To enable phase icons, create a separate Widget Blueprint inheriting from SoulsBossPhaseIconWidget (e.g., WBP_SoulsBossPhaseIcon). Assign it to Boss Phase Icon Widget Class in your health widget settings.
- Required Child: An Image component named
IconImagewith Is Variable enabled. - Custom Icon Source: Assign
Phase Iconinside each entry of the boss'sBoss Phasesarray. The HUD passes that texture into the icon widget automatically. - Behavior: Icons represent configured boss stages. Completed stages use the inactive tint, while current and remaining stages use the active tint.
- Fallback: If no icon widget is assigned, the system skips rendering icons safely without errors.
Advanced Multi-Phase Setup
Create complex boss encounters with unlimited phases using the data-driven Boss Phases system. Each phase can have its own health threshold, cinematic transition, and unique ability set.
Configuration:
- bUseBossPhases: Enable this to activate multi-phase logic on the boss.
- Boss Phases Array: Add entries for each phase of the fight.
- Phase Display Name: Custom label shown in the HUD (e.g., "Enraged" or "Final Form").
- Phase Icon: Optional custom texture for the HUD phase indicator.
- Health Threshold: Health percentage (0.0 to 1.0) required to enter this phase.
- AI Abilities: The set of abilities the boss will prioritize in this phase.
- Transitions: Configure optional Montage, Sound, and VFX to play when the phase starts. The boss can stop movement, pause AI decisions, and resume combat after the transition completes.
- Behavioral Flags:
- Stop Movement: Immediately halts all movement and AI pathing when the transition starts.
- Can Take Damage During Transition: Controls if the player can damage the boss while the transformation is playing.
- Allow Rotation During Transition: If enabled, the boss can continue facing the player during the transition. Keep it disabled for rooted cinematic transformations.
- Prevent AI Decisions: Pauses all combat and ability logic until the transition completes.
HUD Synchronization:
The Boss HP HUD automatically reads the Boss Phases array to determine the total number of phase icons and displays the current Phase Display Name. If no name is provided, it defaults to "Phase X". This ensures a consistent professional look regardless of encounter complexity.
Recommended Three-Stage Setup:
| Entry | Health Threshold | Example Name | Use |
|---|---|---|---|
| 0 | 1.0 | Guardian | Opening moveset. |
| 1 | 0.66 | Enraged | Faster or wider attacks. |
| 2 | 0.33 | Final Stand | Most dangerous ability set. |
Manual Test:
- Place a boss with
bIsBoss,bShowBossHealthHUD, andbUseBossPhasesenabled. - Add two or more entries to
Boss Phasesand assign different display names. - Assign a transition montage to a later entry and keep movement/AI lockout enabled.
- Enter the HUD range, damage the boss below the next threshold, and confirm the boss stops, plays the transition, then resumes combat.
- Confirm the Boss HP bar, health text, phase label, and phase icons update during the fight.
USER EXPERIENCE
Interaction & HUD Polish
Refined mobile-first interfaces and interaction mechanics.1. Souls Recovery System
Upon death, the player drops their current Souls at the death location, creating a Bloodstain. This recovery pickup persists across sessions but is lost if the player dies again before recovering it.
- Auto-Tracking: The engine automatically tracks the latest death location and soul count.
- Persistence: The bloodstain is saved to the active slot and survives game restarts.
- Double Death: Only one bloodstain can exist at a time. A new death overwrites the previous one.
2. Quick Item HUD Logic
The mobile HUD now features smart visibility and icon synchronization for equipped quick items.
- Smart Visibility: The
QuickItemButtonautomatically hides when no item is equipped and appears instantly upon equipment. - Dynamic Icons: The button displays the assigned
ItemIconfrom the data asset. If no icon is set, it falls back to the default utility icon. - Numeric Feedback: The
QuickItemTextdisplays the current stack count, updating in real-time as items are used or looted.
3. Mobile-Safe UI Flow
Critical mobile interfaces are designed to open, close, and return to gameplay without trapping touch input. Inventory and Bonfire Level Up are validated as the primary mobile flow; other optional screens can follow the same pattern if your project expands them.
- Touch Priority: HUD buttons, inventory actions, and bonfire controls remain usable with mobile-style tapping.
- Safe Input Return: Closing a menu restores movement, camera look, attack, block, dodge, interact, and inventory controls.
- Reusable Pattern: Vendor, storage, and save-slot screens can reuse the same mobile-safe open/close rules when customized for a specific game.
UI & MENUS
Mobile Settings Menu
A complete persistent settings system with live previews and save management.Core Features
- Live Preview: Layout scale and Master Volume apply instantly as you slide.
- HUD Integration: The
LayoutScaleSliderdirectly scales the entire mobile HUD in real-time. - Persistence: Settings are saved to the
SoulsSaveGamesystem and persist across restarts. - Save Management: Built-in confirmation flow for resetting or deleting save data.
1. Implementation Guide
1 Create WBP_MobileSettings inheriting from SoulsSettingsWidget.
2 Add sliders and combo boxes in the Designer.
3 Critical: Ensure your widget names match the required bindings below.
4 Configure the DeleteSaveConfirmPanel as a hidden child widget for safety.
2. Required Widget Bindings
| Widget Name | Type | Purpose |
|---|---|---|
LayoutScaleSlider | Slider | Adjusts the size of the mobile HUD (0.5x to 1.5x). |
CameraSensitivitySlider | Slider | Adjusts the look rotation speed. |
MasterVolumeSlider | Slider | Sets the global audio volume. |
GraphicsQualityComboBox | ComboBox | Switches between Low, Medium, High, and Ultra presets. |
CloseButton | Button | Saves settings and returns to game. |
ResetSaveButton | Button | Shows the delete confirmation panel. |
DeleteSaveConfirmPanel | Widget/Border | A panel that contains the confirm/cancel buttons. |
ConfirmDeleteSaveButton | Button | Permanently deletes the current save slot. |
CancelDeleteSaveButton | Button | Hides the confirmation panel. |
LevelToOpenAfterDeleteSave | Class Default | Optional level to open after the save is deleted, commonly MainMenu. |
ConfirmDeleteSaveButton will only work if it is placed inside the DeleteSaveConfirmPanel. The C++ base class handles showing/hiding this panel automatically.
3. Troubleshooting
- Game remains paused on close: The system now forces unpause and restores GameOnly input mode when the settings menu is closed. Ensure you call
CloseSettings()in C++ or Blueprint to trigger this restoration. - Graphics Quality resets: The system uses
ApplyMobileSettingsto persist quality levels to both the save file and the engine runtime (viaGameUserSettings). If settings reset, verify theGraphicsQualityComboBoxindex matches the preset level (0=Low, 3=Ultra). - Delete Save fails: The confirmation panel must be named
DeleteSaveConfirmPanelin your WBP. Deletion usesResetProjectSaveDatawhich wipes both disk and memory, returning all settings to defaults. - Returning to Menu: Delete Save can optionally return the player to a configured level such as
MainMenu. SetLevelToOpenAfterDeleteSavein the settings widget defaults to enable this transition.
UI & MENUS
Mobile Loading Screen
A professional C++ foundation for smooth, mobile-first level transitions.Native Loading Management
The SoulsLoadingScreenWidget provides a smooth transition layer that stays visible during level travel and only hides once the destination world is fully ready and save data (if any) is restored.
1. Creation & Setup
1 Create a Widget Blueprint (e.g., WBP_LoadingScreen).
2 Set the Parent Class to SoulsLoadingScreenWidget.
3 In your GameInstance Blueprint (e.g., BP_SoulsGameInstance), assign your widget to the LoadingScreenWidgetClass property.
4 Tweak LoadingScreenHideDelay (default 0.2s) to ensure the world is settled before the screen fades.
2. Required Widget Bindings
| Widget Name | Type | Requirement | Description |
|---|---|---|---|
BackgroundImage | Image | Optional | Full-screen background for the loading state. |
LogoImage | Image | Optional | Displays your game or studio logo. |
LoadingText | TextBlock | Optional | Automatically set to "Loading..." or a custom message. |
SpinnerImage | Image | Optional | An icon that rotates continuously while bAnimateSpinner is true. |
TipText | TextBlock | Optional | Displays a random tip from the Tips array. |
3. Automatic Integration
- Main Menu: Both "Tap to Start" and "Continue" automatically trigger the loading screen.
- Continue Flow: The loading screen stays active while the map loads AND while your character/inventory are being restored from the save file.
- Delete Save: When returning to the Main Menu after a reset, the loading screen ensures a clean visual transition.
- Indeterminate Progress: Mobile titles typically use spinners and tips rather than fake 0-100% bars, which often stutter during heavy map loads.
PERSISTENCE MODULE
Complete Save System
A robust, AAA-grade system for managing character progression, world state, and inventory persistence.1. Persistent Actor Setup
Make any Actor saveable by attaching a SoulsPersistentComponent. This captures the actor's state and restores it across sessions.
- PersistentId: Must be unique (e.g.,
Gate_Shortcut_01). - bSaveOpenedStatus: Automatically persists the "Opened" state. Ideal for doors and chests.
- bMarkCompletedOnInteract: Automatically marks the actor as "Completed" upon interaction.
- Transform Tracking: Optional support for saving actor location/rotation.
2. Enemy & Boss Persistence Setup
Enemies (inheriting from SoulsEnemyBase) are handled automatically by the system without needing a component.
- Save Enemy State: Enable to allow the enemy to save data to the global save. Assign a unique Enemy Persistent Id.
- Save Current Health: Captures exact HP during a save snapshot.
- Save Boss Phase: Persists phase and enrage status.
- Defeated State: If an enemy dies and
bSaveDefeatedStateis true, they remain dead permanently.
3. What is Saved?
The system uses an "Atomic Snapshot" architecture. When a save occurs, it captures the player and the live world into one save file, then restores both sides together on load.
| Category | Saved Data |
|---|---|
| Player Core | Current souls, level/progression values, base stats, health/stamina upgrade levels, and map/checkpoint location. |
| Inventory & Equipment | All item stacks and quantities, equipped right-hand/left-hand items, equipped quick item (and quantity), and inventory restore events for UI refresh. |
| Persistent World | Opened state of doors/gates, chest looted states, remaining partial chest loot, collected one-time pickups, persistent actor transforms, global custom variables, and active crafting jobs. |
| NPC & AI State | Vendor stock, dialog completion flags, enemy death states, elite enemy HP, and boss phase states. |
4. Runtime Restore Coverage
Loading a slot does more than replace the player inventory. The save manager also refreshes live world actors after the save file is loaded, so testing from the Developer Hub or a custom menu matches the normal in-game load path.
| System | Restore Behavior |
|---|---|
| Inventory, Equipment, Quick Item | Inventory is rebuilt from saved stacks, then equipped right-hand, left-hand, and quick item slots are restored and UI refresh events are broadcast. |
| Storage Boxes | Stored item stacks are matched by asset reference and quantity, preventing duplicate stacks or failed withdrawals after a reload. |
| Chest Loot | Opened state and remaining partial loot are reapplied to placed containers when a slot is loaded. |
| Vendors | Limited stock quantities are saved in the global snapshot and restored on load, including manual slot loads after Play-In-Editor has already started. |
| Enemies and Bosses | Saved HP, defeated state, and boss phase are restored for enemies with a unique Enemy Persistent Id. |
| Dialogs and World Flags | Dialog NPCs refresh their interactable state from saved completion flags so one-time rewards stay one-time. |
5. When to Call SaveGameNow
The SaveGameNow node is the central full-snapshot save call. The project handles most saving automatically:
- Bonfire Save Behavior: The game performs a full atomic snapshot whenever the player interacts with a bonfire or rests. All world state, inventory, and player stats are saved to disk instantly.
- Vendor Transaction Autosave: Buying or selling items automatically triggers a background save to ensure currency and vendor stock states are never out of sync if the game is closed.
- Manual UI/Developer Saves: You can call
SaveGameNowfrom custom Blueprint events, important UI confirmations (like Level Up screens), or the Developer Hub.
6. Manual Validation Checklist
To verify the save system is functioning correctly in your project, perform these manual tests:
| Validation Step | Expected Result |
|---|---|
| Pick up a world item (e.g., a potion), rest at a Bonfire to save, and restart play. | The item remains in your inventory and the pickup actor does not respawn in the world. |
| Open a chest and take half the loot, save, and restart play. | The chest stays opened and contains only the remaining partial loot. |
| Defeat a boss, save at a Bonfire, and restart play. | The boss does not respawn and the arena remains unlocked. |
| Equip a weapon and a quick item, rest to save, and restart play. | The items remain in your inventory and are restored as your active equipped gear. |
| Buy an item from a Vendor, close the game immediately (without resting). | Upon restarting, your souls are deducted and the vendor's stock is reduced correctly. |
PERSISTENCE MODULE
Enemy & Boss State Persistence
Ensuring enemies remember their health, phase, and defeated status across reloads.How Health Persistence Works
The kit supports deep persistence for enemies and bosses. Unlike simple world actors that only remember if they are "Completed", enemies can store their exact current health and boss form.
- Save Enemy State: Enable this to allow the enemy to save data to the
EnemyStatesmap in the save game. - Save Current Health: If true, the enemy captures its exact HP during a save snapshot. On load, this health is restored after the stats system initializes, ensuring it's not overwritten by default Max HP.
- Save Boss Phase: Persists
CurrentBossPhaseandbIsEnraged. The boss will immediately skip to the correct phase when the player returns. - Defeated State: If an enemy dies and
bSaveDefeatedStateis true, they stay dead. They can either be destroyed immediately on load or trigger their death flow visually.
SoulsEnemyBase) do NOT require a SoulsPersistentComponent to be added manually. The system automatically discovers all enemies with bSaveEnemyState enabled and includes them in the global save snapshot.
Setup Checklist
1 Assign a unique Enemy Persistent Id (e.g., Boss_UndeadKing).
2 Enable Save Enemy State.
3 Enable Save Current Health for elite enemies or bosses.
4 Enable Save Boss Phase for multi-stage encounters.
5 (Optional) Enable Destroy if Defeated on Load to prevent the dead body from being seen if the enemy was already killed.
BeginPlay. This ensures that any Blueprint logic or Stat Component defaults are finished before the saved persistence data overrides them.
bEnableSoulsDebugLogs on the Game Instance to see detailed HP save/load logs: [Persistence] Restoring Enemy Boss_Test1: SavedHP=450.0, SavedDefeated=No.
DEVELOPER TOOLS
Souls Developer Hub
Built-in editor tools for diagnostics, save testing, validation, and asset setup.Overview
The Souls Developer Hub is the main editor utility window for Souls Mobile Kit. It provides project validation, save testing, data asset creation, and enemy inspection tools directly inside Unreal Editor.
Open it from the Unreal Editor menu using the Souls Dev Mode entry, then use the tabs across the top of the window: General, Save Data, Validation, Items, Actions, Effects, and AI Tools.
1. General and Save Data Tools
| Tab | Purpose | Typical Use |
|---|---|---|
| General | Project/debug settings and quick development controls. | Switch between PC-focused testing and mobile-style input testing. |
| Save Data | Save management actions for the current test project. | Force a save snapshot, reload saved data, or reset local save data during validation passes. |
| Validation | Project-wide setup scanner. | Find missing IDs, missing montages, missing widget bindings, and other common setup errors. |
| Items | Guided Item Data Asset creation. | Create a clean USoulsItemDataAsset with required fields and recommended defaults. |
| Actions | Guided Action Data Asset creation. | Create a clean USoulsActionDataAsset with action type, costs, cooldown, and montage settings. |
| Effects | Guided Status Effect and Buff creation. | Create gameplay effect assets for buildup, duration, stacking, and stat modifiers. |
| AI Tools | AI Ability creation and enemy inspection. | Create AI ability assets and inspect placed enemies in the active editor or PIE world. |
2. Save Management
The Save Data tab provides utility actions for testing persistence without placing temporary Blueprint nodes in the level.
- Reset Project Save Data: Completely wipes the active save slot from both disk and memory. Use this to test "First Time" player experiences.
- Teleport to Checkpoint: Immediately restores the player to the last registered bonfire.
- Save State Snapshot: Manually trigger an atomic save to verify persistence behavior.
3. Project Validation Tool
The Validation tab scans project assets and reports setup problems before they become runtime bugs. The scan is safe-only: it never edits, deletes, renames, or auto-fixes assets.
What It Checks
- Item assets with missing IDs, display names, weapon classes, or dropped pickup classes.
- Action assets with missing IDs, names, or required montages.
- Status Effect and Buff assets with missing IDs, names, or icons.
- AI Ability assets with missing IDs, names, or montages.
- Known UMG widgets with missing required bindings such as recipe or item list widgets.
Result Severity
- Error: A required setup value is missing and the system may not work correctly.
- Warning: The asset can still work, but a recommended field is missing.
- Summary Cards: The top dashboard shows total issues, errors, and warnings after each scan.
How to Run Validation
1 Open Souls Dev Mode from the Unreal Editor menu.
2 Select the Validation tab.
3 Click Run Project Scan.
4 Review the dashboard counters and the results table.
5 Use Clear Results to reset the table before another scan.
RecipeList is different from RecipesList. If validation reports a missing binding, check the widget hierarchy and the variable name spelling.
4. Item Data Asset Creator
The Items tab provides a C++ Slate form for creating USoulsItemDataAsset assets directly from the Dev Hub. It is intended for fast, consistent setup of common item assets without requiring C++ edits or manual factory setup.
| Field | Description |
|---|---|
Asset Name | The package and asset name to create, such as DA_Item_TestPotion. |
Save Folder Path | Default path is /Game/SoulsMobileKit/Data/Items. |
Item ID | Unique gameplay identifier. If empty, the tool can derive it from the asset name where supported. |
Display Name | Player-facing item name shown in inventory and UI. |
Description | Inventory description text. |
Item Type | Controls item behavior, such as Weapon, Consumable, Key Item, Soul Currency, or Crafting Material when available. |
Max Stack | Recommended defaults are 1 for Weapon/Key Item and 99 for Consumable/Crafting Material. |
Value | Base economy value used by vendor and sell-price systems. |
Dropped Pickup Class | Optional world pickup class used when the item can be dropped into the world. |
Weapon Class | Required for weapon item assets so equipment can spawn the correct weapon actor. |
Example Item Setup
1 Open Souls Dev Mode and select the Items tab.
2 Set Asset Name to DA_Item_TestDevTool.
3 Keep the folder as /Game/SoulsMobileKit/Data/Items.
4 Set Item ID to test_dev_tool and Display Name to Test Dev Tool Item.
5 Choose Consumable, set Max Stack to 99, and set Value to 1.
6 Click Create Item Asset.
7 Confirm the new asset appears in the Content Browser, then run the Validation scan to check for missing setup.
5. Action Data Asset Creator
The Actions tab provides a streamlined interface for creating USoulsActionDataAsset instances. This tool handles the repetitive setup fields for data-driven combat actions, including action identity, action type, animation montage, stamina cost, cooldown, and whether the action system should play the montage directly.
| Field | Description |
|---|---|
Asset Name | The package name (e.g., DA_Action_HeavyAttack). |
Save Path | Default path is /Game/SoulsMobileKit/Data/Actions. |
Action ID | Unique identifier used by the action system and validation tools to identify the action. |
Display Name | The name shown in ability menus or combat logs. |
Action Type | Categorizes the action using the existing Souls action enum, such as Light Attack, Heavy Attack, Dodge, Block, Interact, Quick Item, or Weapon Ability when available. |
Stamina Cost | Amount of stamina consumed when the action starts. |
Cooldown | Duration in seconds before the action can be used again. |
Montage | The animation montage to be played. |
Action System Plays Montage | If enabled, the action system will automatically play the assigned montage when the action is triggered. Keep disabled for wrapper actions that should call existing legacy combat logic. |
Example Combat Action Setup
1 Open Souls Dev Mode and select the Actions tab.
2 Set Asset Name to DA_Action_QuickDodge.
3 Set Action ID to quick_dodge and Display Name to Quick Dodge.
4 Set Action Type to Dodge.
5 Set a small stamina cost and cooldown appropriate for testing.
6 Assign a dodge montage to the Montage field if this action should play animation directly.
7 Enable Action System Plays Montage only when the action asset should play its assigned montage itself.
8 Click Create Action Asset.
9 Run the Validation scan to confirm the new action asset has no missing required setup.
6. Effect & Buff Creator
The Effects tab provides two sub-tools for managing temporary gameplay modifications: the Status Effect Creator and the Buff Creator. These tools generate data assets used by the SoulsStatusEffectComponent to apply ticking damage or stat boosts.
Status Effects
Typically used for harmful or elemental effects like Poison, Bleed, or Frostbite. Supports ticking damage and custom execution intervals.
Buffs
Typically used for beneficial stat modifications like Strength Boosts, Stamina Regen increases, or Temporary Defense.
7. AI Tools & Enemy Inspector
The AI Tools tab is a comprehensive suite for designing enemy combat behaviors and performing live diagnostics on active AI agents in the world.
7.1 AI Ability Creator
This form allows designers to create USoulsAIAbilityDataAsset instances without manual property configuration. It includes safety checks for required montages and ranges.
| Field | Description |
|---|---|
Ability ID | Unique identifier for the ability (e.g., leap_attack). |
Montage | The animation montage played during execution. |
Min/Max Range | Distance requirements for the AI to consider this ability. |
Cooldown | Time before this specific ability can be used again. |
Windup (Telegraph) | Preparation time before the actual attack hitboxes become active. Enables bUseTelegraph automatically if > 0. |
Recovery | Animation duration after the attack before the AI can return to idle/movement. |
7.2 Enemy Inspector
The Enemy Inspector provides a real-time diagnostic view of any ASoulsEnemyBase actor in the current level. It is essential for balancing combat encounters and debugging AI target selection.
- Deterministic Refresh: Refresh List scans the active editor or PIE world directly and does not require clicking the viewport first.
- Rename-Safe List: Renaming an enemy actor in the level updates the dropdown and inspected label after refresh.
- Stale Entry Cleanup: Deleted or invalid enemy references are removed safely from the list.
- Live Stats: Monitor Current HP vs Max HP and health percentages in real-time.
- Targeting: See exactly which actor the AI is currently tracking via its Blackboard.
- Config Overview: Instantly check if the enemy is using Simple AI or a full Behavior Tree.
- Boss Tracking: Monitor boss phases and phase-transition thresholds.
- Auto-Refresh: Enable the checkbox to update data every 0.5 seconds while playing.
- Editor Integration: Use Select in Editor to jump directly to the actor in the world outliner.
- Log Export: Use Copy Summary To Log to print a readable enemy debug report to the Unreal Output Log.
How to Inspect an Enemy
1 Open a level that contains one or more ASoulsEnemyBase actors.
2 Open Souls Dev Mode and select AI Tools.
3 In Enemy Inspector, click Refresh List.
4 Select an enemy from the dropdown.
5 Review stats, target, AI config, boss phase, tactics, and assigned ability count.
6 Enable Auto Refresh Data when testing live HP, target changes, or behavior changes during Play.
7 Use Select in Editor to focus the enemy actor, or Copy Summary To Log to export the current debug summary.
PRODUCTION READINESS
Debug & Performance Logs
Managing log noise and performance monitoring in the final build.Souls Mobile Engine includes an extensive logging system to help developers track combat states, action lifecycles, and inventory changes. By default, these logs are disabled for performance and clarity in the final product.
1. System Debug Toggles
Most core components include a bDebugActionSystem or bEnableDebugLogs boolean. When enabled, the system will output detailed information to the Output Log and Console.
| Property | Component | Log Category | Description |
|---|---|---|---|
| bDebugActionSystem | SoulsActionComponent |
LogSoulsActionDebug |
Logs action starts, finishes, interrupts, and cooldowns. Useful for debugging combo timing. |
| bShowCombatDebugLogs | SoulsCombatComponent |
LogSoulsActionDebug |
Logs combat trace, guard, impact, hit reaction, and damage-flow information while tuning attacks. |
| bShowAICombatDebugOverlay | SoulsEnemyBase |
On-screen overlay | Draws compact PIE text above an enemy showing state, target, distance, active owner, active ability, and last impact data. |
| bShowAICombatDebugLogs | SoulsEnemyBase |
LogTemp audit lines |
Enables verbose AI audit logs such as target detection, ability selection, ability movement, return-home, and action ownership. |
| bEnableDebugLogs | SoulsInventoryComponent |
LogSoulsInventoryDebug |
Logs item additions, removals, equipment changes, and backend inventory logic. |
| bEnableDebugLogs | SoulsInventoryWidget |
LogSoulsInventoryDebug |
Logs UI initialization, tab switching, and item selection events. |
| bEnableDebugLogs | SoulsItemPickup |
LogSoulsInventoryDebug |
Logs pickup attempts and overlap events. |
| bDebugParryDamageFlow | SoulsCombatComponent / SoulsEnemyBase |
LogSoulsActionDebug |
Enables the [PARRY_DAMAGE_TRACE] system. Logs detailed damage flow, startup configuration, and finisher resolution to isolate unintended damage sources. |
| bEnableDebugPersistence | SoulsInteractable |
LogTemp |
Outputs detailed lifecycle logs for persistence (ID matching, state restoration, and auto-saves). Essential for debugging doors/chests. |
2. How to Enable Debugging
1 Open your Player Character or NPC Blueprint.
2 For player action or combat traces, select ActionComponent or CombatComponent.
3 For enemy behavior, select the enemy actor or enemy Blueprint and open Enemy | Debug.
4 Use Show AICombat Debug Overlay for visual tuning without Output Log noise.
5 Use Show AICombat Debug Logs or Show Combat Debug Logs only when you need detailed audit lines.
3. AI Combat Debug Overlay
The enemy overlay is the fastest way to understand why an enemy is idle, approaching, attacking, returning home, or using an ability. It is intended for PIE tuning and is disabled by default.
| Overlay Line | What It Shows | How To Use It |
|---|---|---|
| State | Current AI brain state. | Watch for Dormant, Approach, AttackDecision, AbilityActive, and ReturnHome. |
| Target / Dist | Accepted combat target and distance. | Confirms the enemy is tracking the player and not a world object. |
| Owner | Current action owner, such as AI ability or legacy combo. | Useful for checking that actions are not replacing each other too early. |
| Ability | Current active AI ability, if one is running. | Use it to confirm selection, repeat behavior, and ability movement timing. |
| Last Impact | Recent impact multipliers and hit reaction type. | Use it to confirm that ability-specific impact tuning is being read. |
4. Custom Log Categories
If you are writing custom C++ extensions, we recommend using the following categories for consistency:
LogSoulsActionDebug- Action and Ability logic.LogSoulsInventoryDebug- Inventory and Item systems.LogTempaudit prefixes - Enemy AI audit messages whenbShowAICombatDebugLogsis enabled.
RPG WORLD MODULES
Chest Loot Widget
Optional immersive container interaction and persistent contents.The Chest Loot Widget system lets a container open an inspection UI instead of instantly granting every item. Players can select one item, take it, take everything at once, or close the chest while leaving the remaining contents saved for later.
1. Key Features
Selective Take
Take items one by one or all at once (Take All).
Persistence
Remaining items are saved to the AAA Save System.
Mobile UI
Touch-friendly buttons and clear feedback messages.
Failsafe
Items only removed from chest if inventory addition succeeds.
2. Container Configuration
Use the same chest/container actor. The loot widget is optional, so existing instant-loot chests continue to work when the widget option is disabled.
| Property | Description |
|---|---|
| bOpenLootWidgetOnInteract | When enabled, Interact opens the loot UI. When disabled, the chest uses the classic instant-loot behavior. |
| LootWidgetClass | Assign your WBP_SoulsChestLoot here. |
| bAllowTakeSingleItem | If true, shows the "Take" button for individual items. |
| bAllowTakeAll | If true, shows the "Take All" button. |
| bCloseWhenEmpty | Automatically closes the widget when the chest becomes empty. |
| bSaveRemainingLoot | Stores the remaining chest contents, so partial looting survives save/load. |
| ContainerId | Use a unique id per placed chest. This id connects opened state and remaining contents to the save file. |
3. Main Widget Setup
Create WBP_SoulsChestLoot with parent class SoulsChestLootWidget. The widget must contain these exact BindWidget names:
| Widget Name | Type | Purpose |
|---|---|---|
ChestTitleText | TextBlock | Displays the chest title. |
ItemList | VerticalBox | Container where item rows are created. |
TakeButton | Button | Takes the currently selected row. |
TakeAllButton | Button | Takes all remaining loot. |
CloseButton | Button | Closes the loot UI and returns control to the player. |
EmptyText | TextBlock | Shown when the chest has no remaining items. |
FeedbackText | TextBlock | Shows short messages such as item taken or inventory failure. |
ItemList must be a VerticalBox, not a ScrollBox. For scrolling, place a ScrollBox in the layout and put the ItemList VerticalBox inside it.
4. Row Widget Setup
Create WBP_SoulsChestLootItemRow with parent class SoulsChestLootItemRowWidget. Each row represents one loot entry.
| Widget Name | Type | Purpose |
|---|---|---|
SelectButton | Button | Selects this loot row. |
ItemIcon | Image | Displays the item icon. |
ItemNameText | TextBlock | Displays the item name. |
QuantityText | TextBlock | Displays the remaining quantity. |
5. Assign the Row Class
Open WBP_SoulsChestLoot, go to Class Defaults, and assign LootItemRowWidgetClass to WBP_SoulsChestLootItemRow. Without this assignment, the chest can open but the item list cannot create rows.
6. Recommended Hierarchy
WBP_SoulsChestLoot
  Canvas Panel
    Border
      Vertical Box
        ChestTitleText
        ScrollBox
          ItemList                 // VerticalBox
        EmptyText
        FeedbackText
        Horizontal Box
          TakeButton
          TakeAllButton
          CloseButton
7. Save Behavior
- Take One: removes only the selected item or quantity from the chest after it is added to inventory.
- Take All: attempts to transfer every remaining item to the player's inventory.
- Partial Loot: if the player takes some items and saves, the chest restores only the remaining entries later.
- Empty Chest: when all loot is taken, the chest stays empty after save/load.
- Transfer Safety: if an item cannot be added to inventory, it is not removed from the chest.
8. Manual Validation Checklist
- [ ] Classic Chest: With
bOpenLootWidgetOnInteractdisabled, does the chest still grant loot directly? - [ ] Widget Chest: With
bOpenLootWidgetOnInteractenabled, does Interact openWBP_SoulsChestLoot? - [ ] Rows: Does each loot entry appear using
WBP_SoulsChestLootItemRow? - [ ] Take: Does selecting a row and pressing Take remove only that item from the chest?
- [ ] Take All: Does Take All move every remaining item and show the empty state?
- [ ] Save/Load: After taking one item and saving, does the chest restore only the remaining items?
- [ ] Controls: After closing the UI, do movement, attack, dodge, and interact work normally?